Here are 30 of my favorite ways to streamline Photoshop’s interface including customizing tools, panels, menus, workspaces, view options, screen modes, font size, and more!
Cycle Through Nested Tools — To save screen real estate, Photoshop nests similar tools together in the Toolbar. To quickly cycle through nested tools, Option -click (Mac) | Alt-click (Win) on the tool.
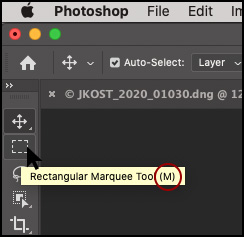
Shortcuts for Tools — Any tool in the Toolbar can be assigned a letter as a keyboard shortcut in order to access it more quickly. To view the keyboard shortcut assigned to a tool, hover your cursor over the tool to display the tool tip or, click and hold on a tool to view the nested tools (the shortcut is listed to the right of the tool name).
Photoshop assigns the same shortcut to multiple, similar, tools. For example the Lasso, Polygonal Lasso, and Magnetic Lasso tools all have the shortcut “L” assigned to them. To cycle through tools that use the same keyboard shortcut, add the Shift key (for example, Shift + L will cycle through the Lasso tools). If you prefer to cycle through tools that have the same shortcut without using the Shift key, choose Preferences > Tools and disable Use Shift Key for Tool Switch.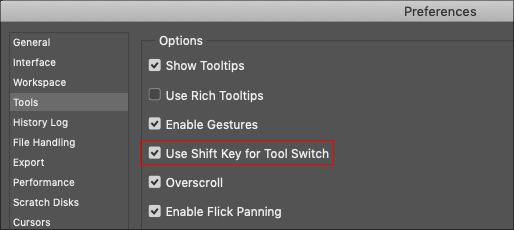
If a tool doesn’t have a shortcut key assigned (or has one that you don’t like), choose Edit > Toolbar and use the editor to assign your own custom shortcuts by clicking in the empty space to the right of the name of the tool. To remove a shortcut, select it and tap the Delete key.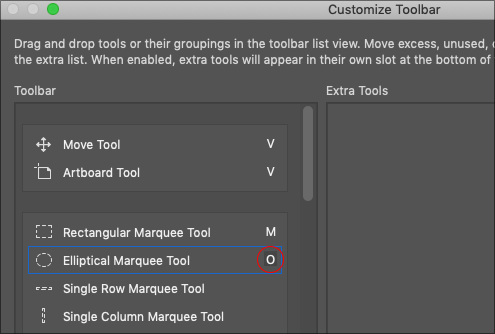
Customizing the Toolbar — This video The Start and Recent Files Workspaces and Customizable Toolbar in Photoshop, demonstrates how to show, hide, and rearrange and regroup tools using the Customize Toolbar editor.
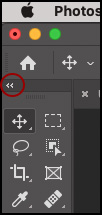
Display Tools as a Double Column — The Toolbar can be displayed as either a single or double column (the double column can be very useful if you like to show a large number of tools). Click the double arrows (chevrons) at the top of the tool bar to toggle the layout.
Tools that Toggle —There are several tools which, with the help of a keyboard modifier, can be temporarily toggled to another tool. For example, to temporarily toggle between the Slice/Slice Select tools or the path/Direct Selection tools hold the Command (Mac) | Control (Win) key. Similarly, Option (Mac) | Alt (Win) toggles between the Sharpen/Blur tool or the Dodge/Burn tool. The advantage to using the keyboard modifier is that many attributes such as brush size remain the same between tools.
Assigning Keyboard Shortcuts to Tool Options — Several tools have features, accessible via the Options bar, which can be assigned keyboard shortcuts by selecting Edit > Keyboard Shortcuts. Select “Shortcuts For: Tools”, scroll down to the bottom of the list, and assign shortcuts to features such as displaying the Foreground or Background Color Picker, Loading and Cleaning the Mixer Brush, Sharpening Erodible Tips and more.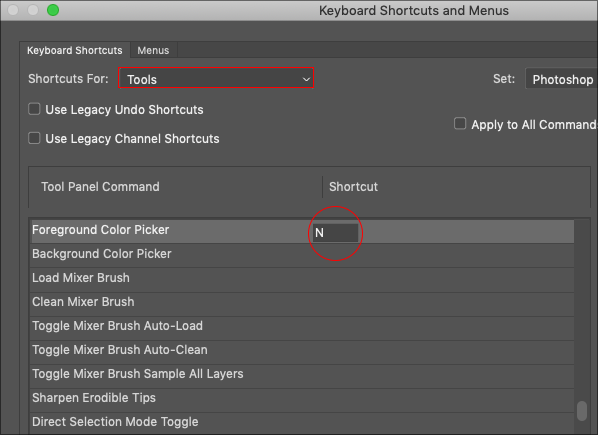
Spring Loaded Cursors — To temporarily access a tool, press and hold the shortcut for the tool. When you release the cursor, Photoshop returns to the previously selected tool. For example, when painting in Photoshop, it can be helpful to use the Rotate View tool to rotate a document on the screen (allowing more natural hand positioning and movement) without actually rotating the contents of the document. With the Brush tool selected, instead of tapping “R” to select the Rotate View tool, press and hold the “R” key to temporarily access the tool. Rotate the document as needed and when finished, release they “R” key to return to the Brush tool. Note: to reset the Rotate View tool, tap the escape key or double click on the tool.
Resetting Tools —Right -click (or Control -click on Mac) the tool icon in the Options bar (officially called the Tool Preset Picker) and choose between Reset Tool and Reset All Tools to reset the tool options (found in the Options bar) to their default state. This shortcut is a great way to trouble-shoot a tool when it’s not working as you think it should (perhaps the tool’s blend mode, feather, or other option was changed the last time you used it). Note: this shortcut doesn’t reset the visibility or grouping of the tools, only their options.

Toggling Tool and Panel Visibility — Tapping the Tab key will hide the Toolbar as well as panels. Tapping again displays them. Shift + Tab toggles the visibility of only the panels. While the panels are hidden, positioning the cursor at the edge of the screen (or application frame on Mac) will display the panels (in order to access the tools/options that you need) and, when you move your cursor away, Photoshop automatically hides them. Note: to disable this feature, choose Preferences > Workspace and uncheck Auto-Show Hidden Panels.
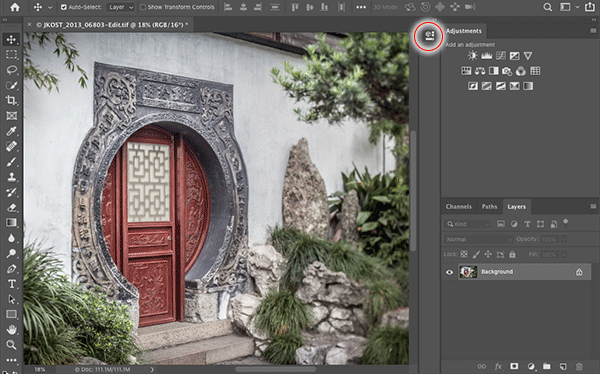
Auto-Collapse Iconic Panels — In the animation below, the Properties panel starts in the collapsed, iconic state. Clicking the Adjustment Layer icon adds an adjustment layer and the Properties panel automatically expands. After making an adjustment (and with the Auto-Collapse Iconic Panels preference enabled), selecting another tool/layer etc. automatically collapses the Properties panel back to iconic view. If you prefer to manually expand iconic panels, and leave them in their expanded state, choose Preferences > Workspace and disable Auto-Collapse Iconic Panels.
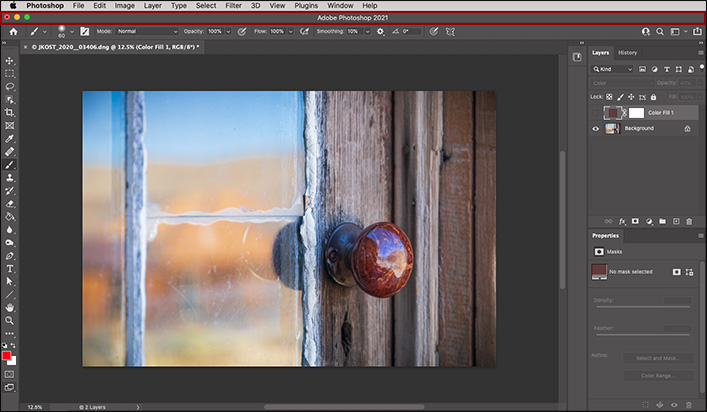
Rearranging Panels — I find it well worth my time to configure the panels that I am going to need for a specific project or type of task and then save them as a custom workspace so that I can quickly return to them. For example, the panels I use for compositing images are quite different than those I use when working with text or video. In the screenshot below, you can see that I also dock the panels that I use most often to the Tools (on the left side of the screen). This saves significant time over the course of the day by eliminating the need to travel back and forth across my monitor to select different panel options, tools, and tool options. I have also placed the Properties panel below the Layers panel so that when I add an adjustment layer, my cursor is automatically above the options for that layer.
In order to dock the panels to the tools, drag either the panel’s tab (that displays the name of the panel) or the grey bar at the top of the panel and reposition it to slightly overlap the tool bar.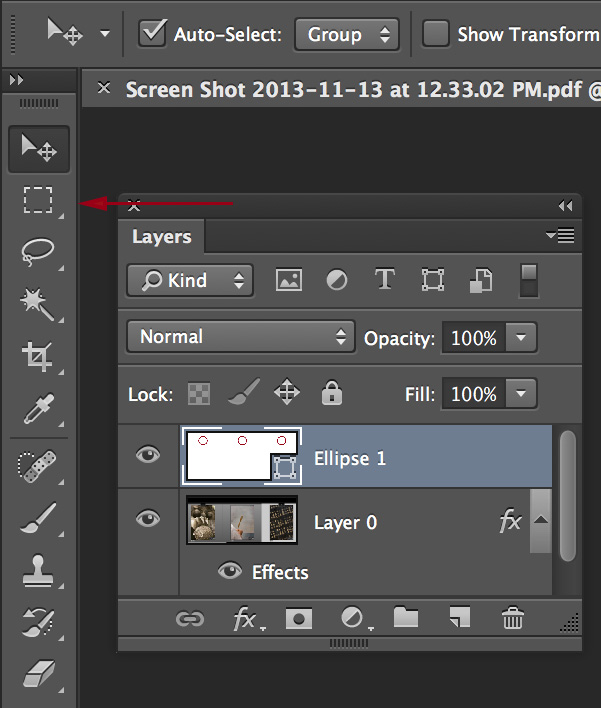
When the cyan highlight appears between the tool bar and the panel, and release the cursor. Note, if you do not “doc” the panels, they will float and be displayed above any open documents.
Saving Custom Workspaces — To create a custom Workspace, rearrange the panels that works best for your workflow, and use the Workspace Picker (on the right of the Options bar) to choose New Workspace. Give the custom Workspace a name, and save the Workspace. For added flexibility, Workspaces can also contain custom Keyboard Shortcuts, Menu items and Toolbar settings. Note: Workspaces can also be saved via Window > Workspace > New Workspace. Saved workspace(s) will appear at the top of the list in the Workspace Picker.
Working with Multiple Monitors — To take advantage of additional screen real estate on a secondary monitor, you can move Photoshop’s panels, Toolbar, and Options Bar to the secondary monitor (and save their location as a part of a Workspace).
Assigning Custom Keyboard Shortcuts to Toggle Workspaces — To assign a custom keyboard shortcut to a Workspace, first create and save the Workspace. Then, choose Edit > Keyboard Shortcuts (or Window > Workspace > Keyboard Shortcuts & Menus), and select “Shortcuts For: Application Menus”. Toggle the disclosure triangle next to Window, and scroll down to locate your custom workspace. Click in the blank area (to the right of the Workspace name) to add a custom shortcut.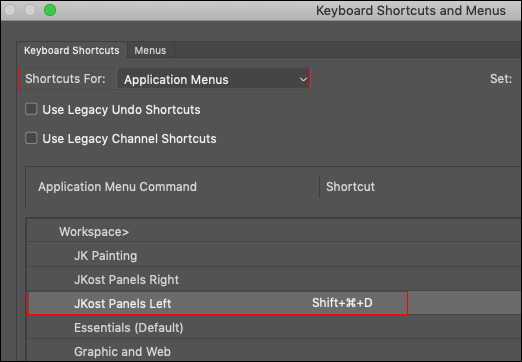
To see a step-by-step of how to create, save, and delete workspace, view this free video (Switching and Saving Workspaces) from Lynda.com/LinkedIn Learning.
Quick Access to Panels for Painting Tools — Some painting tools (such as the Brush, Healing Brush, Art History Brush, Clone Stamp etc.) have additional options which are available in panels. Click the associated panel’s icon next to the Tool Preset Picker in the Option bar to quickly toggle the visibility of the associated panel.
When using the Clone Stamp Tool, click the Brush Settings or Clone Source icons to reveal the corresponding panels.
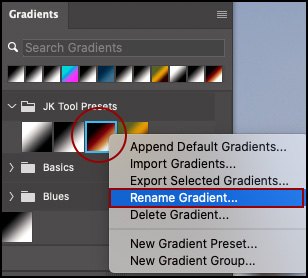
Renaming Items in Panels — Double click the thumbnail or name of an item in a Panel to rename it. Note: when working with some types of layers (shapes, type, fill etc.) where double clicking on the preset’s thumbnail in the Panel would update the contents of the layer, right -click (or Control -click on Mac) on the thumbnail for the item and choose Rename form the context sensitive menu.
Entering Values in Panels — For almost all text/numeric entry fields in a panel (as well as dialog boxes and in the Options bar), clicking on the icon or text next to the field will highlight the values associated with it. For example, with the Lasso tool selected, Clicking on the word “Feather” in the Option bar will highlight the text entry field making it easier to simply type in your desired values/text. Use the Tab key to move between numeric entry boxes. Note: one of the fields must be active in order to tab to another. In addition, once the field is highlighted, the up/down arrow keys increase/decrease the value by one unit. Add the shift key to increase/decrease the value by 10 units. Photoshop also supports addition (+), multiplication (*), subtraction (-) and division(/) in many text entry fields.
Changing Height and Width Values in Dialog Boxes — In dialog boxes referencing width and height (New File, Image Size, Canvas Size, etc.) if you change units of measurement for one of the dimensions Photoshop will automatically match the units for the other dimensions (i.e. if you select pixels as the units for width, Photoshop automatically changes the height to pixels). If you need to enter in two different units of measurement, holding down the shift key will override this feature to allow different units for each value.
Scrubby Sliders — Positioning the cursor over the text or icon next to a numeric entry field in the Options bar (and in most panels and dialog boxes) displays the “Scrubby Sliders” icon (a hand with small arrows pointing to the left and right). When the Scrubby Slider icon is visible, click -dragging left/right decreases/increases the values. Option -drag (Mac) | Alt – drag (Win) increases/decreases the values more slowly while Shift -dragging decreases/increases the values more quickly.
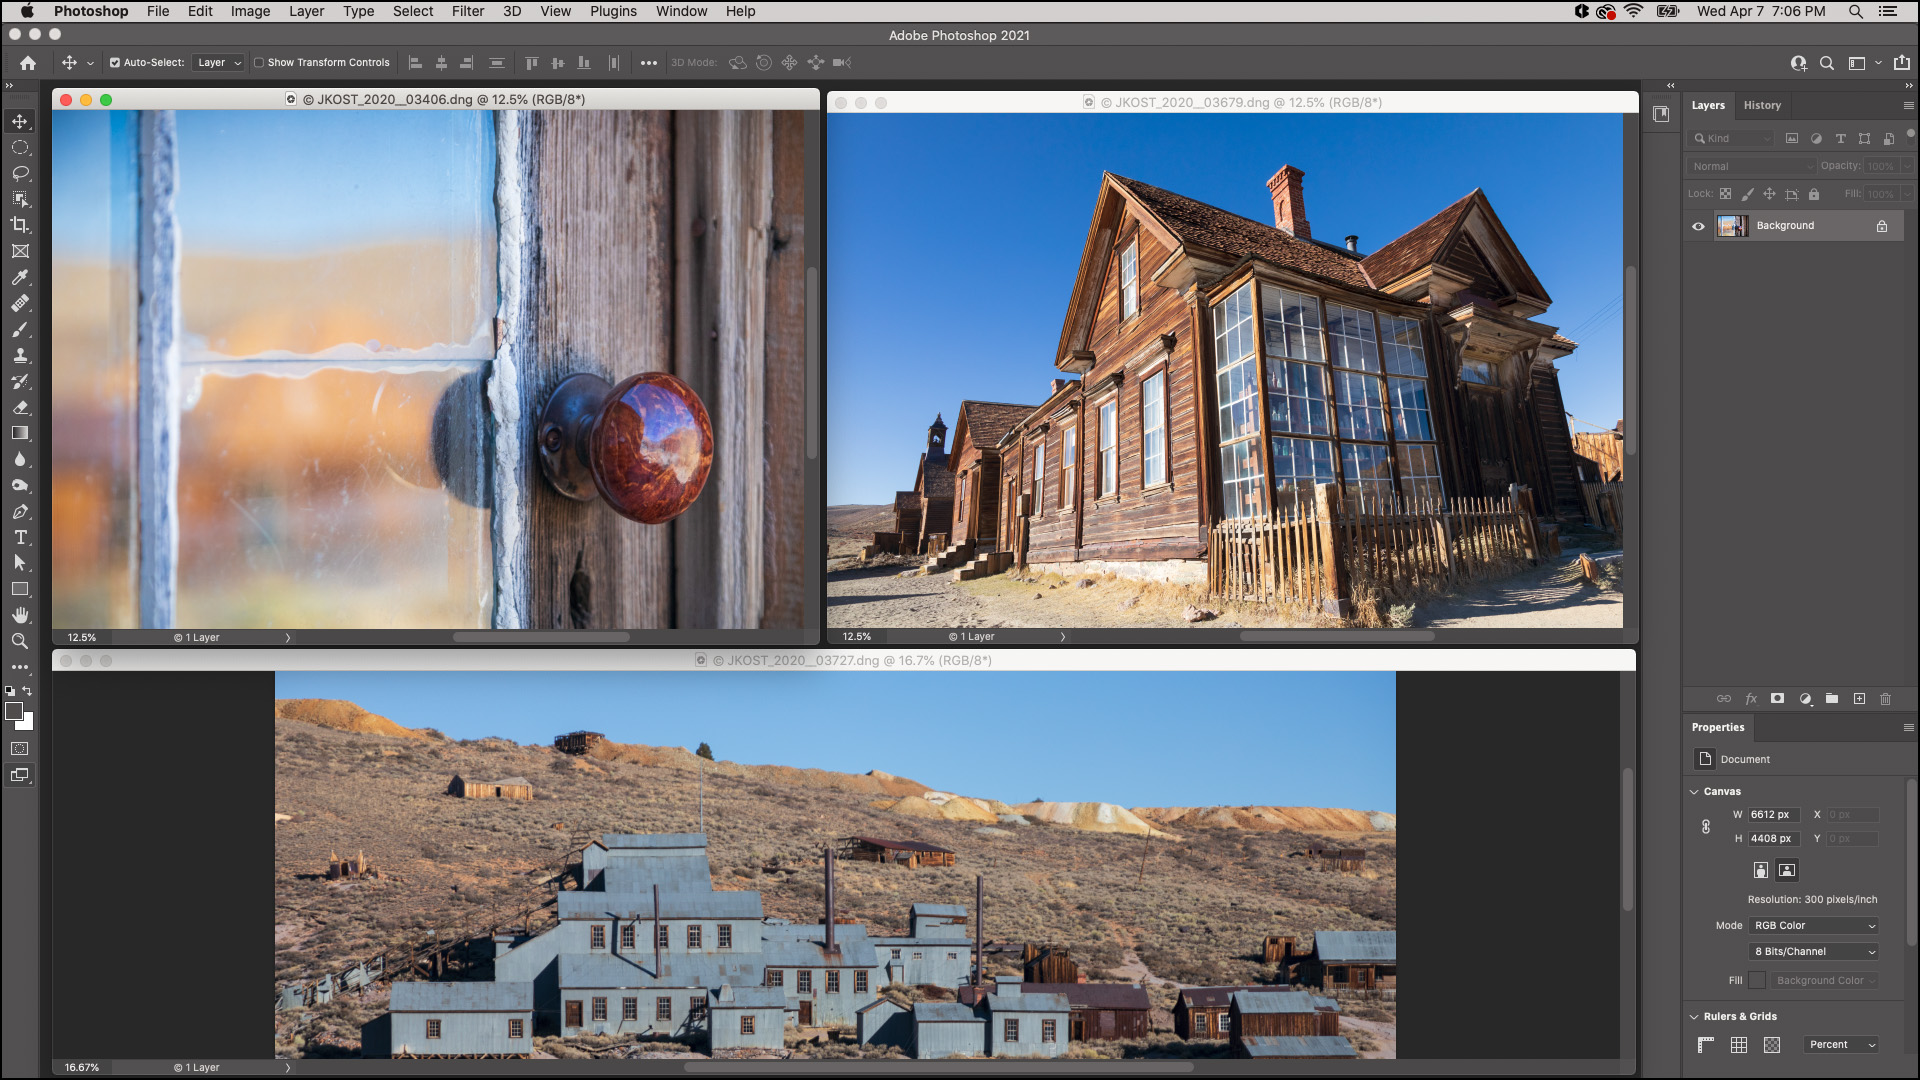
Cycle Through Open Documents — You can use either of these shortcuts to cycle through open documents:
Command + ~ (tilda) (Mac) | Control + ~ (tilda) (Win)
Control + Tab (this is the same shortcut for both platforms). Adding the Shift key will reverse direction.
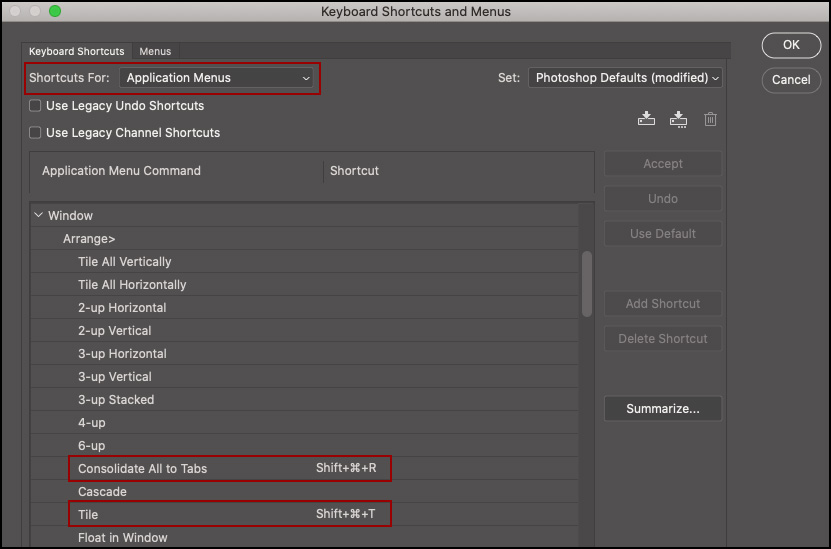
Toggle Between Tile and Consolidate to Tabs — To eliminate wasting valuable time looking through menus or trying to find icons to quickly toggle between viewing one open document and viewing all open documents tiled in the workspace, assign custom keyboard shortcuts to the menu commands. Choose Edit > Keyboard Shortcuts and choose Shortcuts For: Application Menus. Under Window, scroll down to Consolidate All to Tabs and Tile to add shortcuts that make sense to you (I used Shift + Command + T for Tile, and Shift + Command + R for Consolidate All to Tabs – or, in my mind, “Return to primary image”).
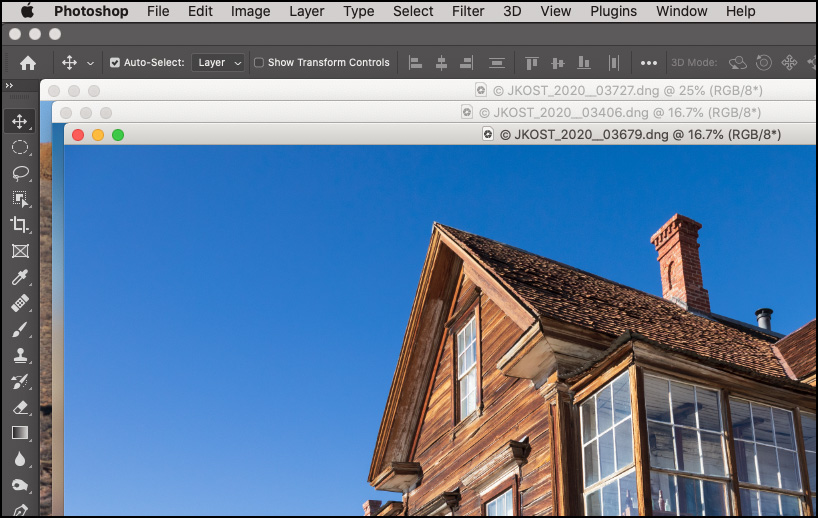
Floating and Cascading Documents — While I prefer opening files in Tabs, Photoshop also has an option to “float” open documents, enabling the repositioning and resizing of multiple open documents. To float an individual document, choose Window > Arrange > Float in Windows or, when working with multiple documents, choose Window > Arrange > Float All in Windows. Or, to float a document manually, simply drag a document’s tab away from the edge of the document preview window and release the cursor.
There is one potential drawback to viewing images in this manner; depending on the size (and zoom level) of the currently active (selected) document, it might obscure other open documents making them more difficult to find (although you can always choose the Window menu and select any open document from the bottom of the menu). Here are four additional Tips for working with “floating” documents:
• When zooming in and out of floating documents, it might be helpful to use Preference > Tools > Zoom Resizes Windows to enable/disable the resizing of the document window when zooming.
• If you like to work with floating documents but don’t want to be able to dock two floating windows together, select Preference > Workspace > Enable Floating Document Window Docking to enable/disable the behavior.
• Selecting Window > Arrange > Cascade will tidy up the floated documents by cascading them from the upper left of the image preview area.
• To disable all documents from opening in tabs, choose Preferences > Workspace and uncheck Open Documents as Tabs.
Hiding Menu Items — If you’re ever feeling overwhelmed at the number of menu items that Photoshop displays, you can hide the ones that you aren’t using. Select Edit > Menus, navigate to any of the menus that you want to hide, and click the eye icon to toggle its visibility.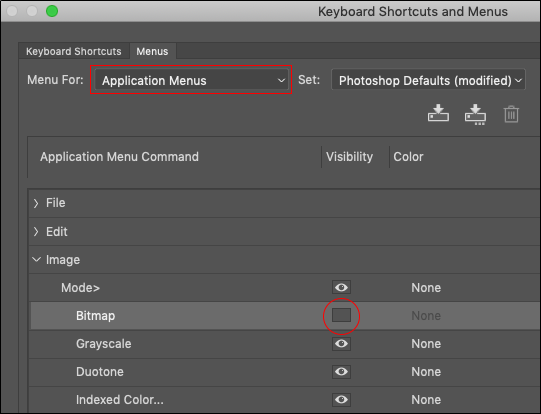
When you choose to hide menu items, a command to “Show All Items” will be added to the bottom of the Menu. To temporarily see hidden menu items, select “Show All Menu Items” or Command -click (Mac) | Control -click (Win) on the menu.
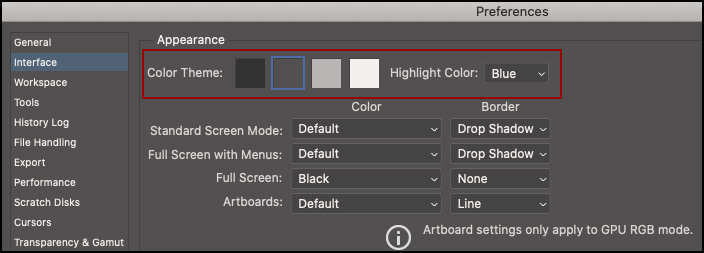
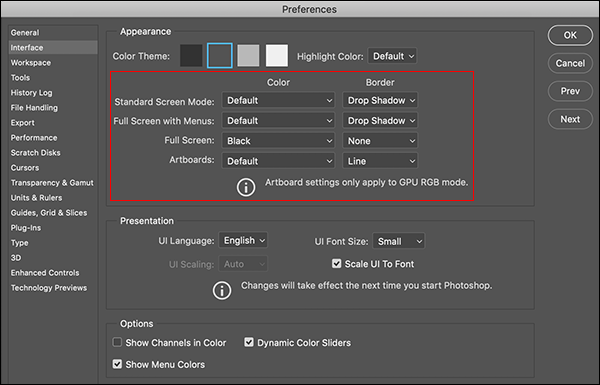
Customizing the Brightness of the Interface — There are four “Color Themes” or levels of brightness that you can choose to display Photoshop’s interface. By default, the second-to-most dark theme is selected. You can change the theme by clicking on the color swatches in Preferences > Interface > Appearance. To make it easier to see what layer/channel/path is selected in a panel, try changing the Highlight Color to Blue.
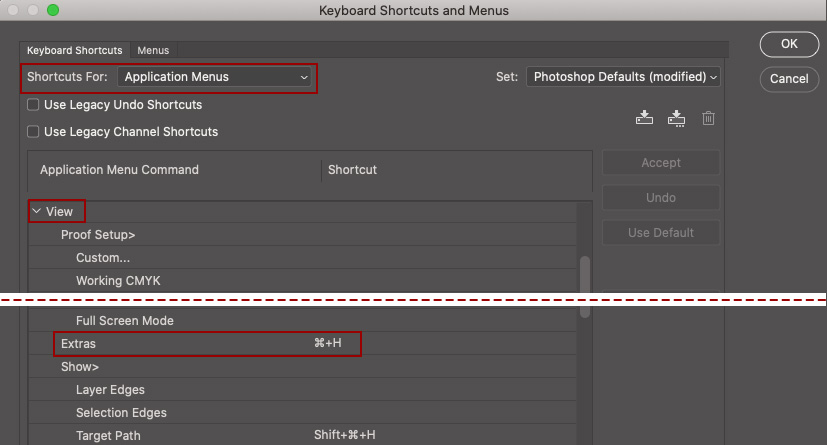
Customizing the View Options — Command + H (Mac) | Control + H (Win), toggles the visibility of several features including Selection Edges, Target Path, Smart Guides, Pixel Grid, and more. To control what features are toggled on/off when using the shortcut, choose View > Show > Show Extra Options and enable/disable exactly what you want to hide and show.

Note: The first time you use this shortcut (Command + H) on the Mac OS, Photoshop will display a dialog asking “Would you like to use Command + H to hide Photoshop (Mac standard), or to hide/show selections, guides, etc. (Photoshop traditional)?” Click “Hide Extras” unless you want to “Hide Photoshop” every time you use the shortcut. If you do choose to “Hide Photoshop”, you can change this behavior later by choosing Edit >Keyboard Shortcuts. Set Shortcuts For: Application Menus and toggle the disclosure triangle for the View menu. Scroll down to Extras, change the Shortcut back to Command + H and click Accept and then OK.
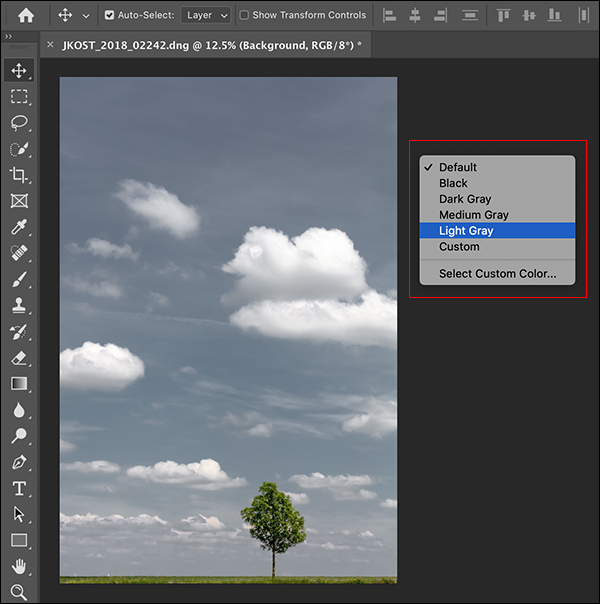
Screen Modes and Custom Background Color — Tapping the F key cycles through Photoshop’s three screen modes: Standard Screen Mode, Full Screen with Menu Bar, and Full Screen Mode. Note: When in Full Screen Mode, the panels and tools are automatically hidden and the image is surrounded by a solid black background, but you can tap the Tab key to toggle the visibility of the Tools/Panels. To change the background color in any of the screen modes do one of the following:
• Right -click (or Control -click Mac) in the preview area surrounding your image and choose a color option from the context sensitive menu.
• Select Preferences > Interface and, under Appearance, customize the Color menus. Note; the Border can also be customized (Drop Shadow/None/Line).
• Use the (nostalgic) legacy method: select the desired color as the foreground color swatch and Shift-click in the area surrounding your image with the Paint Bucket tool.
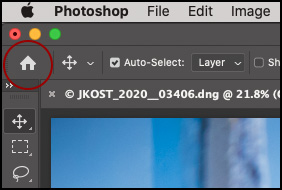
Toggle the Visibility of the Home Screen — Click the Home icon in the Options bar in Photoshop at any time to access the Home screen (to create new or open recent files, discover Learn content and access Lightroom Photos).
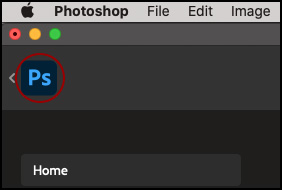
Click the PS icon on the Home screen (or tap the Escape key) to return to Photoshop.
Quick Access to Document Information — By default, Photoshop displays the Document Size at the bottom of the document window in the Status Bar. Click the arrow (chevron) to the right of the Status bar to choose from additional options to display (such as Document Profile, Document Dimensions etc.).![]()
Quick Access to Width, Height, Channels, and Resolution — Click and hold in the information area at the bottom of the document window to display the Document’s Width, Height, Channels, and Resolution (except while a Save is in progress).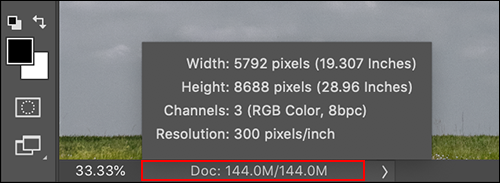
Resetting Dialog Boxes — Pressing Option (Mac) | Alt (Win) while in a dialog box will toggle the Cancel button to Reset for a quick way to reset all of the values.
In dialogs that have a Done button (Save for Web, for example), holding Option (Mac) | Alt (Win) will change the Done button to Remember (click Remember to save the current setting as your default).
Context Sensitive Menus — Another way to increase your productivity is to right -click (or Control -click on Mac) in the image area (or in a panel etc.) to access the “context sensitive” menus in Photoshop. The context sensitive menus change depending on the tool selected and the area clicked on. For example, when the Move tool is selected, the context sensitive menus list the layers under the area in the image that was clicked upon. When the Brush tool is selected, the context sensitive menus display brush attributes such as diameter, hardness and brush tip.
The Application Frame (Mac only) — By default, the Application Frame in Photoshop is enabled on Mac. It can be toggled off by selecting Window > Application Frame. I prefer to leave it enabled for three reasons:
• First, with it enabled, Photoshop hides other applications that you have open making your work area less cluttered. Because you will not be able to see other open applications, use the shortcut Command + Tab to quickly switch between applications.
• Second, if you want Photoshop to be displayed on a smaller portion of the screen (in order to view Photoshop and another application simultaneously for example), position your cursor along the edge of the application (the cursor will change to a double headed arrow), and drag. The application (including any docked panels), conveniently resize as a single unit.
• Third, you can easily move Photoshop to a second monitor by dragging the Application Bar (at the top of the application) to the desired monitor.
Increasing Photoshop’s Font Size — To change the font size for Photoshop’s interface, choose Preference > Interface. Under Presentation, set the UI Font Size and enable the Scale UI To Font option. The illustrations below show the relative difference between setting the UI Font size to Small and Large.
UI Font size set to Small.
UI Font size set to Large.
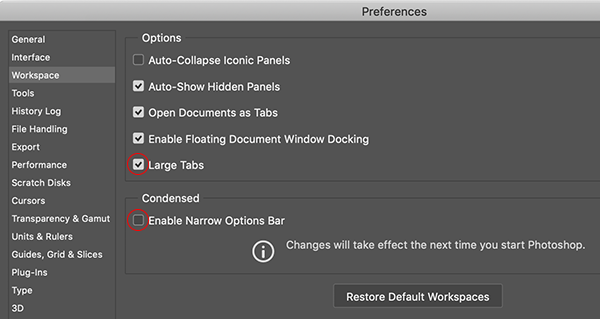
To increase the size of the Panel Tabs (useful when working on touch screen devices) or enable a Condensed Options bar (for smaller monitors), select Preferences > Workspace and enable Large Tabs/Enable Narrow Options Bar as needed.
Default Workspace Panel Arrangement — The default configuration of panels shown in the “Essentials” Workspace display differently depending on your monitor resolution (which may be important if you work in teaching environment as not all of your students maybe be looking at the same interface). For example, on higher resolution monitors, the Libraries panel may appear in its own separate column while on lower resolution monitors, it maybe be nested with the Adjustments and Styles panel and collapsed to iconic view.
The quick tip below (Customizing the Photoshop Interface), demonstrates five ways to streamline Photoshop for your specific needs.
This quick tip below demonstrates several Tips and Tricks for Modifying Tools in Photoshop