The following videos, quick tips, and shortcuts will quickly get you up to speed when importing files into Lightroom Classic:
Importing Images From a Camera Card—This video walks through importing photos from a camera card.
Importing Photos from your Computer into Lightroom—This video walks through importing files from your hard drive.
Importing Files—Command + Shift + I (Mac) | Control + Shift + I (Win) displays the Import window (regardless of the currently selected module).
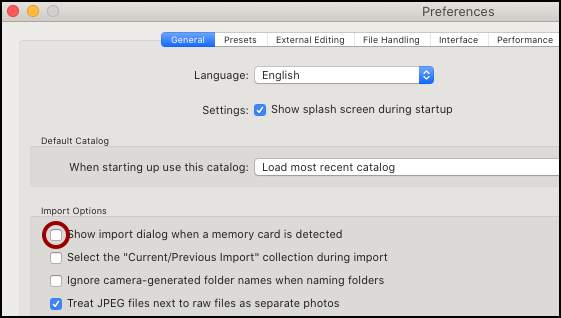
Auto Show the Import Dialog—By default, Lightroom displays the Import window when a memory card is detected. To disable this feature, select Preferences > General > Import Options and uncheck “Show the import dialog when a memory card is detected”.
Import Options — Parent folders are displayed in the Folder panel for newly imported images. To disable this feature, choose Preferences > General and uncheck “Show parent folder during import”.
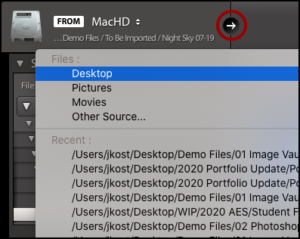
Selecting and Docking Folders—Click the arrow icon to the Right of the Source options (or to the left of the Destination options) to quickly access default and recent source locations. Double-click a folder in either the Source or Destination panels in the Import window to “doc” that folder (docking temporarily hides other folders on the same level as the docked folder making it easier to navigate through complex folder structures).
Zooming and Panning Image Previews—When in Grid view, tap “E” or double click an image thumbnail to preview in Loupe view. Once in Loupe view, you will automatically be given the zoom tool; click on the image to zoom to 1:1. Once you’ve zoomed into an image, Lightroom displays the Hand tool; drag with the Hand tool in the image area to view other portions of the image. Single click in the image area to return to Loupe view or double click to return to Grid View. Double-click an image in Grid view (or tap E) to view in Loupe view. Double click an image in Loupe view to return to Grid view (or tap G).
Selecting Images to Import—To import a subset of images from a card/folder, in Grid view, click the Uncheck All button. Then, select the desired images and click the empty well (the check box) to check all selected images. Select Checked State as the Sort option (at the bottom right of the grid area) to display the checked images at the top of the grid.
Photo Viewing Options—When selecting Copy as DNG, Copy, or Move, choose to View All photos, New Photos, or Destination Folders. Selecting Destination Folders will preview how images will be grouped when organizing the destination folder by date. In addition, Lightroom has the ability to view “All Photos” or only “New Photos” (files which have not been previously imported).
Preview the Import File Size—Use the File Size indicator (in the lower left of the Import window) to preview the size of the import.
Compact Expanded View—“\” (backslash) toggles compact/expanded view of the Import window.
Ejecting External Devices—When importing from an external device such as a card reader, mobile phone etc), the volume can be ejected (un-mounted) from the system after import by checking the box to the right of the device name. Note: It is not possible to import images from a card and have Lightroom erase the files on the original card.
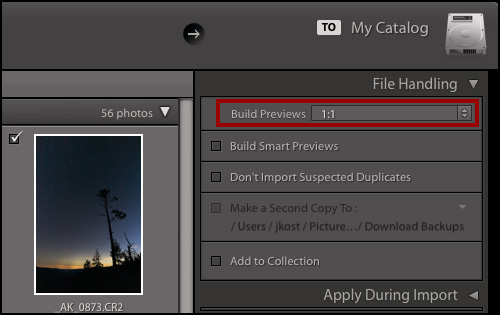
Building Image Previews—Lightroom has a number of different options for building Image previews. I prefer to build 1:1 previews on import. They will take longer to create the full resolution preview, but once rendered, moving from between images in the Library module will be quicker. Note: setting Build Previews to Standard will set the preview size based on the resolution of the monitor. To customize the Standard preview size, choose Catalog Settings > File Handling.
The video below (Viewing Images Quickly with the New Embedded Preview Workflow), was through Lightroom Classic’s Embedded Preview workflow – the fastest way to preview images.
Don’t Import Suspected Duplicates —To avoid importing duplicate files, select Don’t Import Suspected Duplicates: Lightroom will search the entire catalog (regardless of path) for duplicates using comparison logic that includes items such as name, file size, and time stamp (+/- 1 minute).
Make a Second Copy To—When importing files and using “Copy as DNG” “Copy” or “Move” you can choose to create a secondary copy of the original files by checking “Make a Second Copy To”. Note, this feature makes a copy of the original files in their “pure” state and does not include any changes made to the files on import. In other words, any changes made to the files on import (renaming, adding metadata etc.), will only be made to the imported files – not the secondary copy. This is deliberate as many photographers want a way to backup their original files in their “pure” state.
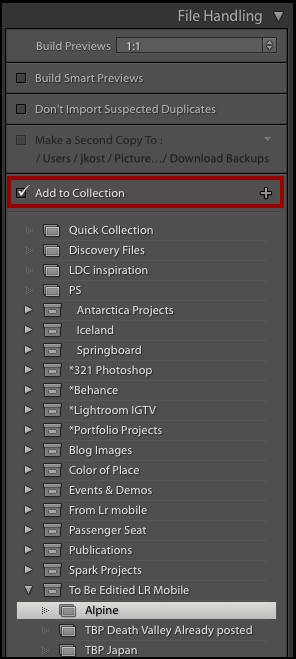
Add to Collection—To simultaneously import files and add them to a collection, select Enable Add to Collection and select the desired collection or, click the plus icon to create a new Collection.
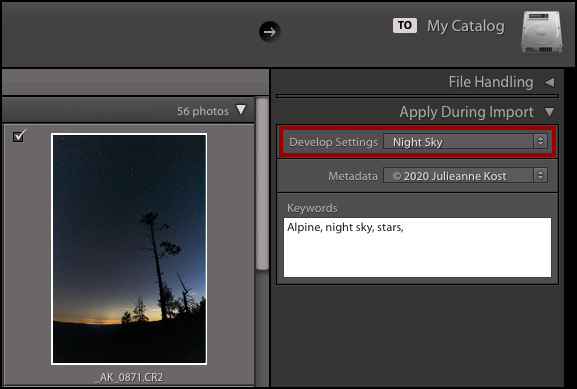
Apply Develop Settings—Choose Apply During Import > Develop Settings to apply a Develop preset to images on import. This Quick Tip (Batch Processing the application of Develop Presets on Import) will show you how.
Renaming Files on Import —This Quick Tip (Creating a Custom File Renaming Templates in Lightroom Classic) demonstrates how to create a custom File Naming template. Once created, the template can be applied during import (when selecting Copy as DNG, Copy, or Move), using the File Renaming panel.
Adding Metadata on Import—In this Quick Tip (Adding Copyright and Contact Information to Photographs in Lightroom Classic), you’ll discover how to create a metadata template to add copyright and contact information to your images on import.
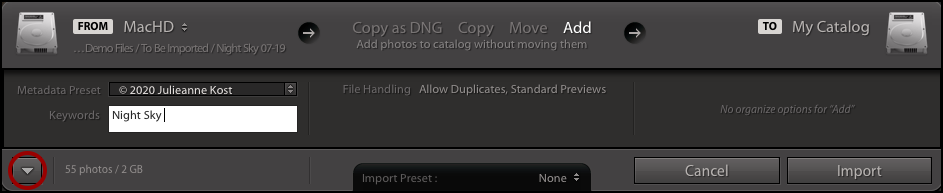
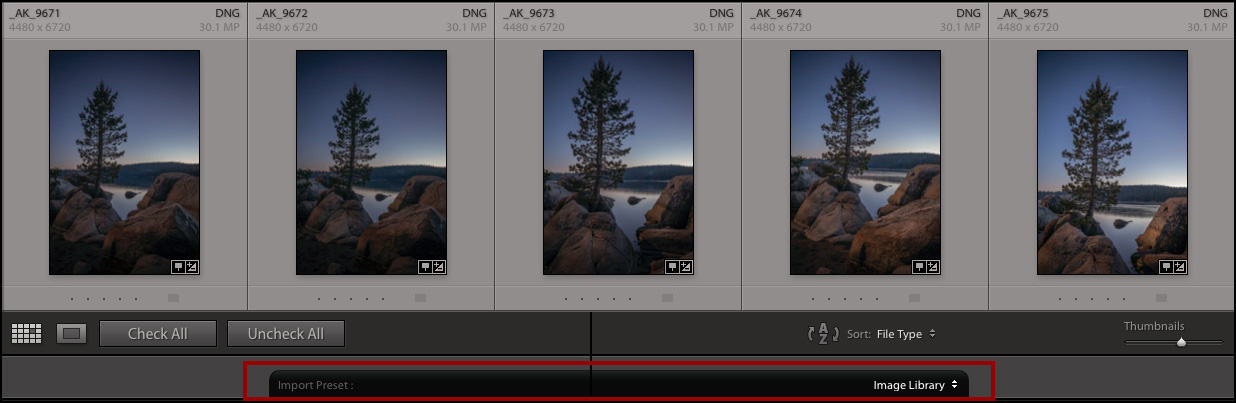
Import Presets—To help minimize mistakes and speed up your workflow, choose the desired settings in the Import window. Then at the bottom-center of the window, click to the right of Import Preset and choose Save Current Settings as New Preset from the drop-down menu.
Viewing Imported Files—When Lightroom finishes importing images, it automatically changes focus from the currently selected folder/collection to the “Previous Import” collection in the Catalog panel. To keep the focus on the currently selected folder/collection), choose Preferences > General > Import Options and uncheck Select the “Current/Previous Import” Collection During Import. This Quick Tip (How to Stop Lightroom Classic from Switching Folders After Importing Files) walks you through the process.
Image Previews Change—In this Quick Tip (Why Does the Photograph’s Preview Change in Lightroom Classic and Bridge After Import? ), you’ll learn why Lightroom updates the camera manufacturer’s embedded preview with it’s rendering engine.
Auto Import—Lightroom has the ability to automatically import files using a watched folder. To enable this feature, in the Library module, choose File > Auto Import and customize the Auto Import settings. Enable Add to Collection or create a new collection to automatically add the files to a collection. If Sync is enabled for the collection, all photos added to the collection will also be synchronized. This might be an alternative to tethered capture if your camera is not supported. Note: auto import can only copy files to a single, flat folder as it’s destination.
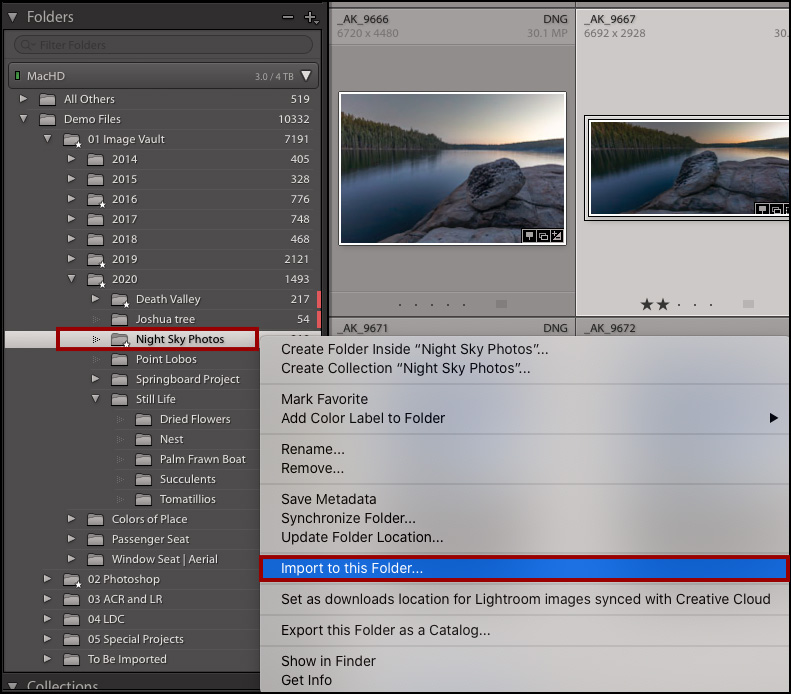
Import to a Specific Folder—In the Library module, Control -click (Mac) | Right -click (Win) a folder in the Folder panel and choose Import into this Folder to display the Import window and automatically set the destination folder.
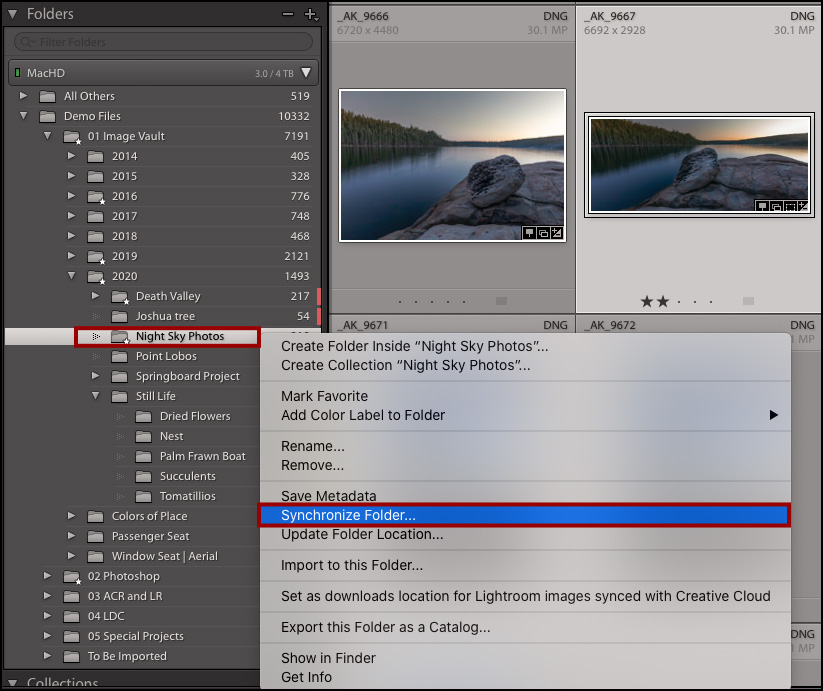
Synchronize Folder—If a folder has been imported into Lightroom and then additional images are added to that folder via the operating system, Lightroom will NOT automatically import the newly added images. To make Lightroom aware of the newly added images, Control -click (Mac) | Right -click (Win) on the folder and choose Synchronize Folder. In the Synchronize folder dialog, you can choose to display the import dialog (to add additional metadata for example) or, toggle it off and add any necessary metadata in the Library module. This Quick Tip Synchronizing Folders in Lightroom Classic demonstrates how to synchronize a folder.
Optimizing Lightroom’s Performance—Since I’m always looking for ways to make image editing faster, I will typically store the files that I’m currently working with on my internal drive (which happens to be a speedy little solid state drive). However, the internal drive is much to small to hold all of my images so, when I’m finished editing the project, I move them to my (slower) external storage drives to make room for new projects. Click here for additional tips on how to Optimize Lightroom Classic’s performance.
Supported File Formats and Sizes—Click here for a complete list of file types that Lightroom supports (including an extensive list of Camera Raw Formats). Lightroom will not import files that have the longest dimension greater than 65,000 pixels, are larger than 512 megapixels, have been saved as PSD without Maximize PSD and PSB File Compatibility turned on (in Photoshop’s File Handling Preferences), or are 32-bit PSD files. It will import PNG files and retain their transparency.
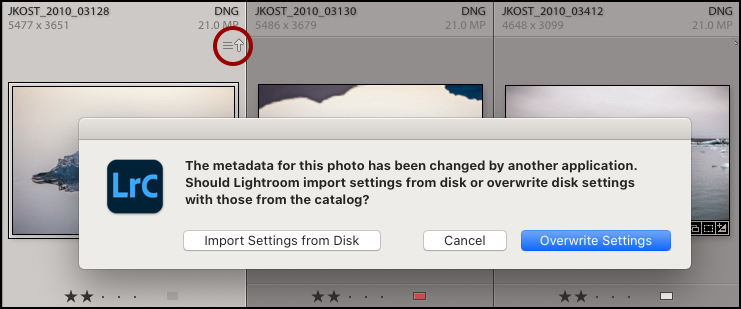
How Lightroom Works with Metadata from Other Applications—Lightroom can understand changes made in Bridge and Adobe Camera Raw (such as the addition of metadata like copyright and contact information and enhancements made using ACR such as changes made to Color Temperature or Exposure). However by default, if you open a file in Bridge and make changes to the Metadata, Lightroom will NOT automatically update the Metadata. Instead, Lightroom will warn you that the file has changed by an external application by displaying an icon in the Grid view. You can then choose whether or not you want to use the updated Metadata from Bridge/Camera Raw or use the information in Lightroom’s database. To update the file with the external application’s Metadata, click the icon and choose “Import Settings from Disk”, or select the file in the Grid view and choose Metadata > Read Metadata from File). Note: Additional software applications that follow the XMP standard should also be able to read/write Lightroom and Photoshop’s metadata.