I’m excited to announce several new features and enhancements to Photoshop 2021 (v22) including the new Pattern Preview, Sky Replacement, and Neural Filters, and well as enhancements to Shapes, Camera Raw, Select and Mask, Cloud documents, Plugins, and much more!
This video provides a quick look at Pattern Preview, Sky Replacement and the Colorize Neural filter. Additional information about these features – and much more -can be found below the video.
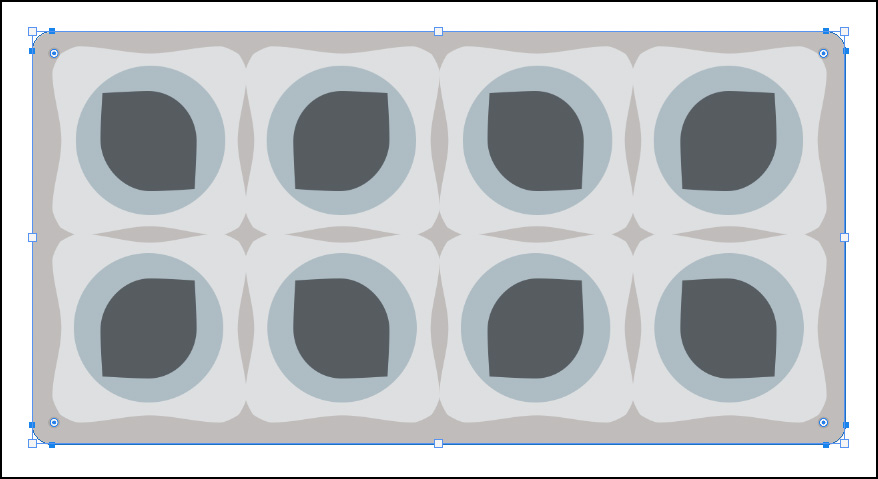
PATTERN PREVIEW—Photoshop now makes it quick and easy to move and adjust layers to create seamless, repeating patterns. Choose View > Tiled Canvas: the original canvas is centered (with a blue outline around the edge) and “virtual” tiles of the document are created to fill the work area to preview the repeating pattern. 
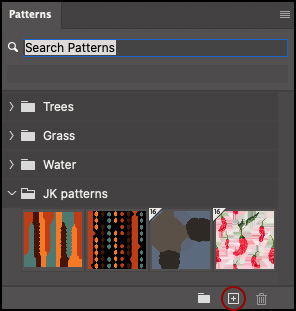
As elements are repositioned beyond the canvas, Photoshop eliminates any guesswork by displaying a live preview of the resulting tiled pattern.To save the pattern, click the plus icon at the bottom of the Pattern Panel. Patterns can be applied as: Pattern Fill Layers, Layer Effects (both Patter Overlay and Stroke), Shape Layers (both Fill and Stroke), and the Frame tool (Stroke via the Properties panel).
Note: most tools work beyond the canvas area (across tiled boundaries) including the Brush, Pencil, Mixer Brush, Clone Stamp, and Eraser, Healing Brush and Spot Healing Brush, Pen tool, Shapes, and Type. Selections can be made outside of the tile boundaries, but will only appear within the tiled canvas area. Pattern Preview works best with smart objects (transforming pixel layers may show unexpected results).
SELECT SKY AND SKY REPLACEMENT—Photoshop’s new Select > Sky and Edit > Sky Replacement features automatically separate the sky from the foreground elements in a photograph. To simply select a sky, choose Select > Sky: this is an excellent way to quick select the sky area (or the foreground: Select > Inverse) to make adjustments. To select the sky and replace it with the help of Adobe Sensei’s AI and machine learning, choose Edit > Sky Replacement.
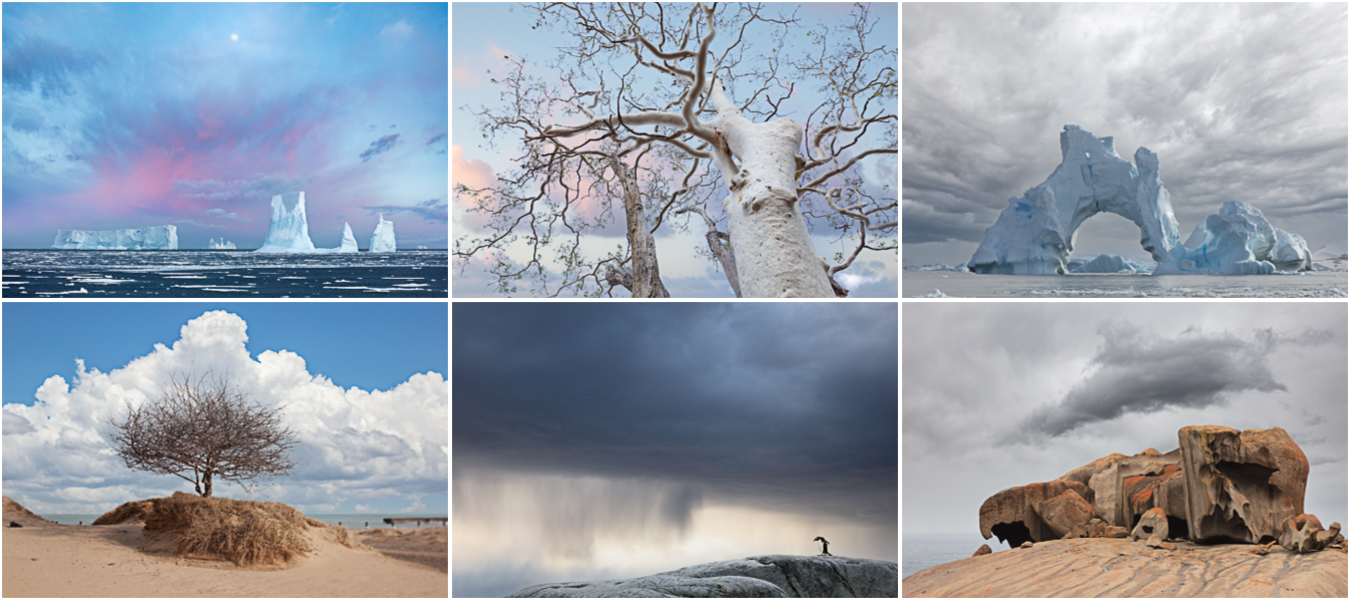
Choose from one of the preset skies, or, click the gear icon to load a New Sky. Photoshop automatically fits the sky in the image area and displays a preview. Sky Replacement will recognize the horizon in the image and to adjust the foreground colors to match the sky.
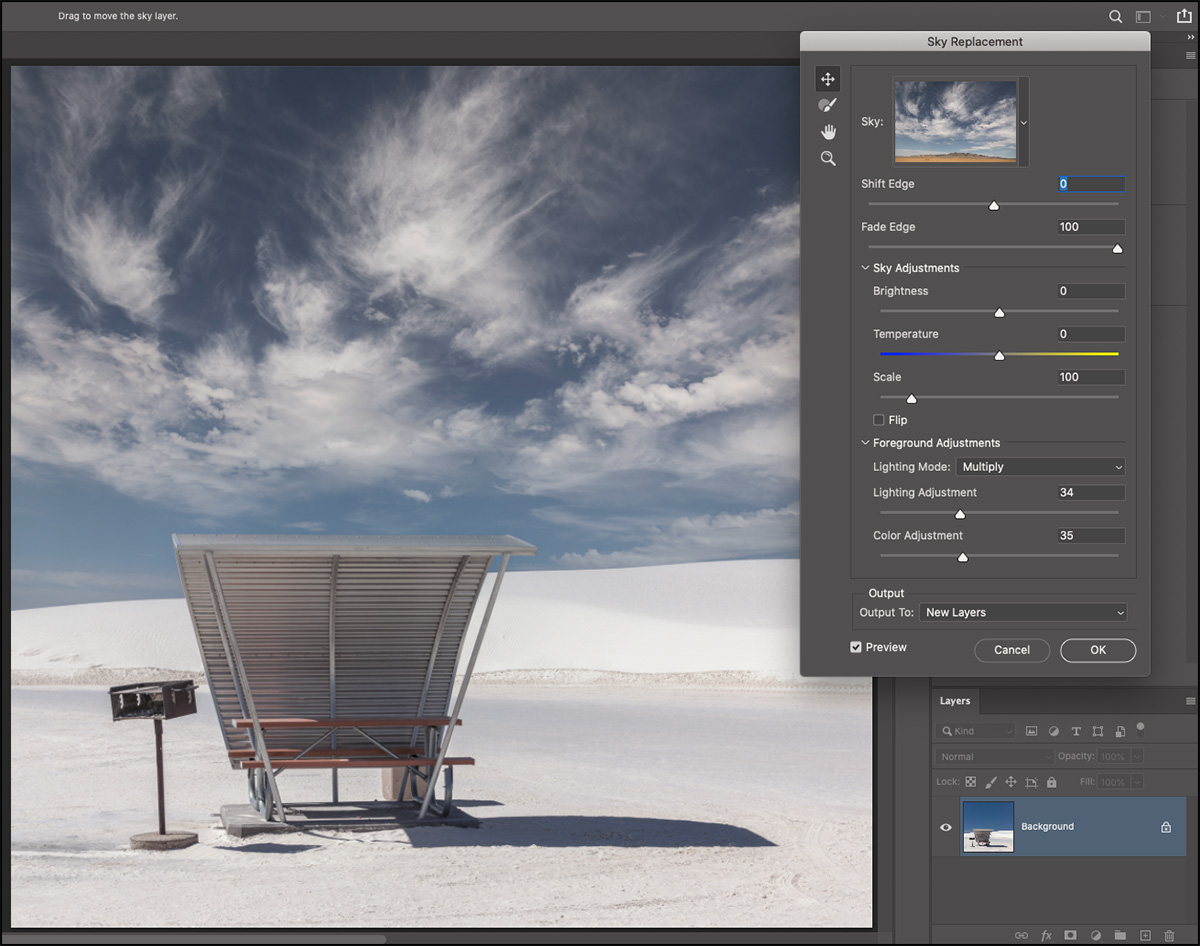
The Sky Replacement panel contains several customizable options including:
Shift Edge—Shifts the edge and helps to reduce fringing of the edges by shifting the edge of the layer mask for the sky layer (which you can see in the Layers panel when the Output is set to New Layers).
Fade Edge—Softens the edges of the sky by blurring the mask for the sky layer (which you can see in the Layers panel when the Output is set to New Layers). A lower values provide crisper blending and can reduce halo effects that may appear for some foreground/sky combinations.
Sky Adjustments—Sky Replacement uses nondestructive adjustment layers (Brightness & Contrast and Color Balance ) to harmonize color and tone in order to make the final composite more realistic.
Size—Use the Size slider to decrease/increase the size of the sky and the Sky Move Tool to reposition the sky. As the sky is repositioned, the foreground elements will be re-harmonized (based on the visible part of the sky).
Flip—Use the Flip option to better match the direction of light.
Foreground Adjustments—These options adjust the toning in the foreground to better match the new sky. The Multiply option can darken the area, while the Screen option lightens it.
The Sky Brush—Use the Sky Brush to manually paint the new sky in or out to reduce halos or amplify the appearance of the sky in complex areas such as treetops. When the brush is selected, additional options appear in the Options bar including: size, blend mode and opacity.
• Option (Mac) | Alt (Win) toggles between adding and subtracting sky.
• Using the “add” brush mode on the new sky can reduce halo effect or give the sky more presence in treetops.
• The “subtract” mode on the foreground can remove new sky that is bleeding into the foreground.
• The Overlay or Soft Light blend modes are effective for gently toning in the sky and foreground boundary. Use the Normal blend mode and higher brush opacity for a stronger effect.
Output—Choose to output the results to a New Layer Group (for maximum flexibility including access to Layer masks, color and tonal adjustment layers), or to a Duplicate layer (the results flattened upon a single layer).
Sky Groups—When adding new skies, click the Folder Icon (or use the gear icon) to create a new Group. Then, drag and drop sky presets between groups to organize your skies.
Note: Added Sky’s are automatically available across devices (when signed in using the same Adobe ID).
SHAPE TOOLS—Photoshop’s Shape Tools have been updated with several new features and enhancements including on-canvas transform and corner radius controls, a new Triangle tool, Live Shape Properties for the Polygon and Line tools, and added controls via the Properties panel.
Drawing Shapes—When drawing shapes, use the gear icon in the Options bar to change default behaviors or, use the following shortcuts:
• Add the Shift key to constrain the drawing of shapes (constrain proportions is off by default).
• Option -drag (Mac) | Alt -drag (Win) to draw from the center.
• Press the Spacebar to reposition the shape while drawing.
• Command -drag (Mac) | Control -drag (Win) to change the angle (rotate) of a Polygon while drawing.
Transforming Live Shapes—After drawing a shape, Photoshop now displays on-screen transform controls:
• Drag any control point to scale the shape. Constrain proportions is off by default. Add the Shift key to constrain proportions.
• Position the cursor outside of a control point (the icon will change to a double headed arrow) to rotate. To reset a rotation, use the Properties panel.
• Drag the Corner Radius control point to increase/decrease the radius of the shape. By default the corner radii are linked: Command -drag (Mac) | Control -drag (Win) to change a single corner radius. Note: the Triangle and Polygon tools have a single Corner Radius control point handle which modifies the roundness of all corners equally.
• When multiple shapes are selected on a single layer, changing the attributes for one shape will change all selected shapes.
Note: The on-canvas Transform controls should reduce the need to use Edit > Transform to scale and rotate shapes however, you will still need to use the Transform options to apply transformations such as Skew, Distort, Perspective, and Warp (which will convert a Live Shape to a regular shape).
The Triangle Tool—The new Triangle tool is dedicated to creating three sided shapes. Drag the on-canvas controls to scale and rotate and the corner radius tool to round the corners. Use the Properties panel to flip the orientation. Note: the Triangle tool has a single Corner Radius control point handle which modifies the roundness of all corners equally. There are no individual Corner Radius control points for the triangle tool at this time.
The Line Tool—The redesigned Line tool is now defined by 2 control points. Use the Stroke value to determining the thickness of the line.
• Use the Cap Type control in the Options bar (or Properties panel) to round the start/end of the line.
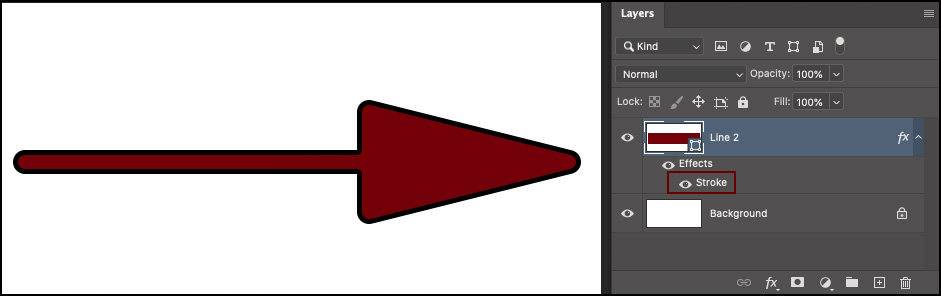
• When adding and arrowhead(s) to a line, use the Fill option to fill the arrowhead. Note: To create a line with an arrow head that are the same color and apply a different color stroke – use the Stroke Layer Effect.
• When transforming lines with arrowheads the arrowheads will retain their dimensions (while the line is transformed).
The Properties Panel—The Properties panel now displays several additional controls for the shape tools (when appropriate) including: flip, angle/rotation, radius, number of sides and star attributes (indent percentage and smooth radius) and Pathfinder commands.
• When making changes to shapes, use the scrubby sliders (position your cursor over the name of the feature and click-drag left/right) to change values to see the updates in real time (whereas using the text boxes requires a commitment (tap enter or return) to preview changes).
• Click the Color swatch to select the Color Picker updates the color applied to the shape in real time.
Reference Point—To change the reference point for shape layers (the point from which shapes are scaled and rotated using on-canvas transform controls), select Preferences > Tools > Show Reference Point when Using Free Transform (or choose Edit > Free Transform and check the empty well to the left of the reference point icon in the Options bar to enable it for both Edit > Transforms and on-screen transforms).
NEURAL FILTERS—With this version of Photoshop, Adobe has introduced a completely new type of filter based on AI and machine learning – developed for experimental and creative photo-editing scenarios. There are two categories of filters: Featured and Beta. Featured filters are farther along in the development cycle while the Beta filters are built on early technologies that the team is excited about investigating and, upon a framework that can be rapidly iterated and promoted as they improve. Because not every filter will produce the perfect results on every image, I would suggest that you use the output options and choose to output to a Smart Object in order to take advantage of the Smart Filter mask and additional tools in Photoshop to remove various machine learning imperfections. Note: Some of the training models are quite large and need to be downloaded by clicking the cloud icon next to the filter. Other filters (such as Smart Portrait) require internet connectivity while applying as the processing is done in the cloud.
Featured > Skin Smoothing—This filter adjusts and removes skin imperfections while preserving details in portraits.
Featured > Style transfer—This filter adopts the appearance or visual style of a source image and applies it on your image. There are 50 styles to experiment with and additions options such as applying/preserving colors, Focus and Style strength, Brush size, and Background Blur.
![]()
Beta > Smart Portrait—This filter takes the pixels in the original image and then fabricates new pixels from scratch (via processing in the cloud) that it “thinks” should work and creates a fictional output. For example, when increasing the Happiness slider, Smart Portrait “imagines” what teeth should be in the mouth (size, shape, etc.) and creates them. Use the Expressions and Subjects sliders to change facial features, the Mask sliders to adjust the placement and feathering of the masks, and the Experimental slider to help retain unique details in an image such as a mole, nose ring etc.
• Be sure to run the filter on the entire face (it won’t recognize just a portion of the face), then use the Smart Filter mask to hide the changes in any areas that you don’t want.
• If the document has multiple faces, Photoshop will draw a blue rectangle around the one that is selected. Click on a face with a yellow rectangle to select it (or select the new face from the drop-down menu).
• Face occlusions (a hand in front of the face, decorative eyeglasses), tricky lighting, strong color casts on faces that hide skin tones, hair across the face, glitter/face-painting, and large beards or hats, may cause the filter to fail.
Beta > Makeup Transfer—This filter adopts the appearance of the lip and eye area from a reference photo and applies it to your image.
Beta > Depth Aware Haze—This filter analyzes the objects inside the image to predict what the depth is, creates a depth mask, and simulates volumetric haze to better highlight your subject (based upon the depth mask). Use the Haze slider to increase/decrease the amount and the warmth slider adjust color. Note: transparent objects are tricky for this filter.
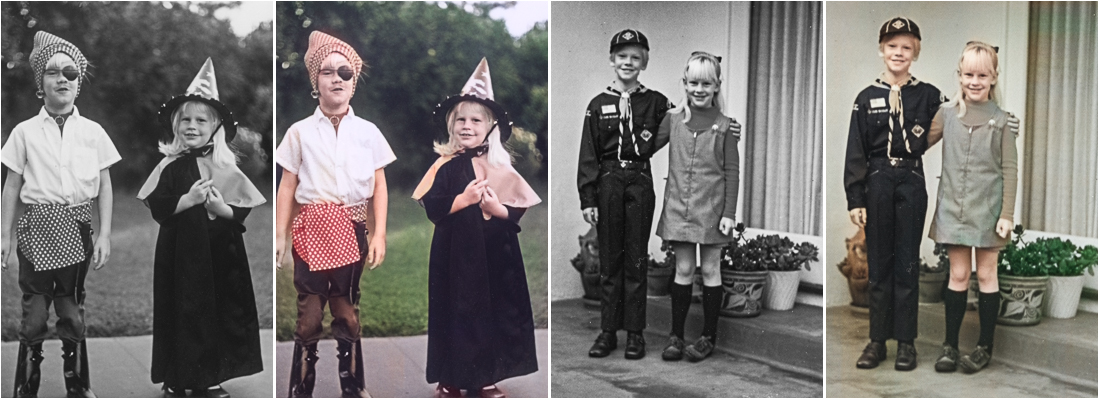
Beta > Colorize—This filter automatically adds color to an image. Click the color swatch to choose additional colors and apply them by clicking in the preview area (on the right). (Option -drag (Mac) | Alt -drag (Win) a color point to duplicate it. Use the Scene color sliders (Cyan/Red, Blue/Yellow, Magenta/Green) to adjust the color balance of the image and use the Focus/Scene slider to balance the weight of the manually/auto generated colors in the image. Note: if you start with a black and white (grayscale) image, don’t forget to convert it to RGB before running the filter so that Photoshop can add color to the image!
Beta > Super Zoom—This filter zooms into a portion of the image, resizes that area, and outputs it to fill the document size (this can be very handy if when creating comparison illustrations). If you want to enlarge the entire image, first expand the Canvas size and then don’t zoom in on the photo in the filter.
Beta > JPEG Artifact removal—This filter works well removing artifacts in gradient areas, but doesn’t try to make up what’s not there in detail areas.
Beta > Potential filters—These filters are not functional, but are listed below the beta filters and were included to gauge interest (click “I’m interested” to submit your feedback).
Feedback—You can provide feedback on the results of any of the filters by clicking on the Are You Satisfied with the result? Yes/No option.
Note: I would anticipate that some of the Beta filter models will be improved and updated over time—in other words, they are likely to change. If you apply the filter to a Smart Object (thereby creating a Smart Filter), the results will be cached, and will only be updated with the results of a new model if you edit the filter. For example, if you Free Transform the Smart Object with the Smart Filter applied, the filter will need to be reapplied and, if the model has been updated, the results will be based on the new model with potential improvements (but also potential differences).
SELECT AND MASK—There are two new Adobe Sensei features in the Select and Mask workspace: Refine Hair and Object Aware Refine Mode. Both use AI to further improve selections that include tricky subjects like hair on complex and similarly- colored or similarly-textured backgrounds..
Refine Hair—Previously, when selecting hair, one would create an initial foreground selection and then paint using the Refine Edge Brush to refine the mask along the edges of the hair. The new Refine Hair button replaces this manual brushing by automatically creating and refining the edges along the hair with a single click.
Refine Modes—There are now two Refine Modes to choose from in the Select and Mask workspace – Object Aware and Color Aware. When trying to select hair and other fine elements of an image – particularly when the foreground and background are similar in color or hard to differentiate – use the Object Aware mode (button). With the help of AI and Machine learning, it often produces the best results in these situations.When you have a photo with a simple background and high color contrast with the subject, the Color Aware mode (button) may yield better results – especially when used in combination with the Refined Edge Brush . When using Color Aware mode, the Real-time Refinement checkbox in the View mode section can help preview the results of the Refine Edge brush in real time.
Saving Presets—You can now save presets in the Select and Mask workspace.
CLOUD DOCUMENTS—There have been several enhancements made to Cloud Documents making them easier to work with than ever before including a new Version History panel, offline availability of Cloud Documents, improved sync experience and and embedded Photoshop cloud documents.
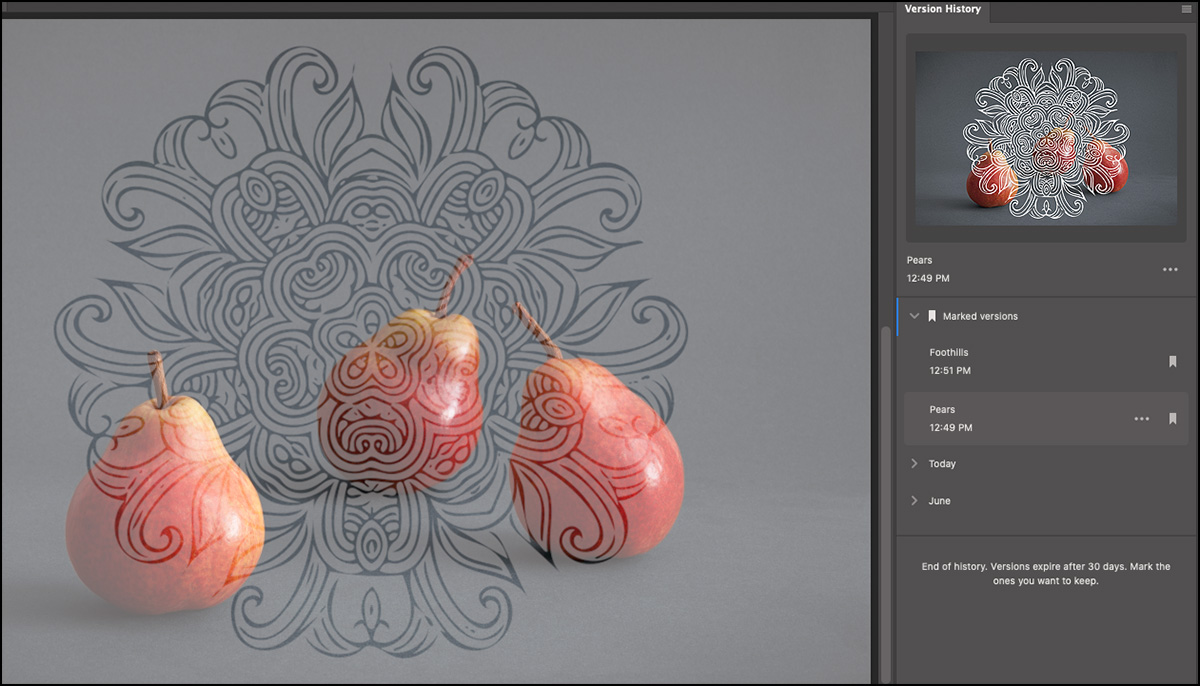
Version History Panel—Cloud Documents automatically create “versions” as you work (a huge benefit if you need to look back or revert to prior states). In Photoshop (on the desktop), choose Window > Version History to view, revert, open, save as, and name different versions of your cloud documents. A new Version is automatically created whenever a Cloud document is auto-saved (after a certain time duration) or when you choose to save the document. The Version History panel displays a preview of the version, Marked versions, and Auto Saved versions. Click the Mark Versions icon to bookmark and save a version. Note: all marked versions appear under the Marked Versions section.Versions that are not marked are deleted periodically (10 days for trial users, 30 for individual accounts, and 60 for enterprise customers).
• Choose the More menu (…) to name (or rename) a version. Note: when a version is named, it is automatically saved as a Marked version.
• To open a new (copy) of the cloud document, choose the More menu (…) and choose “Open in a new tab”. The copy behaves like any other newly created document and can be useful when trying to access content from a previous layer, take the image in another direction, or simply see another version full screen.
• To revert the cloud document back to the selected version, choose the More menu (…) and choose “Revert to this version”. The version you reverted to then becomes the current version of the document. A new version (auto created from your current state prior to reverting) is added to the list of existing versions of that document. Note: Version History is non-linear, you can choose any version and they act like separate files.
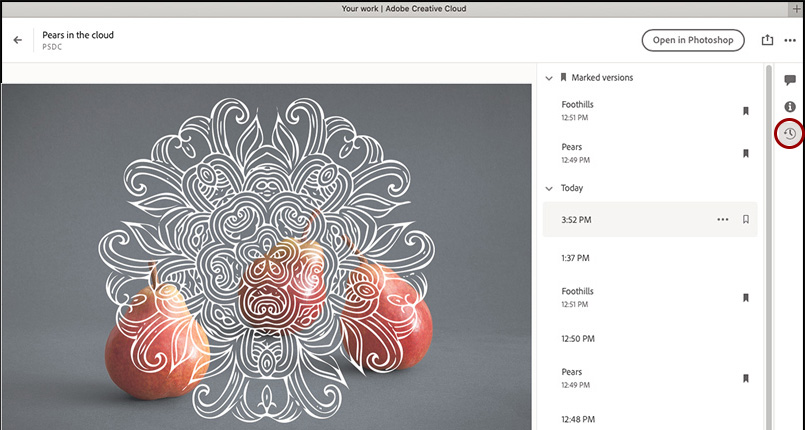
• You can also managing Versions using the Timeline view on assets.adobe.com. Choose Your Work > Files > Cloud Documents and select the desired file and click the Timeline View icon (the on the right of the window.
Note: Even though Versions are actually separate files, only the marked versions count against your quota of cloud storage.
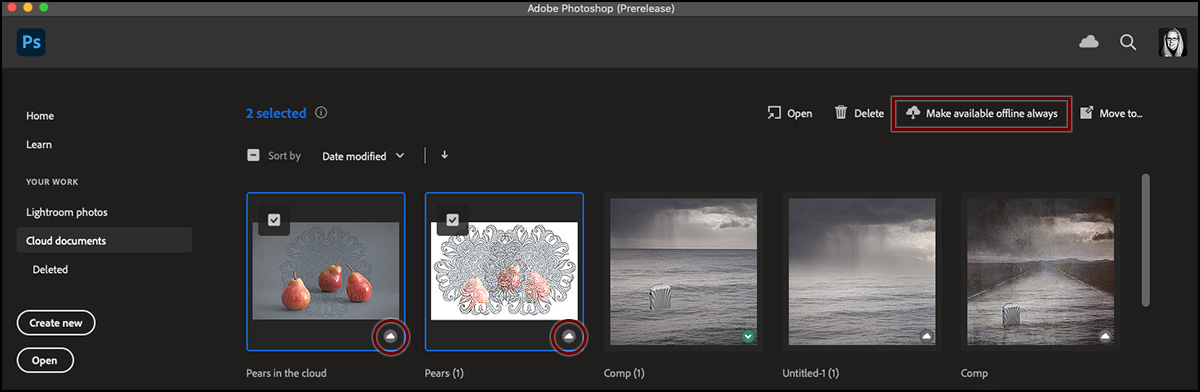
Offline Availability of Cloud Documents—Cloud Documents can be made available offline. In the Photoshop Home screen, select a Cloud Document and click the Cloud icon (at the bottom right the image preview) to make them available offline (they will be stored locally in a cache). Or, select the image(s) by clicking the empty well in the upper left of the preview), and choose Make Available Offline Always. Note: to designate a online document back to cloud-only, select it and choose Make Available Online-Only.
Improved Sync Experience—Click the Cloud icon in the upper right of Photoshop’s Home screen to view the sync status, the amount of data you are using for a sync, and how much of your storage quota you have used. Note: currently this feature is only available on desktop.
Embedded Photoshop cloud documents—now you can place embedded Photoshop cloud documents (PSDC) in Illustrator cloud document files (AIC).
ADOBE CAMERA RAW—There have been several updates to Adobe Camera Raw including the new Color grading panel, GPU acceleration for local tools, and interface enhancements.
COLOR GRADING—Camera Raw’s new Color Grading Panel enables even more control over the application of color tints to your images. Colors can be applied independently to shadows, highlights and midtones in your image with additional controls to blend, shift balance, and change luminosity values. This video (although recorded in Lightroom Classic, will walk you through the feature or, you can read all about it below.
Note: @7:25, you need to position your cursor over the Color Wheel in the Detail view for the shortcuts that I mention in the video to work!
The Split Tone Panel—The new 3-way Color Grading panel upgrades (and replaces) the Split Tone panel. When opening legacy files (or applying legacy presets that contain Split Tone settings), the color tints will be applied in the Color Grading panel (using the Shadows and Highlight color wheels and the Blending slider if necessary) to achieve a perfect match.
Applying Colors—The Default view of the Color Grading panel displays 3 color wheels: one for shadows, midtones, and highlights. Quickly select the desired Hue and Saturation by clicking in a color wheel.
• To limit refinements to the Hue, drag the solid colored dot (handle) on the edge of the wheel or, Command -drag (Mac) | Control -drag (Win) the hollow dot within the color wheel to restrict refinements to Hue.
• To limit refinements to the Saturation, drag the hollow dot within the color wheel (Lightroom displays a soft constraint (spoke) between the center and edge) or, Shift-drag to restrict refinement to Saturation. Note: Dragging the dot far enough away from the initially selected spot will break the constraint and enable you to select a different Hue and Saturation.
• Option -drag (Mac) | Alt -drag (Win) the dot will move it more slowly, enabling finer adjustments to both Hue and Saturation. Note: Fine Adjustment mode does not use the soft-constraint.
The Luminance Slider—Drag the Luminance slider (beneath each color wheel) to darken/lighten each color range. Lightening the Shadows and darkening the highlights enables color to be added to the black and white pixels in an image.
• While Luminance changes can be applied to an image even without applying a color tint, there are more sophisticated controls in the Basic panel for adjusting tones (for example, recovering shadow and highlight information). The Luminance controls are intended to make color grading specific changes and are optimized to adjust the color tinting ranges as changes are made to the Blending and Balance sliders.
The Balance Slider—Use the Balance slider to shift the range of values that define the shadows/midtones/highlights. For example, if you apply a blue tint to the shadows and want that tint to extend farther into the midtones/highlights, move the Balance slider to the left. If you apply a yellow tint to the highlights and want that tint to extend farther into the midtones/shadows, move the Balance slider to the right.
The Blending Sliders—Use the Blending slider to determine the amount of color blending (crossover/overlap) between the tints assigned to the shadows/midtones/highlights. With blending set to 0, there is a small amount over overlap to avoid abrupt transitions but each color should remain “pure”. With the slider set to 100%, the color tints will overlap (crossover) and create additional colors between shadow/midtones, and highlights. Note: Without the blending slider, it would be difficult to control how color is added in the midtones (a lower blending value enables the midtone color to stand on its own).
• Option -drag (Mac) | Alt -drag (Win) the Blending slider to temporarily boost the saturation to 100, allowing you to quickly see how the tints are mixing as you adjust the Blending.
Detail View—To view individual (larger), color wheels, click the Detail icons at the top of the Color Grading panel (or click the “peek-a-boo” Color Wheels on either side of the panel to move from one Color Wheel to another).
• You can use the same options for adding color tints as the 3-color view, or use the disclosure triangle to use the Hue and saturation sliders.
• In Detail View, while hovering the mouse over the Color Wheels, hold Option (Mac) | Alt (Win) to adjust the Hue using the left/right arrows.
• In Detail View, while hovering the mouse over the Color Wheels, hold Option (Mac) | Alt (Win) to adjust the Sat using the up/down arrows.
• Small dots are added under each detail icon that has adjustments.
Global Color Slider—Use the Global color wheel to apply a color tint (and adjust luminance values) to an entire image or, to apply a tint in conjunction with three-way adjustments. This can be helpful when you like the effect that you have achieved using the other color wheels, but want to increase/decrease the global Hue/Sat/Luminance.
• The Luminance slider is displayed by default, use the disclosure triangle to view Hue and Sat sliders.
• Click the color swatch to select from the default colors or click -drag with the eyedropper to select a color. Note: the eyedropper is actually recording video when it is selecting a color – this is why (on Mac), Lightroom Classic asks for permission to record video.
• The Blending and Balance sliders have no effect on the toning applied by the Global wheel.
Resetting Color Wheels—Double click within a Color Wheel to reset the Hue and Saturation. Double click on the Luminosity slider to reset it. Double click “Adjust” to reset all sliders.Or, Control -click (Mac) | right -click (Win) on a color wheel and use the context sensitive menu to reset the color wheel you clicked on, reset all three-way color wheels and/or reset all three-way color wheels plus the Global color wheel.
Copy and Paste Color Wheel Settings—Control -click (Mac) | Right -click (Win) on an individual color wheel and use the context sensitive menu to Copy the settings of the clicked wheel or paste settings copied from another wheel. To copy and paste all color grading settings, select the more icon (…) and choose Copy Selected Edit Settings (choose Color Grading in the dialog). Then, move to the desired image, select the more icon (…) and choose Paste Edit Settings. Color Grading settings can also be saved as part of a Preset.
Previewing Changes—Press and hold the eye icon next to a color wheel to toggle the visibility of a single Color Wheel. Press the eye icon to the right of the Color Grading header to toggle the visibility of all settings in the Color Grading panel.
For more information on Color Grading be sure to check out this blog post “Introducing Color Grading” from Max Windt on the ACR engineering team!
Camera Raw GPU Acceleration—Images with several brush strokes or radial or graduated filters will render much faster thanks to full GPU acceleration.
Compact Mode—When viewing the edit stack on lower resolution screens, select Preferences > General > Compact Mode to view more options on screen. And, for more precision when dragging sliders, drag to resize the edit stack’s width.
This release also includes additional camera raw support, lens profile support, and addresses bugs that were introduced in previous releases of
HIDDEN GEMS—In addition to the big features, the Photoshop team is also ways working to improve little things that help improve our workflows:
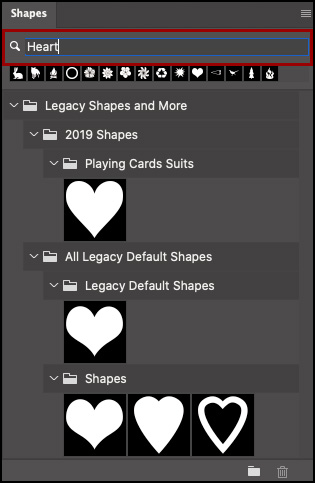
Preset Search—Finding presets in Photoshop just got a whole lot easier! At the top of the Preset panel (Swatches, Gradients, Patterns, Shapes, Styles, Brushes), just start typing in the contextual search bar, to quickly find your presets. Toggle the visibility of the Search Bar for each of the individual panels using the panel flyout menu. Tapping the Escape key will clear the Search bar field.
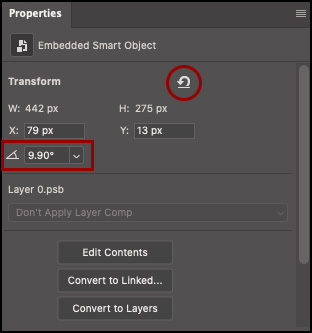
Improvements to Smart Objects—Use the Properties panel to reset transformations applied to Smart Objects including rotations, transforms, and warps.
Plugins Panel—You can now use the Creative Cloud desktop application to discover, manage, and install plugins (via the new plugins marketplace), and then access them directly in Photoshop using the new the Plugins menu and Plugins panel (Plugins > Plugins Panel). The new, modern UXP architecture and panel will make them easier to find, improve their reliability and performance and make them easy to install. Several popular plugins are now available in the marketplace with many more on the way, so be sure to check them out.
Free Public Libraries—Be sure to check out the new Libraries available via the new Marketplace tab within the Creative Cloud desktop application. Follow a public library can enable access free assets including brushes, patterns, gradients, color themes, fonts, icons graphics and more!

World-Ready Text Layout Engine—Japanese text is now supported in the World-Ready Text layout engine.
Preview for Actual Size—Because Photoshop knows the resolution of your monitor, selecting the new View > Actual Size will preview a document at it’s true size on screen (showing the correct print size).
Export As—The Export As feature has been re-written on UXP and is available as a Technology preview. To enable it, choose Preferences > Technology Previews > and enable UXPExportAs. While there aren’t any functional changes, it is faster than the previous Export As.
The Discover Panel—Be sure to check out the new Discover panel for in-app learn content, brand new step-by-step tutorials, and a new powerful search functionality.. There’s a lot of great content packed into this new panel and it uses AI to deliver recommendations based on you and your work. Access the Discovery panel via the Magnifying/Search icon, Help > Photoshop Help, or Command + F (Mac) | Control + F (WIn). Note: The Learn Panel has been removed and the Discovery panel currently only fully support US English. If you have another language/locale, you may see partial translations.
PHOTOSHOP FOR IPAD—the iPad continues to add new features including in-app live streaming and Behance gallery and Image Size options.
Image size Options—change the dimensions of your PSD to fit the output that you need using the new document Properties panel.
In-app Live Streaming—share your creative process with the world using the new in-app live-streaming in Behance or, watch past recordings to learn from others. Click here to find out how to Livestream your creative process.
In-app Behance Gallery—get inspired and view work from others in the community with the in-app Behance gallery.
Click here to see the What’s new in Photoshop detailed feature summary on helpx.adobe.com