Here are my favorite tips, tricks and shortcuts for working with the Shape Tools in Photoshop.
This quick tip (Ten Tips and Shortcuts for the Shape Tools in Photoshop), shows several of my favorite tips for working with the Shape tools in Photoshop.
This quick tip (How to Capture Patterns, Shapes, Colors and Gradients From Images in Photoshop) demonstrates the new Capture from Image functionality in Photoshop, that automatically create patterns, shapes, color themes, and gradients from your images.
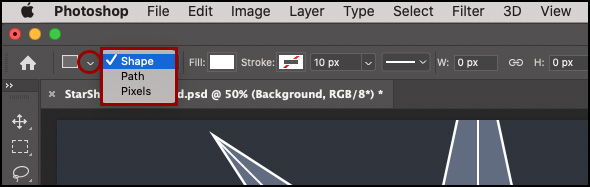
Prior to Drawing Shapes — Before starting to work with any of the Shape tools, be sure to use the drop down menu in the Options bar to choose between creating a Shape Layer, Path, or Filled Pixel regions or you might have to backtrack or go through extra steps to correct it. Note: other options (such as changing fill and stroke attributes), are easily changed/refined after drawing the shape using the Properties panel.
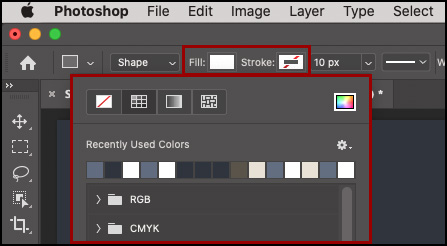
• Click the Fill and Stroke color swatches to choose the type of content: None (for a transparent shape), Solid Color, Gradient, or Pattern. Or, click the Color swatch to choose a color from the color picker or from recently used colors.
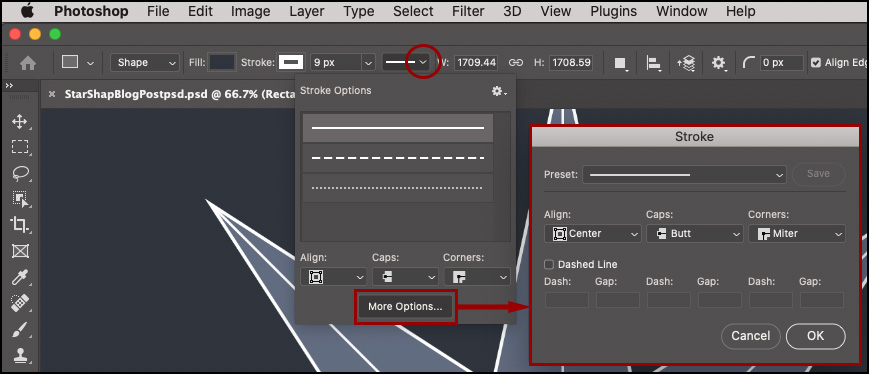
• When adding strokes to a shape, click the downward pointing chevron to change Align, Caps, and Corners options. Click the More Options… button to enter Gap and Dash values (to create dashed lines) and use the Presets drop down menu to save custom presets.
• To save all of the Options for a shape tool (fill, stroke, size etc.), create a Tool Preset. Click here for more information to Tool Presets.
• Use the following shortcuts to quickly change Shape values in the Options bar:
The Rectangle Tool: ‘[‘ or ‘]’ decreases or increases the corner radius by one pixel. Add the Shift key to increase/decrease the radius in increments of 10.
The Polygon tool: ‘[‘ or ]’ decreases or increases the number of sides by one. Add the Shift key to increase/decrease the number of sides in increments of 10.
The Line tool: ‘[‘ or ‘]’ decreases or increases the line Weight value by one pixel. Add the Shift key to increase/decrease the line width in increments of 10.
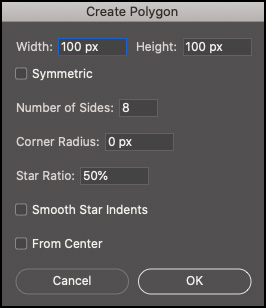
Or, instead of using the Options bar to change setting specific to each Shape, single click with the shape tool in the image area and set the desired options in the Create (Shape) dialog.
While Drawing Shapes — When drawing shapes, use the gear icon in the Options bar to change default behaviors or, use the following shortcuts:
• Add the Shift key to constrain proportions while drawing shapes (constrain proportions is off by default).
• Option -drag (Mac) | Alt -drag (Win) to draw the shape from the center.
• Press the Spacebar to reposition the shape while drawing.
• Command -drag (Mac) | Control -drag (Win) to change the angle (rotate) of a Polygon while drawing.
On-Screen Transform Controls — After drawing shapes, Photoshop displays on-screen transform controls:
• Drag any control point to scale the shape. Constrain proportions is off by default. Add the Shift key to constrain proportions.
• Position the cursor outside of a control point (the icon will change to a double headed arrow) to rotate. To reset a rotation, use the Properties panel. Note: to change the point from which shapes are scaled and rotated see “Reference Point” below.
• Drag the Corner Radius control point to increase/decrease the radius of the shape. By default the corner radii are linked: Option -drag (Mac) | Alt -drag (Win) to change a single corner radius. Note: the Triangle and Polygon tools have a single Corner Radius control point handle which modifies the roundness of all corners equally. There are no individual Corner Radius control points for the triangle tool at this time.
• When multiple shapes are selected on a single layer, changing the attributes for one shape will change all selected shapes.
Note: To apply transformations such as Skew, Distort, Perspective, and Warp, select Edit > Transform Path however this will convert the Live Shape Properties to a regular shape.
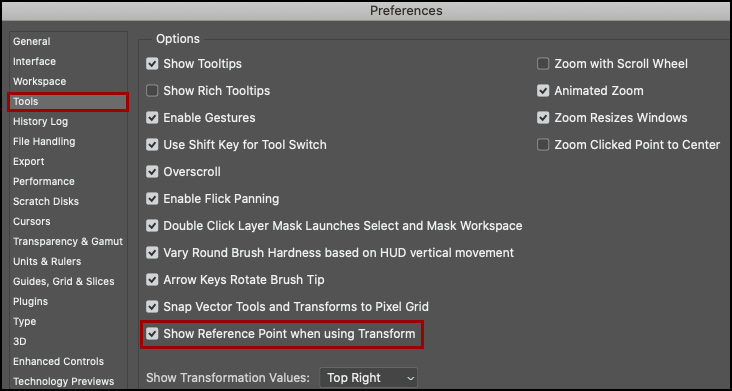
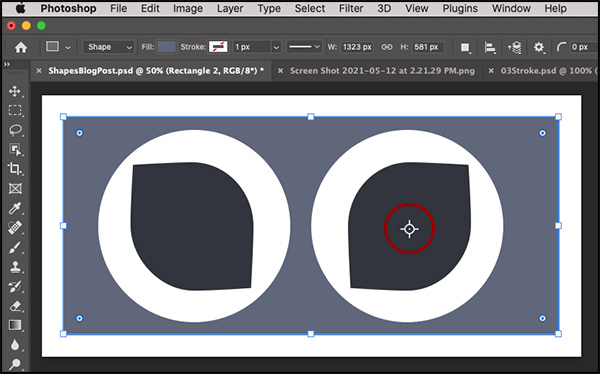
Reference Point—To change the Reference point for Shape layers (the Reference point is the point from which shapes are scaled and rotated using on-canvas transform controls), select Preferences > Tools > Show Reference Point when Using Transform.
Or, choose Edit > Free Transform and check the empty well to the left of the reference point icon in the Options bar to enable it. To reposition the Reference Point, drag the center point icon within the image area.
The Properties Panel—After drawing a shape, use the Properties panel to change a shape’s attributes such as: flip, angle/rotation, radius, number of sides and star attributes (indent percentage and smooth radius) and Pathfinder commands.
• To view changes made using the Properties panel in real time, instead of entering values into the text boxes (which require tapping Enter or Return to preview changes), use Photoshop’s Scrubby sliders (position the cursor over the name of the feature: when the cursor changes to hand with arrows pointing in both directions, click-drag left/right to decrease/increase values). Option -dragging (Mac) | Alt -dragging (Win) increases/decreases the values more slowly while Shift -dragging decreases/increases the values more quickly.
Preventing the Properties Panel from Auto-Expanding when Drawing Shapes — When the Properties panel is collapsed to “icon” view, adding a shape automatically expands the panel (making it easier to access Shape Properties). To prevent the Properties panel from automatically expanding, from the Properties panel’s fly-out menu, uncheck “Show on Shape Creation”. Note: you must have a Shape layer with Live Shape Properties to access this fly-out menu.

Changing a Shape’s Color using the Layers Panel — Double click the Shape Layer’s thumbnail to change the color of the shape’s fill. The benefit of using this method is that the shape’s color is updated in real time (unlike using the color swatch in the Properties panel where you have to commit to the color before seeing the change in the image area).
Applying Presets to Shapes — This post (Preset Panel Behaviors in Photoshop 2020 v21), reveals everything you need to know about applying Swatches, Gradients, Patterns, and Styles to shapes.
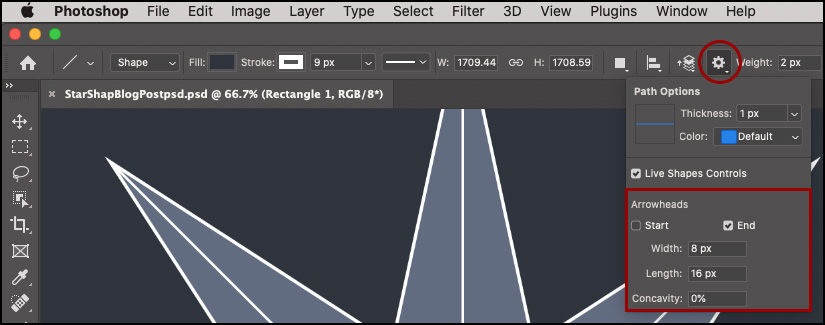
Adding Arrowheads to a Line — Click the Gear icon in the Options bar to add and customize the width, length and concavity of the arrowhead(s). Note: Arrowheads need to be added to lines before they are drawn.
Selecting Shape and Shape Layers — With the Path Selection or Direct Selection tool selected, targeting a Shape Layer in the Layers panel automatically displays the shape’s path in the image area (making it easier to quickly edit the shape).
• Clicking on a shape in the image area with the Path Selection tool will automatically select that layer in the Layers panel. Shift -click on another shape to add it to your selection. Shift -click on a selected shape to deselect it.
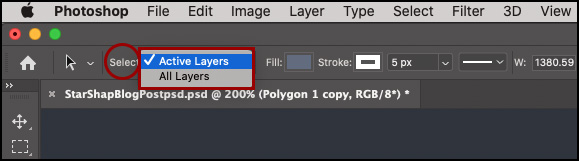
• Use the Path Selection tool to drag-select shapes in the image area. Use the Direct Selection tool to drag-select portions of a shape/path(s). To isolate the selection to only the currently selected Layer (or layers), set the Selection option (in the Options bar) to Active Layers. To drag-select shapes from multiple layers, set the Select option to All Layers.
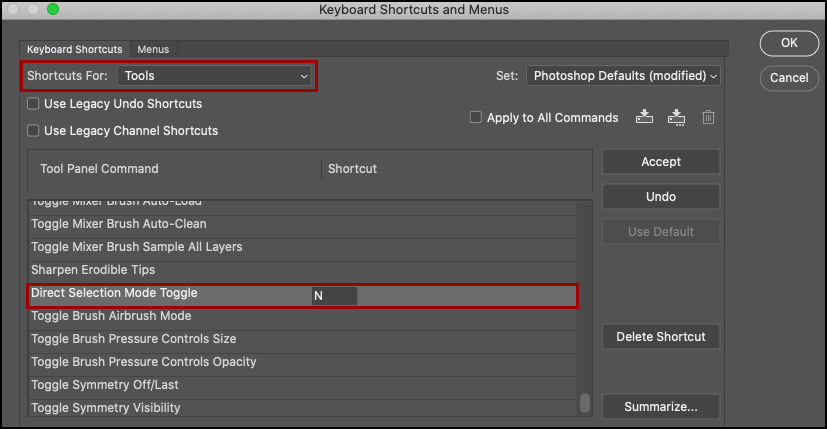
• To assign a custom Keyboard shortcut to toggle between selecting the Active Layers and All Layers, choose Edit > Keyboard Shortcuts and set Shortcuts For: Tools. Scroll down and enter a single character for Direct Selection Mode Toggle.
Copy and Paste Fill and Stroke Attributes — To copy and paste Fill or Stroke attributes from one shape to another, right -click ( or Control -click Mac) on the Layers panel (to the right of the layer name), and select Copy Shape Attributes. Then, in the Layers panel, select the layer(s) to paste the attributes and right -click (or Control -click Mac) and select Paste Shape Attributes.
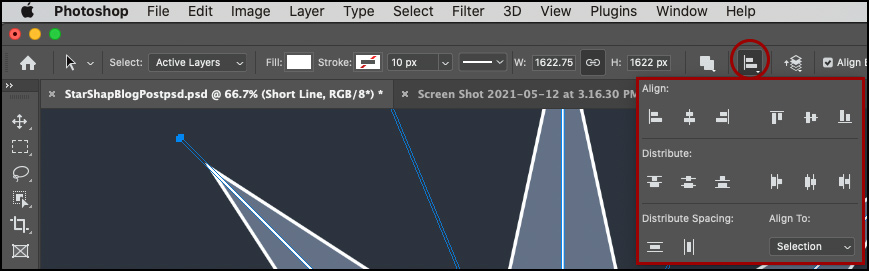
Align and Distribute Shapes — With multiple shapes selected on the same layer, use the Path Alignment icon in the Options bar to align the selected shapes (to the Selection or Canvas) and/or distribute the shapes (based on the size of the shape or the spacing between shapes).
Hiding a Shape Layer’s Path — Command + H (Mac) | Control + H (Win) hides the Shape Layer’s path. Note: The first time you use this shortcut (Command + H) on the Mac OS, Photoshop will display a dialog asking “Would you like to use Command + H to hide Photoshop (Mac standard), or to hide/show selections, guides, etc. (Photoshop traditional)?” Click “Hide Extras” unless you want to “Hide Photoshop” every time you use the shortcut. If you do choose to “Hide Photoshop”, you can change this behavior later by choosing Edit >Keyboard Shortcuts. Set Shortcuts For: Application Menus and toggle the disclosure triangle for the View menu. Scroll down to Extras, change the Shortcut back to Command + H and click Accept and then OK.
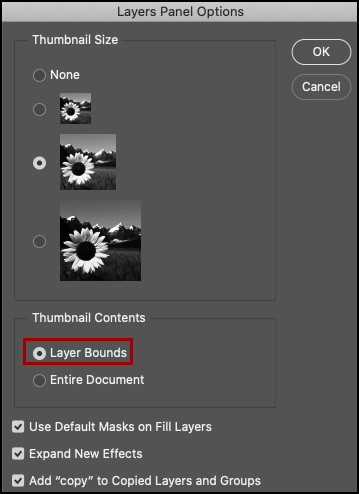
Viewing Shape Layers in the Layers Panel — When working with complex documents that contain several small shape layers, changing the Thumbnail Contents from Entire Document to Layer Bounds can make it easier to see the contents of a layer. From the Layer’s panel fly-out, choose Panel Options… and select Layer Bounds (Layer Bounds typically provides larger previews of layers containing minimal content whereas as the Entire Document option will display the content smaller; in relationship to the entire document).
Converting Shapes to Smart Objects — To prevent to conversion of a shape with Live Shape Properties to a regular shape, first convert the shape into a Smart Object, then apply the transformation. And, if you first create a Shape Layer and convert it to a Smart Object and then duplicate the Smart Object, when you edit the contents of the Smart Object (to change the color or corner radius of the shape for example), all instances of that Smart Object will be updated. This video demonstrates how (the example begins at 8:30).
Applying Path Operation Shortcuts — By default, the shape tools draw a new Shape Layer every time you click and drag with the tool. Use the Path Operations drop-down list in the Options bar in order to add additional shapes to a single Shape Layer. The video below demonstrates how to select, merge, combine and align shapes in Photoshop.
Path Operation shortcuts:
• After starting to draw a second shape (but before releasing the cursor), holding the Shift key adds the newly drawn shape to the current shape layer and combines the two shapes if the two paths overlap (Combine Shapes).
• Holding the Option (Mac) | Alt (Win) and dragging a shape adds a newly drawn shape to the current shape layer and subtracts the new path from the previous shape(s) if the two shapes overlap (Subtract Front Shape). Note: after you start drawing the shape, you can release the shortcut keyboard modifier to drag the shape from the corner instead of the center.
• Holding the Option + Shift (Mac) | Alt + Shift (Win) and dragging a shape adds a newly drawn shape to the current shape layer and displays the intersection of the shapes if the two paths overlap (Intersect Shape Areas). Note: after you start drawing the shape, you can release the shortcut keyboard modifiers.
To apply path operations to shapes after they are created, select the desired shapes (on a single layer) and use the following shortcuts:
• Tap the + (plus) key to Combine Shapes (set the path operation in the Option bar to Combine Shapes).
• Tap the – (minus) key to Subtract the front shape (set the path operation in the Option bar to Subtract Front Shape).
• Tap the * (multiply) key to set the path operation to Exclude Overlapping Shapes. Note: this shortcut requires input from an extended keyboard (shift + 8 does not work).

Path Arrangement — The arrangement of shape/paths (sometimes referred to as their stacking order), as well as path selection is critical when assigning path operations. In the illustration below, the the circles in the first group were drawn from left to right, on a single shape layer with the path operation set to Combine Shapes. In the second grouping, the middle circle was selected and the path operation was changed to Exclude Overlapping Shape. Because path operations only affect paths below the selected path, only the first circle was affected. In the last grouping, the center circle was selected and the Path Operation was also set to Exclude Overlapping Shapes. However, when the center circle’s arrangement (stacking order) was set to the top of the stack (by selecting Bring Shape to Front using the Path Arrangement icon in the options bar) , it then affects both of the circles below it.


The illustration below is my attempt to show the stacking order of the paths in the above illustrations from a “side” view (however all three circles/paths/shapes are on a single layer).
Fill and Stroke attributes — All shapes on a single Shape Layer will have the same Fill and Stroke attributes. To apply different attributes to shapes, put each shape on its own layer by selecting the shape and choosing Layer > New > Shape Layer Via Cut. Or, use the shortcut: Command + Shift + J (Mac) | Control + Shift + J (Win).
Pasting Shapes From Illustrator — If you copy and paste a shape from Illustrator to Photoshop, the results will differ depending on the type of layer selected:
• If a pixel layer is the selected layer in Photoshop, the pasted shape will take on the fill of the foreground color swatch set in the Tool bar.
• If a shape layer is the selected layer in Photoshop, the pasted shape will take on the fill from the Options bar.
Saving Custom Shapes — To save a shape for reuse at a later time, select the shape and Choose Edit > Define Custom Shape to add the shape to your Shapes panel.
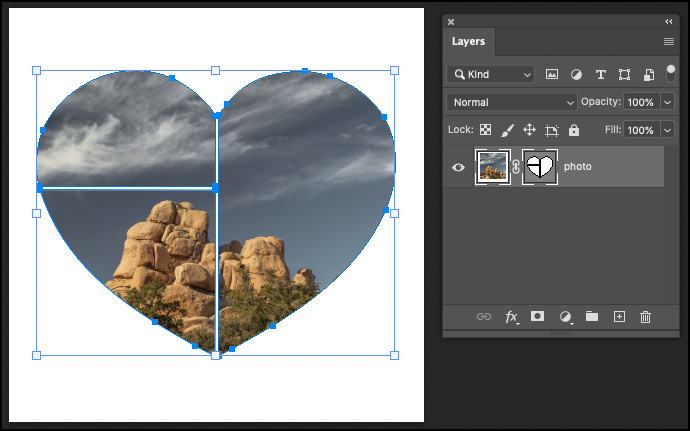
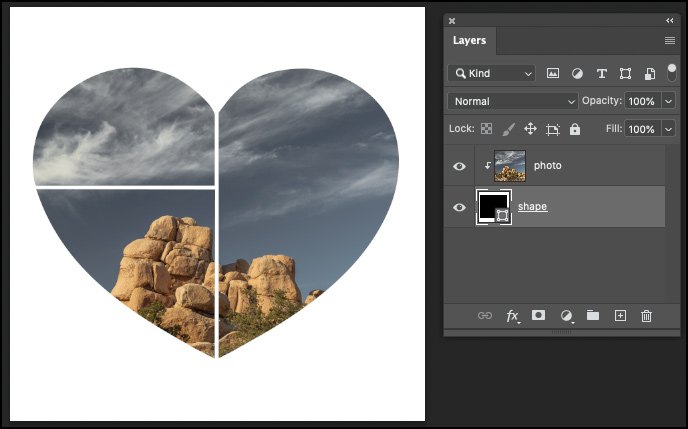
Displaying a Photograph within a Shape or Path — There are several ways to display a photograph within a shape or path in Photoshop.
• This first example uses a Vector Mask to control what portion of the photo is hidden or revealed. To create this effect, select the desired Shape tool and set the shape options (in the Options bar) to create a Path. Drag out the shape (with the photo layer selected) then, choose Layer > Vector Mask > Current Path.
• The second example shows the photo clipped to a shape layer. To create this effect, select the desired shape tool and set the Shape tool options (in the Options bar) to draw a Shape. Drag out the shape, then reposition the Shape Layer in the Layers panel so that the shape is below the layer with the photo. With the photo layer targeted (selected), choose Layer > Create Clipping Mask.
• The third example shows a copy of the photo layer (photo copy) below the shape layer. The photo copy layer has it’s opacity reduced and the shape layer has a drop shadow applied to create an interesting effect.

This quick tip (Masking Images to Shapes and Type) demonstrates how to apply a clipping mask to a Layer Group to display a photograph within type and shapes (while keeping both the type and graphics as well as the photograph re-editable).
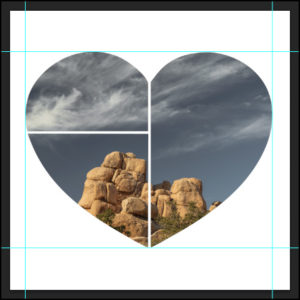
Create New Guides from Shape — To create new guides based on the bounding box around a Shape Layer, select the Shape layer and choose View > New Guides From Shape. Note: you can also create guides around Type layers and pixel based layers.
Snap Vector Tools and Transforms to Pixel Grid — If you Zoom into an image above 500%, a Pixel Grid is automatically displayed on top of the image. By default, Photoshop “snaps” shapes drawn with the Shape tools (as well as shapes drawn with the pen tools) to the Pixel Grid. This prevents the creation of soft, anti-aliased edges on shapes such as rectangles and can help when precise alignment of shapes is required. Note: If you need to disable the “snapping” behavior for any reason, choose Preferences > Tools > Snap Vector Tools and Transforms to Pixel Grid and uncles the preference. To toggle the Pixel Grid off, uncheck Pixel View under View > Show >Pixel Grid.
The illustration below demonstrates three options for shape alignment:
• The first shape was drawn with the Snap Vector Tools and Transforms to Pixel Grid preference enabled. As a result, all sides of the rectangle are solid. Note: even though the initial rectangle shape might not have been drawn in perfect alignment to the pixel grid, Photoshop automatically snapped the rectangle shape to that grid because the preference was enabled.
• The middle illustration was drawn with the Snap Vector Tools and Transforms to Pixel Grid preference disabled. This resulted in anti-aliased edges (varying levels of opacity) because the rectangle shape was not perfectly aligned to a pixel edge when the rectangle was drawn.
• The final illustration is the same rectangle as in the second illustration (the Snap Vector Tools and Transforms to Pixel Grid preference was disabled), however the Align Edges option (in the Options bar) was enabled for the rectangle shape layer. Enabling the Align Edges option “jumped” the fill of the rectangle to the nearest pixel grid (you can still see that the original shape (the black path), is not aligned to the pixel grid, but the fill is being forced to Align Edges to the edges of the pixel grid). The Align Edge option is a convenient way to align objects to the pixel grid on a “per shape layer” basis if you need to disable the Snap Vector Tools and Transforms to Pixel Grid preference for some reason.

Adding a Gradient Stroke on a Shape Layer — When adding a Gradient stroke to a shape layer, Photoshop simply draws a gradient and then displays it within the width of the stroke. You can change the look of the gradient by changing the style (Linear, Radial etc,), but if you want a gradient to be applied either along a stroke or across a stroke, then you might want to step into Illustrator. The following graphic shows the different ways that Photoshop and Illustrator can apply strokes to shapes.
This video (New Features and Enhancements to Shape layers in Photoshop CS6) is also quite useful if you prefer to see a video of several of the tips mentioned above).
Awesome! What a great post, it’s clear that a lot of work has gone into it.
There are some things I didn’t know – thank you so much for sharing this information. It is not easy at all to come across this kind of things on the Internet (but, of course, we’re always counting on you to reveal these secrets to us! 😊).