When editing multiple images in Lightroom Classic, there are several ways to apply those same settings (or a subset of settings) to additional photographs. In this post, I’ll cover the most common methods for batch processing and include shortcuts to help streamline the workflows.
Apply Previous Settings
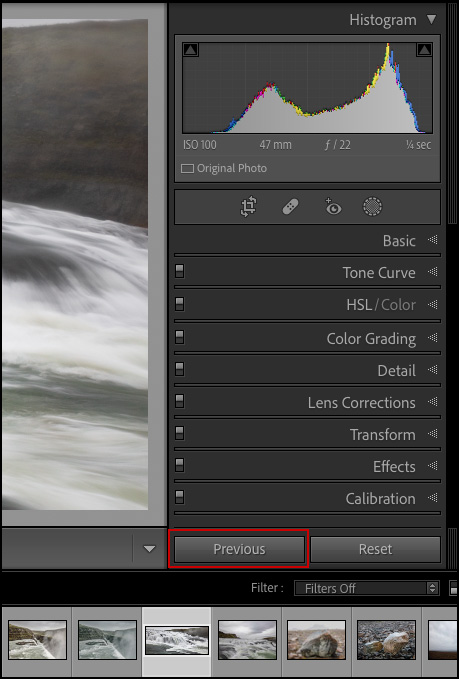
While in the Develop module, you can copy all the settings of the photo you last selected in the Filmstrip and apply them to the currently selected photo by clicking the Previous button or by using the shortcut Command + Option + V (Mac) | Control + Alt + V (Win). Note: When multiple photos are selected in the Filmstrip, the Previous button in the Develop module toggles to the Sync button.
Copy and Paste Settings
While in the Develop module, make the desired edits to the selected image then, click the “Copy…” button (or use the shortcut Command + C (Mac) | Control + C (Win)). In the Copy Settings dialog, choose the attributes to copy and click Copy. Then, click the “Paste” button (or use the shortcut Command + V (Mac) | Control + V (Win) to paste the copies settings.

Depending on your workflow, it might also be helpful to copy commonly used settings and then paste them to select images as you edit a shoot. For example, to add a vignette to images as you move through editing a shoot, simply add the vignette to the first image, then copy the Vignette settings and as you move from image to image, paste the vignette settings to the images that need it.
Sync Settings
After making changes to an image in the Develop module, select additional images and click the “Sync’” button (or use the keyboard shortcut Command + Shift + S (Mac) | Control + Shift + S (Win)) to display the Synchronize Settings dialog. In the Synchronize Settings dialog, choose the attributes to copy and click Synchronize.
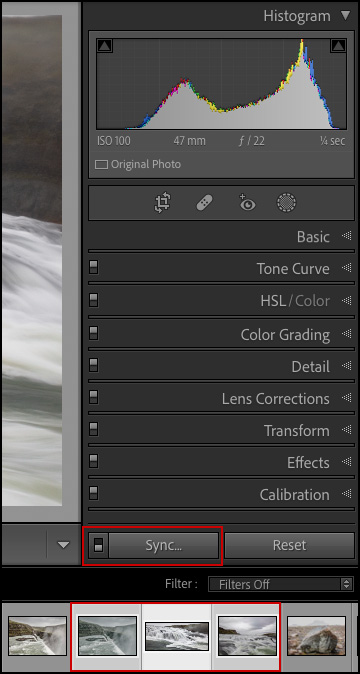
Note: you must have multiple images selected for the Sync button to appear (when only a single photo is selected in the Filmstrip, the Sync button in the Develop module toggles to the Previous button).
Sync Files with Previous Image’s Copied Settings
Option -click (Mac) | Alt -click (Win) the Sync button to copy the settings from the selected image – that were last copied in the Copy Settings dialog AND paste the settings to all selected images. Because the Synchronize Settings dialog is not displayed with this shortcut, it requires that you remember which attributes you copied in the Copy Settings dialog but it can save a lot of time if you’re moving through a shoot and have to modify a settings (such as white balance) for several different “groups” of images.
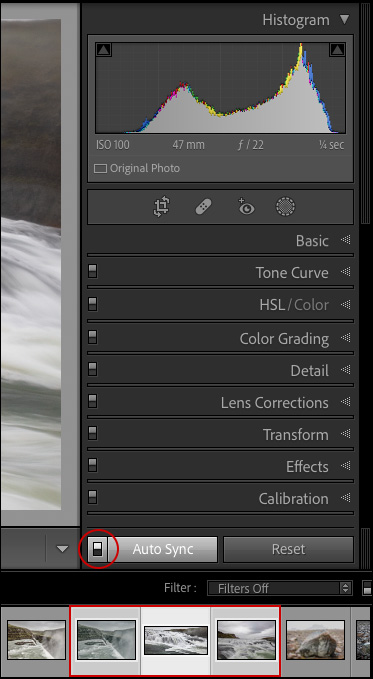
Auto Sync
With multiple images selected in the Develop module, click the Enable Auto Sync switch on the left side of the Sync button to enable Auto Sync mode (or use the shortcut Command + Option + Shift + A (Mac) | Control + Alt + Shift + A (Win). With Auto Sync enabled, any changes made (dragging sliders, applying profiles, adding presets etc.) to the selected image will be automatically be applied to ALL of the images selected in the filmstrip. Note: you must have multiple images selected to use Auto Sync. With Auto Sync enabled, a message will appear when changes are made to multiple images (the message can be disabled in Preferences -> Interface > Show Auto Sync Notifications).
Auto Sync is a powerful feature; just don’t forget to toggle it off when finished or you may inadvertently apply unwanted changes to multiple, selected images. If you discover that you’ve accidentally auto-synced settings to multiple images (and you’ve just made the changes), you can use the Undo command (multiple times if necessary), to remove them. If however, you have made a number of changes to the primary image that you want to keep (or if you made the changes some time ago), then you could disable Auto Sync, select each of the images that you inadvertently changed, and use the History panel to move back one step in time. Your decision will probably be based on whether it will take you more time to reset the images you didn’t mean to change, or redo the changes you made to the primary image.
Applying Settings from the Library Module
While in the Library module, you can apply Develop settings from one image to another by selecting:
- Photo > Develop Settings > Copy Settings
- Photo > Develop Settings > Paste Settings
- Photo > Develop Settings > Paste Settings From Previous
- Photo > Develop Settings > Sync settings
Resetting Images
Command + Shift + R (Mac) | Control + Shift + R (Win) resets an image to the default settings.
In this Quick Tip (Applying Changes to Multiple Images in Lightroom Classic), you see how easy it is to apply Develop setting to multiple images at once using the Previous, Copy, and Paste buttons.