The Background Layer
- Clicking the lock icon next to the Background layer on the Layers panel converts the Background to a layer enabling transparency, repositioning in the image area and changing the stacking order.
- Double click the Background layer to display the New Layer dialog for additional options (renaming, color coding etc.).
Renaming Layers
- To rename a single layer, double click the layer’s name in the Layers panel.
- To rename multiple layers, rename one and then, without pressing the enter key to apply the new name, press the Tab key to move to the layer below. Shift + Tab moves to the layer (above).
Adding New Layers to a Document in Photoshop
- Command + Shift + N (Mac) | Control + Shift + N (Win) will add a new layer and display the New Layer dialog for additional options (layer name, blend mode etc.).
- Command + Option + Shift + N (Mac) | Control + Alt + Shift + N (Win) adds a new layer bypassing the New Layer dialog.
- By default, new layers are added above the currently selected layer. Command -click (Mac) | Control -click (Win) the New Layer icon (on the Layers panel) to create a new layer below the currently selected layer. This shortcut is helpful for example, when adding a layer that you don’t want to be included in a Clipping Group.
Deleting Layers
- To delete a layer(s), select it in the Layers panel and tap the delete key.
- To delete hidden layers from the Layers panel, use the fly-out and select Delete Hidden Layers.
Duplicating Layers
- With the Move tool selected, Option -drag (Mac) | Alt -drag (Win) a layer in the image area to duplicate (copy) the selected layer(s).
- To duplicate a layer using the Layers panel, select the layer(s) and Option -drag (Mac) | Alt -drag (Win) the layer until a solid line between the layers appears and release.
- Command + J (Mac) | Control + J (Win) duplicates the selected layer(s). Note: this shortcut works for Layer Groups as well.
- To prevent Photoshop from adding “copy” and a sequence number to a duplicated file name, use the Layers panel fly-out menu to select Panel Options and uncheck Add “copy” to Copied Layers and Groups.
Drag and Drop Between Open Documents
- To duplicate layers from one document to another, select the layers in the Layers panel and drag from one document window to another. When the “destination” document becomes highlighted, release to “drop” the layers.
- Holding the Shift key while dragging and dropping a layer(s) between two documents will place the “dropped” layer(s) into the center of the destination document. If there is a selection in the destination document, holding the Shift key while dragging and dropping an image will drop it into the center of the selection.
- When working with tabbed documents, use the Move tool to drag layers from the image area or the Layers panel, on top of the “destination” document’s tab. When the “destination” document pops forward, position the cursor over the image area and release to “drop” the layers.
Changing the Blend mode of a Layer
- To quickly cycle through a the Blend Modes select the Move tool (or any tool that does not have Blend Mode options), hold the Shift key and press “+” (plus) or “-” (minus) to move forward or backwards through the list.
- In addition, each blend mode has a unique keyboard shortcut. They all begin with Option + Shift (Mac) | Alt + Shift (Win) then a single letter.
- Normal + N
- Dissolve + I
- Behind + Q
- Clear + R
- Darken + K
- Multiply + M
- Color Burn + B
- Linear Burn + A,
- Lighten + G
- Screen + S
- Color Dodge + D
- Linear Dodge + W
- Overlay + O
- Soft Light + F
- Hard Light + H
- Vivid Light + V
- Linear Light + J
- Pin Light + Z
- Hard Mix + L
- Difference + E
- Exclusion + X
- Hue+ U
- Saturation+ T
- Color + C,
- Luminosity + Y
Changing the Opacity of a Layer(s)
- To change the Opacity of a layer(s), select the Move tool (or any tool that does not have Opacity options), and press a numeric key to add the percentage of the pressed number. (1 = 10%, 2= 20% etc. and 0 = 100%).
- Pressing two numbers quickly will give you that exact amount (5 + 4 = 54%).
- Pressing 00 (zero-zero) decreases the opacity to 0%.
- Adding the Shift key will change the Fill amount.
Toggling Layer Visibility in Photoshop
- Clicking the eye icon next to any layer on the Layers panel will hide/show the layer.
- Option -click (Mac) | Alt -click (Win) the eye icon in the Layers panel to toggle visibility of all other layers.
- Command + “,” (comma) (Mac) | Control + “,” (comma) (Win) toggles the visibility of the currently selected layer(s).
- Command + Option + “,” (comma) (Mac) | Control + Alt + “,” (comma) (Win) shows all layers (regardless of which layers are selected).
- Control -click (Mac) | right -click (Win) the eye icon and select “Show/Hide all other layers” to make all layers visible (regardless of which layers were previously visible).
- If you often toggle the visibility of layers but don’t want them to count as a step in history, use the History panel’s fly-out menu to select History options and uncheck “Make Layer Visibility Changes Undoable”.
Zoom to Layer Content
- To maximize the use of the canvas and make editing easier, Option -click (Mac) | Alt -click (Win) on a layer will zoom to the contents of the layer to the screen. Option -click (Mac) | Alt -click (Win) on a Layer Group to zoom to fit the Layer Group’s content on the screen. Note: if multiple layers are selected, Option -click (Mac) | Alt -click (Win) on a layer first deselects other layers. Option -click (Mac) | Alt -click (Win) a second time to zoom to that layer’s contents.
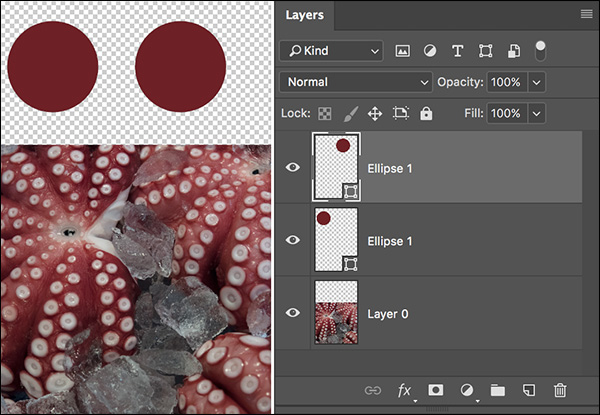
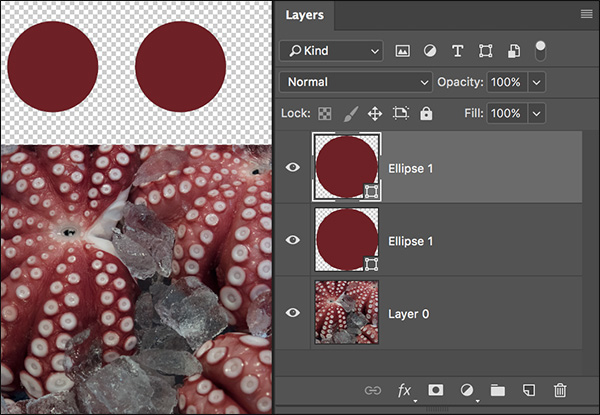
Merging Layers
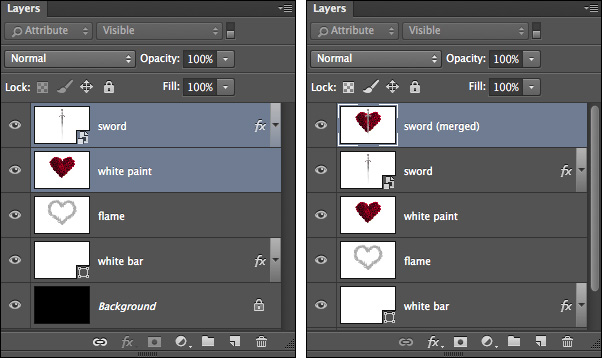
- Command + E (Mac) | Control + E (Win) will merge selected layers.
The three selected layers are merged into a single layer.
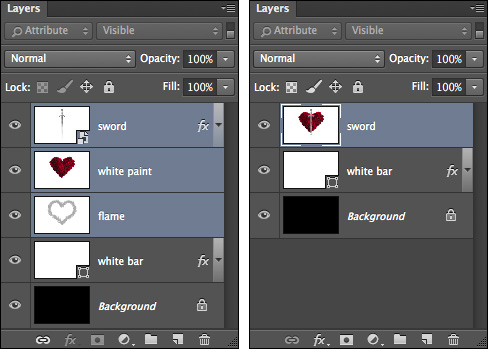
- Command + Shift + E (Mac) | Control + Shift + E (Win) will merge all visible layers (hidden layers will remain untouched).
The top two Layers aren’t merged because they are hidden.
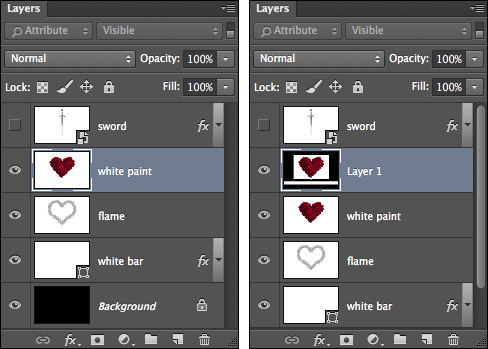
- Command + Option + E (Mac) | Control + Alt + E (Win) creates a new layer and pastes a “flattened” version of the selected layers on it (the key to this shortcut is that you have to have multiple layers selected)!
A flattened copy of the two selected layers are merged onto a new layer.
- Command + Option + Shift + E (Mac) | Control + Alt + Shift + E (Win) does one of two things:
- If the top most layer in the Layers panel is an empty (blank) layer, Photoshop will create a flattened copy of all visible layers and place the merged/flattened information onto the top layer.
- If the top layer in the Layers panel has content (is not empty/blank), then Photoshop will create a new layer and merge a copy of all visible layers onto the newly created layer.
A flattened copy of all visible layers is merged onto a new layer (regardless of what layer(s) is selected).
- When Merging layers, if any of the layers that are going to be merged have been manually renamed (i.e. you renamed them), Photoshop will keep that custom layer name and use it as the new merged layer name. If you have created custom names for multiple layers that are all being merged together, then Photoshop will take the top-most custom named layer.
Copying Merged Layers (and Groups)
- Command + Shift + C (Mac) | Control + Shift + C (Win) with an active selection in the image, copies a merged view of all visible layers onto the clipboard.
- Option + Command + Shift +E (Mac) | Alt + Control + Shift +E (Win) pastes a merged copy of all visible layers on a (single) new layer above the topmost currently selected layer.
Color Coding Layers
- Control -click (Mac) | Right -click (Win) on a selected layer(s) and choose a highlight color from the context sensitive menu. Note: the Background must be converted to a layer to color-code.
Layer Thumbnail Preview Options
- To change Layer thumbnail size, from the Layers panel fly-out choose Panel Options. Choose a large size to more easily see the contents of the layer. Choose a small size to see more layers in a complicated document. Note: if your image is wider than it is high, selecting the smaller thumbnail sizes might display the generic icon for Adjustment layers).
- Change Thumbnail Contents – select “Layer Bounds” to display a preview image of only the area in the layer that contains content – this option typically provides a larger preview of layers containing minimal content, Select “Entire Document” to display the layer content in relationship to the entire document (this option typically provides a smaller preview of layers containing significant areas of content.
Thumbnail Content set to Entire Document.
Thumbnail Content set to Layer Bounds.
Locking and Unlocking Layers
- Several layer attributes can be locked including Transparent Pixels, Image Pixels, and/or Position
- Locking Transparency enables editing of image information but not transparent areas.
- Locking the Image Pixels prohibits any pixel editing (painting etc.).
- Locking Position prevents the layer from being moved.
- Command + / (Mac) | Control + / (Win) toggles between locking and unlocking all selected layers.
- Command + Option +/ (Mac) | Control + Alt + / (Win) unlocks all layers (except the Background layer), regardless of which layers are selected.
- If a layer has locked attributes, pressing the “/” key will toggle the lock for those attributes (instead of toggling the lock for all attributes). If the layer was unlocked to begin with, then all attributes will be locked.
Linking Layers
- When layers are linked together, commands applied to one layer will also be applied to linked layers (when possible). Linking can be helpful when working with complex documents in eliminating the need to have to reselect layers again and again when multiple layers require identical changes.
- To link two or more layers, select them in the Layer’s panel and click the Link icon.
- For increased efficiency, assign a custom keyboard shortcut to Link/Unlink Layers (Choose Edit > Keyboard Shortcuts. In Shortcuts For, select Panels, Menus. Then under Layers, scroll down to Link/Unlink Layers.)
- Shift-click on the link icon to temporarily disable linking of a given layer.
- The rules for linking layers are a bit complex because Layers can only belong to one link set at a time. They are as follows:
- Selecting a layer that is linked will show the link icon on all the other layers to which it is linked.
- To unlink a single layer from a link set, simply select the layer and click the link icon. If there were other linked layers, they remain linked.
- If none of the layers selected contain linked and you click the link icon, all layers become linked – creating a new link set.
- If the layers selected contain only linked layers, regardless of whether they’re all in the same link sets, clicking the link icon unlinks everything selected.
- If the layers selected contain at least some linked layers within the selection, plus any number of unlinked layers, clicking the link icon extends the link set to include the unlinked layers in the selection.
- If the layers selected contains linked layers from two or more link sets plus at least one unlinked layer, everything in the selection gets put into a “new” linked set.
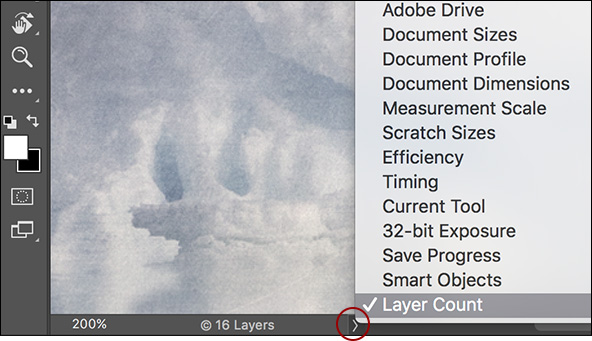
Layer Count
- To quickly view the number of layers in a document, click the chevron to the right of the status box (at the bottom of the image preview area) and choose Layer Count.
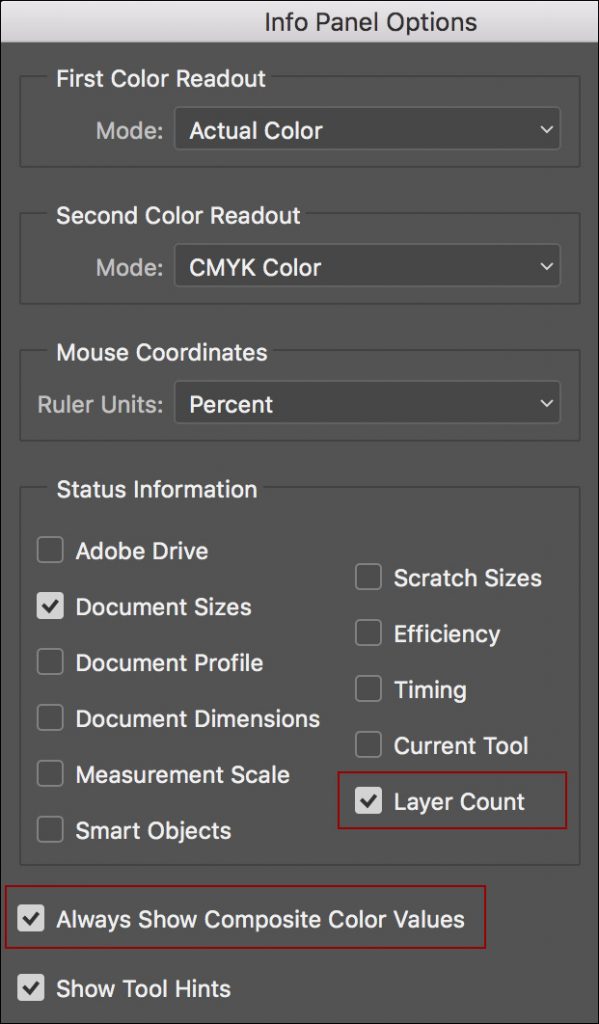
To Display the Layer Count in the Info Panel, use the flyout menu to enable Layer Count.
Hi Julieanne – a great resource, as always!
I do have a question though – you mention the following shortcuts for blend modes, both of which are new to me:
Behind + Q
Clear + R
Can you explain what these modes/functions do, and under what circumstances are they active? I cannot get either to work in PS so far, I just get the ‘ding’ sound for an invalid command.
Thanks!
Sorry, those only work with certain tools – try using them with the eraser or some of the other painting tools that have those blend modes…