In the video below, you’ll learn everything you need to know to create a beautiful book using Lightroom Classic’s Book Module.
In addition, below are some of my favorite tips, tricks and shortcuts for quick reference.
Preferences — In the Book module, Book > Preferences controls the default Photo Zoom, Auto Fill, and Text options.
Book Module Supported Output Formats — The Book module supports Blurb Photo Books, Blurb Magazine, Blurb Trade Books, PDF and JPEG Each option has several options for size, cover, paper type and the addition of a logo page for a price discount.
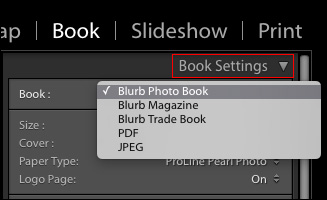
- Photo Books are a an excellent way to present your work and I’ve found the quality to be quite high. In fact, I create a book at the end of each year as a way to review my photography. Photo Books can also support Layflat paper.
- Magazines provide a high-end look with semigloss cover and velvet finish paper.
- Blurb Trade Books are affordable books ideal for distribution.
The Maximum number of pages a book can contain is 240.
Navigation and Page View Shortcuts
- Left/right arrow keys move between pages (or spreads depending on view).
- Command + Shift + left/right arrow keys (Mac) | Control + Shift + left/right arrow keys (Win) moves to the first or last page.
- Plus/minus ( +, – ) increases/decreases page thumbnail size.
- “I” toggles the book information overlay.
- Command + E (Mac) | Control + E (Win) displays Multi-Page view.
- Command + R (Mac) | Control + R (Win) displays Single Spread view.
- Command + T (Mac) | Control + T (Win) displays Single Page view (double clicking a page also views a single page).
- Command + U (Mac) | Control + U (Win) displays Zoomed Page view.
- Command “+” and “-” (Mac) | Control “+” and “-” (Win) toggles through View modes.
Showing and Hiding Guides
- Command + Shift + G (Mac) | Control + Shift+ G (Win) toggles all selected options in the Guides Panel.
- Command + Shift + J (Mac) | Control + Shift + J toggles Page Bleed.
- Command + Shift + U (Mac) | Control + Shift + U toggles Text Safe.
- Command + Shift + K (Mac) | Control + Shift + K toggles Photo Cells.
Snap to Grid — To make it easier to align multiple photo cells (or Photo Description cells) on a page, in the Guides panel, choose between Grid Snap: “Grid” and “Cells”.
Making Selections
- Command + Option + A (Mac) | Control + Alt + A (Win) selects all text on page (or pages depending on view).
- Command + Option + Shift + A (Mac) | Control + Alt + Shift + A (Win) selects all photos on page (or pages depending on view).
Working with Text — To place text anywhere on a page Right -click (or Control -click Mac) and choose Photo > Photo Description.You can also use the Page Text option in the Text panel to add text to a page. Reposition the text using the top/bottom button and the offset slider. Further refine the text position with in the cell using the Padding options in the Cell panel.
With the Targeted Adjustment Tool selected:
- Drag left/right to decrease/increase text Size.
- Drag up/down to decrease/increase Leading.
- Command -drag up/down (Mac) | Control -drag up/down (Win) to increase/decrease Baseline Shift.
- Command -drag left/right (Mac) | Control -drag left/right (Win) to increase/decrease Tracking.
- Right -click (or Control -click Mac) the font menu to add favorite fonts.
Adding Text to the Spine — When creating soft-cover books, you need to have a certain thickness to the book before you can add text to the spine. The limit differs based on the paper type:
- Premium Lustre and Premium Matte paper – 84 pages.
- ProLine Uncoated and Pearl Photo paper – 70 pages.
- Standard paper (a more economical yet lighter weight paper). – 114 pages
- If you still can’t add text to the spine, it might be because your the point size of the text to too large (reduce it using the Text panel) or, it might be because the cell padding has been changed and the text won’t fit within the padding. In order to change this, reduce the padding values in the Cell panel.
- To vertically center text on the spine, enter your text, then in the Type panel, click the Vertical Align Center icon.
Note: hardcover books (Hardcover Dust Jacket and Hardcover Image Wrap) can have text on the spine regardless of the number of pages.
Page Numbering Options — In the Page Panel, enable Page numbering, then use the pull down menu to select a position (Top Corner, Bottom Corner, Top, Side, Bottom). For Display, choose Left and Right, Left, or Right.
- To change the start page for numbering, Right -click (or Control -click Mac) in a page and choose Start Page Number. Lightroom defaults to starting the page numbering on the first non-cover page.
- Right -click (or Control -click Mac) in a page to change the appearance of page number either globally or locally.
- Right -click (or Control -click Mac) in a page to hide a page number on a specific page.
Special Image Filter Options — Select “Used” or “Unused” from the Filter presets (in the black bar above the filmstrip), to view images that have/have not been added to the book. In addition, the filmstrip will display a count of how many times an image is used in within a book.
Creating Custom Layouts
- Drag and drop a photo from the filmstrip (or from any photo cell), to a page to automatically create a new cell for the photo.
- Reposition any cell (Text or Photo) anywhere on the page by dragging the center anchor point.
- Change the size of a cell by dragging any of the eight anchor points surrounding the cell.
- Dragging slightly within the cell border to change the cell padding.
- Right -click (or Control -click Mac) on a page and choose Add Cell > Photo or Photo Description to add new cells to a page.
- Right -click (or Control -click Mac) on a page and choose Remove Selected Cell to delete an unwanted cell.
- Nudge cells into position using Option + left/right/up/down arrow keys (Mac) | Alt + left/right/up/down) arrow keys (Win).
- After making modifications to a page template, Right -click (or Control -click Mac) and choose Save as Custom Page.
- Apply custom pages using the Page Picker (from the Custom page category).
- Custom pages are specific to Book settings (size/dimensions) and file format (Blurb/JPEG/PDF).
Changing the Stacking order of Images — If cells overlap, change the stacking order (z-plane) by right -clicking in the cell and choosing one of the following:
- Send To Back – sends the cell to the lowest level in the stacking order.
- Send Backward – sends the cell one level down in the stacking order.
- Bring To Front – sends the cell to the highest level in the stacking order.
- Bring Forward – sends the cell one level up in the stacking order.
Adding Pages to Favorites — Position the cursor over a page in the Page Picker and click the circle icon to add the page to the list of Favorites.
Saving Book Projects — In order to save output settings with a set of images, click Create Saved (Book/ Print/Slideshow/Web) in the bar at the top of the creation’s preview area (or use the shortcut Command + S (Mac) | Control + S (Win) .
Reordering Images — Reorder images in the Output modules by dragging them in the Filmstrip. Note: The Book must first be saved.
Sharpening — Sharpening is automatically be adjusted for increases/decreases in image size within the Book.
Adding Additional Images to a Saved Book Project/Collection — After saving a book project, return to the Library module to quickly add or remove images to the saved Book Collection. I find it easiest to add additional images by Right -clicking (or Control -clicking Mac) on the Saved Book Project and selecting Set as Target Collection. Then, I navigate to the image(s) that I want to add, select them, and tap the “B” key to add them to the targeted collection. Once they are part of the Saved Book Collection, return to the Book module and drag and drop them into your book layout. Note: if you are sorting by User Order, Lightroom will add the image(s) at the end of the collection.
Duplicating Book Projects — To create a duplicate of any saved project (to create another book with the same layout but different images for example), Option-drag (Mac) | Alt-drag (Win) the collection in the Collection panel until you see a gray highlight and then release the cursor.
Working with Metadata — While you can add text directly in the Book module, if you add Metadata (such as Captions and Titles) to images in the Metadata panel in the Library Module, they can be set to auto populate in the Book module if you set the Photo Text to the specific metadata that you want it to use (Title, Caption etc.). After making changes to Captions/titles etc. in the Library module, choose Book > Update Metadata Based Captions. The book module will update any changes.
Deleting Pages — To delete a page (or pages) select the page(s) and Right -click (or Control -click Mac) and choose Delete Page.
Pause (and Resume) during Upload — Use the Activities Center to pause/resume the upload of cover and pages with in a session while uploading to Blurb.
Exporting a Book to JPEG — This video shows how to output your book to JPEGs.
Thank you so much for all this free information! One thing I haven’t found is how to create a custom size photobook. My photobook provider accepts PDF-files but they have to be a specific size that I don’t find in the available presets. Is ist possible to adjust the page size to a custom setting (i.e. 205 mm x 205 mm)?