Here are my favorite tips for working with color in Photoshop.
1) The Foreground / Background Color Picker
• Tap the “D” key to set the foreground/background colors to black/white. If a Layer mask is selected, tapping the “D” key will set the foreground/background colors to white/black.
• Tap the “X” key to exchange the foreground and background colors on the tool bar.
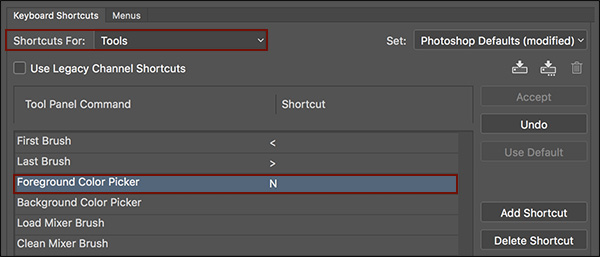
• To display the Foreground/Background color picker using a keyboard shortcut, choose Edit > Keyboard Shortcuts. Under “Shortcuts For”, select “Tools” and scroll the to (almost) the bottom of the list to locate the Foreground Color Picker or Background Color Picker line item. Click to the right of the item and enter a own custom keyboard shortcut. Note: “N” and ”K are not assigned to tools in Photoshop’s default set.
2) The Color Panel
• The Color panel can be enlarged (drag the bottom of the panel), to make color selection easier and more accurate.
• Select Hue Cube from the Color panel’s fly-out menu to make it look similar to the Foreground Color picker ‘s default state.
• To change the color sliders on the Color panel, click the panel’s drop down menu and select from Grayscale, RGB, HSB, CMYK, LAB, or Web Color Sliders.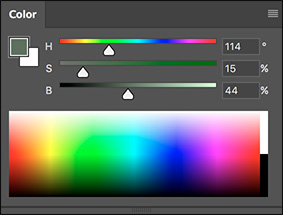
• Shift -click on the Color panel’s color ramp to cycle through the available color modes.
• Use the Color panel’s fly-out menu to either Copy Color as HTML or Copy Color’s Hex Code.
• If you have ever tried selecting a new foreground color using the eyedropper tool only to have the background color updated, make sure that in the Color panel you have the foreground color swatch selected. If, for some reason you have selected the background color swatch, every time you use the eyedropper it will update the background color!
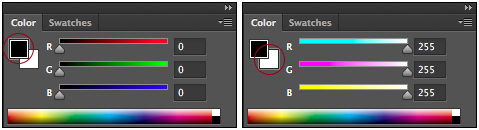
On the left, the Foreground color swatch is selected in the Color panel and has a thin highlight surrounding it. On the right, the Background color swatch is selected.
3) The Swatches Panel
• Recently used colors are displayed across the top of the Swatches panel. Hover the cursor over a swatch to display the color name or color value in a tool-tip.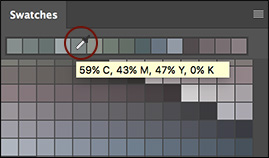
• Right -click (or Control click on Mac) on a color swatch to delete, rename, create a new swatch etc. using the context sensitive menu.
• While viewing the Swatches panel in thumbnail view ( Tiny, Small, or Large), positioning the cursor over a gray, empty swatch area and clicking will add a new swatch based on the currently selected foreground color (the icon swaps to the paint bucket icon).
• Photoshop has two options for saving swatches from the Swatches panel:
• Choose Export Swatches (.aco) to save a set of color swatches to be used in Photoshop.
• Choose Export Swatches for Exchange (.ase) to save a set of color swatches to be loaded into Illustrator and InDesign.
• Swatches can be saved to any location, however swatches saved to the default location (User > Library > Application Support > Adobe > Adobe Photoshop (year) > Presets > Color Swatches will appear automatically from the Swatches panel’s drop down menu.
• To load swatch files from an HTML, CSS, or SVG Document, use the flyout menu on the Swatches panel to choose Import Swatches. Then, navigate to any HTML, CSS, or SVG document and Photoshop will find all of the colors used in that document and load them as swatches.
Note: color swatches can also be saved in the Libraries panel. One advantage of using the Libraries panel, is that stored content is automatically synchronized between multiple installs of Photoshop using the same Adobe ID (for example, your work and home computers). In addition, Libraries can be shared with others using the fly-out menu and selecting Invite People or Get link.
4) The Heads-Up-Display (HUD) Color Picker
• Control + Option + Command -click (Mac) | Shift + Alt + right-click with a painting tool selected to display the HUD color picker.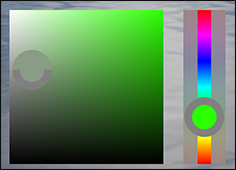
• The HUD can be displayed as either a strip or a wheel (select the shape and size from Preferences > General HUD Color Picker).
• When selecting colors you’ll quickly discover that you will need to jump from one portion of the HUD interface to another. To do so, continue to hold the mouse down while releasing the shortcuts keys and press the spacebar. The spacebar freezes the selection of the color and allows you to “jump” from the strip or wheel to the Hue/Saturation area (or vice versa) in order to refine one with out moving the other. This shortcut is a bit tricky when you first start using it, but makes the HUD color picker infinitely more useful.
5) Finding the Average Color
• Filter > Blur > Average finds the average of all of the colors in an image (or in a selection) and fills the entire image (or selection) with that color.
6) Inverting the Hue of the Currently Selected Foreground Color
This JavaScript inverts the foreground color in Photoshop. To install:
Click on the link ( InvertForeGroundColor.jsx ) to download and unzip the file.
Quit Photoshop.
Place the script in Applications/Adobe Photoshop CC 2017/Presets/Scripts folder.
Launch Photoshop.
Select a foreground color.
Choose File > Script > invertForeGroundClor
To make it easier to access, assign a keyboard shortcut to the script (Edit > Keyboard Shortcuts, selecting Shortcuts For: Application Menus and scrolling down to File >Scripts >InvertForeGroundClor
7) Using Color to Add Emotional Impact to a Photograph
In this Episode of the Complete Picture Julieanne discusses how the addition of color as well as supporting imagery can help reinforce the mood and message of a composite image that a single photograph may fail to do on it’s own. AfiBD0Ax4uw
8) Learn Eight Easy Ways to Select Colors in Photoshop
In the video below, you’ll discover how to select color in Photoshop using the eyedropper tool, foreground, background and heads-up-display color picker.