The Blur Gallery filters (Field Blur, Iris, Tilt-Shift, Path, and Spin) are incredibly powerful features that can help selectively blur a photograph in order to remove distracting elements, help direct the viewers eye through an image, or just add creative effects! To apply these filters in a nondestructive manner, I would recommend that you first convert the layer(s) to Smart Objects before applying the filter so that you can:
- Re-edit the parameters of the filter at any time (by double clicking the name of the filter in the Layers panel).
- Paint in the Smart Filter mask to selectively hide and show the filter.
- Apply a Smart Filter to an entire video clip (not just the first frame).
01) Common shortcuts across Blur Gallery filters
- Press and hold “H” to temporarily hide the Blur interface (pins etc.).
- Press “P” to toggle the preview on and off.
- Press and hold “M” to display the mask.
02) The Tilt-Shift Blur
Option -drag (Mac) | Alt -drag (Win) the dotted line causes the opposite side to mirror the change by repositioning it by the same number of pixels. This means that if the two dotted lined were symmetric before dragging with the keyboard modifier, they will remain symmetric, but if they were previously repositioned (one line was moved 20 pixels and the other was moved 50), then using the modifier will change them both by the same number of pixels.
- When rotating the filter, press the Shift key to constrain the rotation to 15 degree increments.
- Rotate the blur to add distortion to the foreground or background of the image. Or, select Distort Symmetrically to apply distortion to both sides of the blur.
03) The Effects Panel in Blur Gallery
The Effects Panel can apply a bokeh to Field, Iris, and Tilt-Shift blurs.
- Light Bokeh controls the amount of highlights in the blur.
- Bokeh Color increases/decreases saturation.
- Light Range controls the range of light where the bokeh appears.
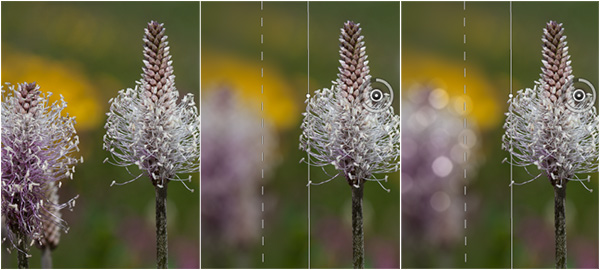
The original image, Tilt-Shift filter applied (blurring the flower on the left), and bokeh added to create circles from highlight areas.
04) The Path Blur Filter
Discover how to add motion blur to images my recent episode of 3, 2, 1, Photoshop! Simuate a Long Exposure using the Path Blur Filter. 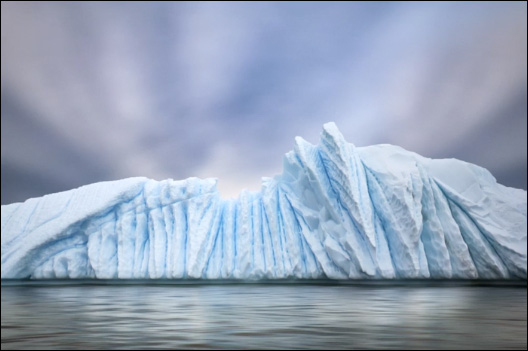
Additional features of the Path Blur filter include:.
- Increase the Taper amount to allow the blur to gradually trail off.
- Enable the Center Blur option to produce a more “stable” looking motion blur (the blur is created using pixels on both sides of the blur). Uncheck to create a more fluid blur (the blur is created from the pixels on one side of the blur).
- Use the End point slider to change the amount of blur independently on each end of the path
- Command -click (Mac) | Control -click (Win) the end of a path to set the End Point blur to 0.
- Add more than one path in an image to selectively blur areas.
- Click on the path to add a point. Click on a point to select it and tap the delete key to delete it.
- Command -click (Mac) | Control -click (Win) on the path (or points) to reposition.
- Option + Command -drag (Mac) | Alt + Control -drag (Win) to copy the path.
- Shift -drag on the Blur Shape path to simultaneously change the direction of both Blur Shapes.
- Option -click (Mac) | Alt -click (Win) an anchor point (on the path) to convert it to a corner point (and vise versa). Pressing “C” also toggles an anchor point between corner and non-corner. (Corner points can be useful for blocking off parts of an image and for creating a sharp motion blur transition: make a path that is straight then add corner point and curve the second line.)
- Select from Basic Blur or Rear Sync Flash (Rear Sync Flash sets the Path Blur settings to: Speed = 100%, Taper = 20% and Centered Blur = Off and the Motion Effects to: Strobe strength = 25%, Strobe flashes = 1).
Below is an additional video demonstrating how to use the Path Blur to create motion effects in an image. Note: the video was recorded before the Noise Panel was added to path Blur – in the current version of Photoshop CC, it would be easier to apply noise in the Blur Gallery.
05) Restoring Noise in Blur Gallery
When applying the blur gallery filters, you have the option to add Uniform, Gaussian, or Grain noise back into the blurred areas in order to closely match the restored noise with the original image.
- Noise – this checkbox turns the Noise on/off. It’s not just a preview, if you turn it off, the noise will not be applied to the result.
- Type – select between Uniform, Gaussian, and Grain (this is the same Grain that is found in Camera Raw).
- Amount – the amount of contrast added to the noise.
- Size – controls particle size for Grain (this is the same control as found in Camera Raw and is not available for Gaussian or Uniform).
- Roughness – controls the regularity of the grain. A negative value makes the grain more uniform, a positive value makes the noise more uneven (this is the same control as found in Camera Raw and is not available for Gaussian or Uniform).
- Color – controls how much color appears in the grain (from monochromatic to highly saturated).
- Highlight – suppresses the application of noise in the highlight areas (for better highlight/shadow matching).
06) Spin Blur
The new Spin Blur filter creates non-destructive, realistic, motion effects including the ability to spin an object at variable angles, as well emulate traditional strobe effects. This video will show you how:
Shortcuts for the Spin Blur filter:
- Option -drag (Mac) | Alt -drag (Win) the center pin to reposition the Rotation point (the center of the spin).
- Command + Option -drag (Mac) | Control + Alt -drag (Win) the pin to duplicate the pin.
07) The Motion Effects Panel in Blur Gallery
Use the Motion Effects panel to emulate traditional strobe effects (including the ability to define the strength, number of flashes and duration)on Path and Spin Blur filters.
- Strobe Strength: determine how much blur will show between flash exposures. (0% Strength = no strobe effect. 100% Strength = high strobe effect, little blur shown between exposures). This simulates the control of balance between strobe light and ambient light.
- Strobe Flashes: Set the number of exposures.
- Strobe Flash Duration: Measured in degrees (º), this allows the user to set the “length” of the flash by setting how much distance on the circumference the blur.
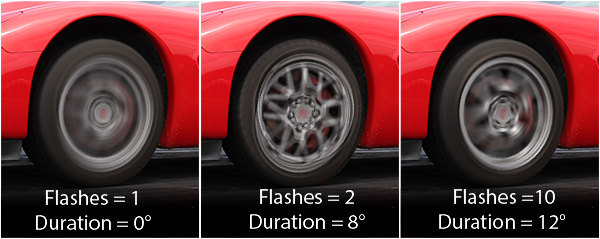
Strobe strength is set to 100% in all three illustrations.
08) Field Blur
Unfortunately, Field blur is one of the least used of the Blur Gallery filters because once a pin is added, it blurs the entire image and at that point, most people dismiss it’s value. However, you can set down additional pins and set each pin’s blur value independently to create differing levels of blur throughout an image.
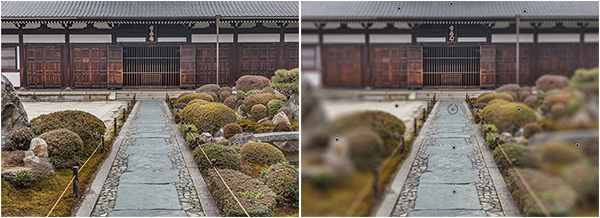
Original image (left), and multiple Field Blur pins set to varying blur amounts (right).
09) Iris Blur
- From the center pin to the “free-floating” solid white dots, no blur is applied. Between the solid dots and the solid white circle is the “transitional” area where the blur is applied over the length of the transition. Beyond the solid white circle, the blur is fully applied.
- Option -drag (Mac) | Alt -drag (Win) the free-floating dots to move independently (thus making the transitional area asymmetrical).
- Drag the large square on the solid circle outwards to create a rectangular shape Iris blur.
- Drag the small white dots on the outer circle to rotate and/or to distort the circle to an oval.
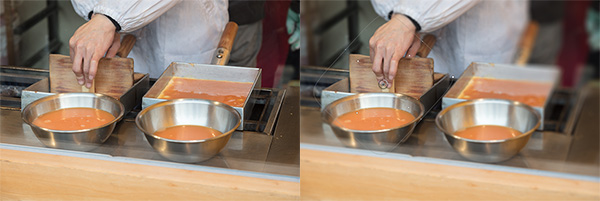
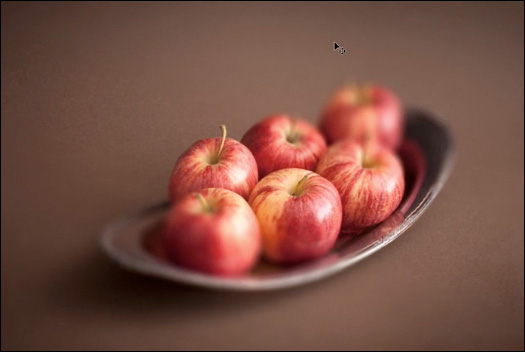
Original image (left), Iris Blur added to soften background and emphasize hand (right).
10) Additional Blur Gallery features
- When working with selections, use the Vary the Selection Bleed to expand the blur into the selection (This feature is disabled when using Smart Objects/Filters and, the selection must be created before selecting the filter).
- Decrease the Focus amount to blur the center of the Iris and Tilt-Shift blurs if you want the image to start slightly out of focus.
- Enable Save Mask to Channel in the Options bar to create an alpha channel when applying the filter. (If the blurs are the same type, or a combination of Tilt-Shift, Iris and Field blurs, Photoshop will create a single unified, intersecting mask.)
- Enable High Quality for smoother rendering when applying bokeh (this feature might decrease performance).
- If you use the Blur Gallery filters often, assign a custom keyboard shortcut (Edit > Keyboard Shortcuts) to the one you use most (this give easy access to the others as well).
- Neither the Blend Mode nor Opacity settings for Blur Gallery can be changed (like you can for other Smart Filters), but you can duplicate the Smart Object before applying the filter and then use the Blend Mode and Opacity settings to blend the filtered / non-filtered layers together.
- When applying Blur Gallery on a multi-layered document, you can see other layers while applying the filter. In addition, you can choose to show your Layers panel while in the Blur Gallery (Window > Layers) to change Opacity, Fill and Blend modes on layer that is being filtered. When finished interacting with your layers, you can choose to hide the Layers panel by selecting “Reset Workspace” from the Blur Gallery workspace (in the upper right of the interface).
Thank you for this Julieann it is mast helpful to me
kate