Here are some tips and shortcuts for working more effectively with Layer Groups:
- To create an empty Layer Group, click the Create Layer Group (the folder) icon at the bottom of the Layers panel. The Group will be added above the currently targeted layer. If no layers are targeted, Photoshop will add the group to the top of the layer stack.
- Command + G (Mac) | Control + G (Win) creates a new Layer Group while simultaneously placing selected layers into that group. The group will be added above the topmost currently targeted layer.
- Command + Shift + G (Mac) | Control + Shift + G (Win) will ungroup layers.
Adding Layers to Layer Groups
- When adding a layer to a Layer Group, Photoshop positions the layer at the top of the layer stack (with in the group).
- Adding the shift key when releasing the mouse will position the layer at the bottom of the stack (within the group).
Repositing Layers
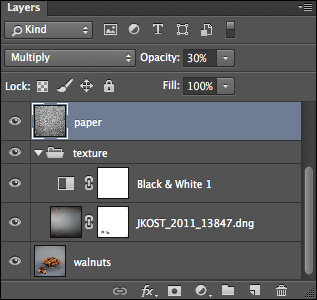
- When changing the stacking order layers in the Layers panel, I found it difficult to predict if the layer I was dragging was going to land within a Layer Group or outside of it. In the example below, I want to drag the “paper” layer above the “walnuts” layer, but I didn’t want to include it within the “texture” Layer Group.
- If you look carefully at the next illustration you can see that the hand icon is positioned over the bottom layer in the Layer Group. If I release the mouse at that point, the “paper” layer would be added within the “texture” Layer Group.
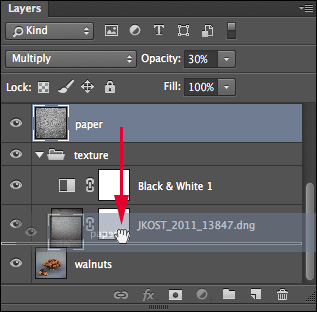
- Instead, if I position the curser a bit lower (below the baseline of the Layer Group), and release the mouse (as it’s positioned in the next illustration), the layer will be repositioned above the “walnuts” layer but not within the “texture” Layer Group.

- Note: Another way to be sure that the “paper” layer wasn’t included in the texture Layer Group would have been to close the Layer Group before repositioning the layer.
Duplicating Layer Groups
- Command + J (Mac) | Control + J (Win) will duplicate the selected Layer Group(s).
- Option -drag (Mac) | Alt -drag (Win) the Layer Group (in the Layers panel) to simultaneously duplicating and repositioning a Layer Group.
- Control -click (Mac) | right mouse -click (Win) on the Layer Group and select Duplicate Group.
Deleting Layer Groups
- With the Layer Group selected, tap the Delete key or Option -click (Mac) | Alt -click (Win) the trash can icon.
- To delete a Layer Group but keep the layers, choose Layer > Delete > Group or click the trash can icon. Either method displays a dialog with an option to delete “Group Only” (which ungroups the layers within the group and removes the Layer Group while leaving the Layers in tack).
- Command -drag (Mac) | Control -drag (Win) a Layer Group to the trash can icon to delete a Layer Group without deleting it’s contents.
Selecting Layer Groups
- To automatically select Layer Groups using the Move tool, enable the Auto-Select box in the Options bar and choose Group from the pull-down menu.
Nesting Layer Groups
- You can nest layer Layer Groups up to 10 groups deep. That should help organize even the most complex documents!
Displaying the Contents of Layer Groups in Photoshop
- Command (Mac) | Control (Win) -click the disclosure triangle next to a Layer Group to expand/collapse all Layer Groups in the document.
- Option (Mac) | Alt (Win) -click the disclosure triangle to expand/collapse all groups nested within the current Layer Group.
- Option + Command (Mac) | Alt + Control (Win) -click the disclosure triangle to expand and collapse all groups (nested or not).
- Control (Mac) | right mouse (Win) -click the Group’s disclosure triangle and choose “Close/Open this Group” or “Close/Open all Other Groups”.
Applying Blend Modes to Layer Groups
- Layer Groups are, by default, set to display blending effects (such as opacity, blend modes etc.) just like any other layer in Photoshop. For example, if a layer in a Layer Group has its blend mode is set to “Multiply”, it will be multiplied (blended) with all other layers below it. In this default state, clicking on the Layer Group in the Layers panel displays “Pass Through” as the Layer Group’s blend mode (i.e: any blending applied to layers within the group is “passing through” the group to be applied to the layers below it).
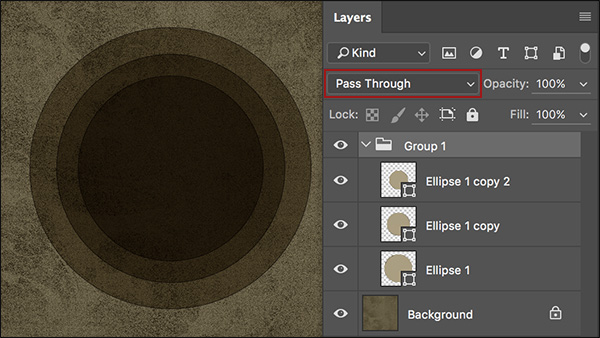
Each Layer’s blend mode is set to multiply. The Layer Group is set to Pass Through.
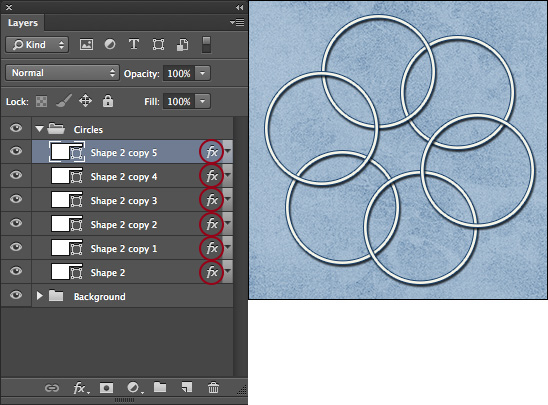
- To change this default behavior and limit the blending between layers to only those layers within the Layer Group, target the Layer Group in the Layers panel and set the Layer Group’s blend mode to “Normal”. Note: the circles are still multiplied within the Layer Group (if each layer was set to Normal instead of multiply, all of the circles would appear the same color, but not the Background because the Background is not in the Layer Group).
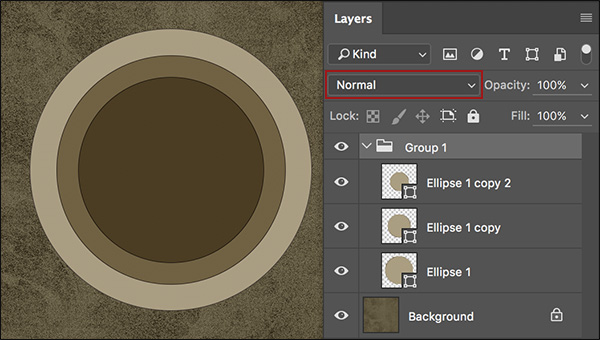
Each Layer’s blend mode is set to multiply. The Layer Group is set to Normal.
Applying Layer Styles or Effect to Layer Groups
- To be more efficient when working with multiple layers, you can drag multiple layers into a Layer Group and add a Layer Style or Effect to the group (instead of to each individual layer). But there is a slight difference that you should be aware of. When you add an Effect/Style to a group, Photoshop treats the contents of the group as if they are merged/flattened before adding the Effect/Style. As long as nothing is overlapping, this is not a problem, and the advantages is that if you want to change the Effect/Style, you only have to change the one on the group (not on each individual layer). Of course this might also be the look that you are trying to achieve!

Layer Effect/Style applied to Layer Group.
- If you do have multiple layers that overlap (and don’t want the effect to appear as if the layers are merged), then you can apply the Effect/Style to one layer and copy/paste it to others. To do this, add the desired Effect/Style. Then, Control -click (Mac) | Right Mouse -click (Win) on the Effect/Style in the Layers panel and choose Copy Layer Style. Then, select all of the other layers and Control -click (Mac) | Right Mouse -click (Win) and paste the effect.
Layer Effect/Style applied to each individual layer.
Adding Masks to Layer Groups
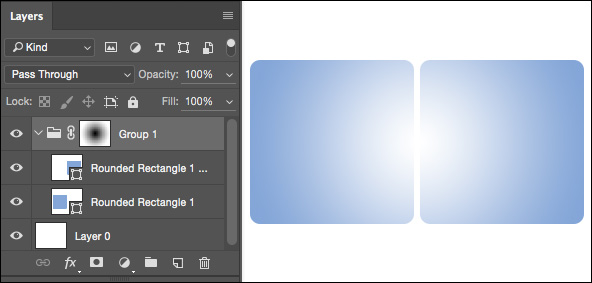
- Not only are Layer Groups great for organizing your layers, they can also be used to mask the contents of multiple layers at one time. With the Layer Group targeted in the Layers panel, click the Add Layer Mask icon from the bottom of the Layers panel. Paint in the mask to control the visibility of all layers within the Layer Group.
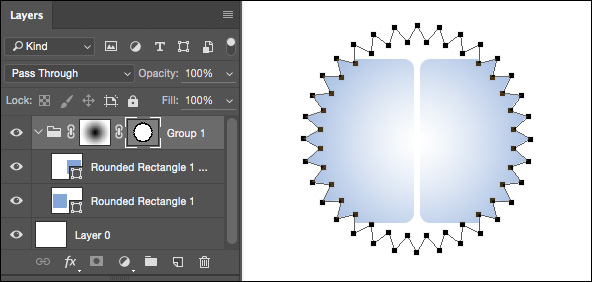
- This shortcut also works with vector masks (and a combination of both vector and raster) as shown below.
Discover eight reasons to use Layer Groups, be sure to watch this episode of 3, 2, 1, Photoshop!
Discover seven tips for working with Layer groups in this episode of 3, 2, 1, Photoshop!
What a cornucopia of layer groups shortcuts.
some other useful ones:
•Command -click (Mac) | Control- click (Win) the Create Layer Group (the folder) icon at the bottom of the Layers panel, to add a layer on top of the currently targeted group.
Adding Layers outside of Layer Groups:
•Command -click (Mac) | Control- click (Win) the add layer icon at the bottom of the Layers panel, to add a group below the currently targeted layer. If no layers are targeted, Photoshop will add the group at the second position from the top of the layer stack, unless the topmost layer is a layer group, in which case, the new group is nested inside that one.
Nesting layer groups:
If a layer group is targeted, Command -click (Mac) | Control- click (Win) the Create Layer Group (the folder) icon at the bottom of the Layers panel will add a new group inside the first one.
I meant to write Command -click (Mac) | Control- click (Win) the Create Layer Group (the folder) icon at the bottom of the Layers panel, to add a group below the currently targeted layer.
Thanks for all the tips!
Thank you for these additions Pierre-Etienne!
Great tips as usual! 🙂 The video about reasons to use layer groups is very interesting too. Thanks.
Thanks for sharing shortcuts! I am new to these field! I am following all the articles!
Glad to see this! Thanks!