In this video you’ll learn how use the Folder panel in Lightroom Classic to organize and manage your photographs.
Adding Folders — While creating a new folder is straightforward enough (click the plus icon in the Folder panel header, select Add Folder, and create the new Folder in the desired location), you can also use the New Folder icon to make Lightroom Classic aware of an already existing folder on disk that has yet to be imported and may even be empty. Let’s say for example, you have created a folder using the operating system on an external drive that you want to move and archive your images in, yet Lightroom is not aware of that folder. You can’t “import” the folder because it doesn’t have any images in it. Instead, click the + (plus) icon on the Folder panel, select Add Folder, navigate to and select the desired folder. If the folder is empty, Lightroom will simply add it to the Folder panel. If there are images in the folder, Lightroom display the Import dialog so that you can take advantage of options such as applying metadata or Develop presets as you import the files in the folder. This Quick Tip ( How to Copy Files to an External Drive in Lightroom Classic) walks though the process of copying files to an external drive that Lightroom is unaware of.
Creating Subfolders — Click the plus icon in the Folder panel header and select Add Subfolder to create a new Subfolder. To quickly create a subfolder (without having to scroll to the top of the Folder panel to click the plus icon), Control -click (Mac) | Right -click (Win) on a folder and choose Create Folder Inside “xxx” from the list.
Selecting Multiple Folders — Command -click (Mac) | Control -click (Win) to select multiple folders (to view the contents, move, delete, etc.). Shift -click to select a range.
Expand/Collapse all Folders — Option -click (Mac) | Alt -click (Win) the disclosure triangle next to the folder name to Expand/Collapse all subfolders within that folder.
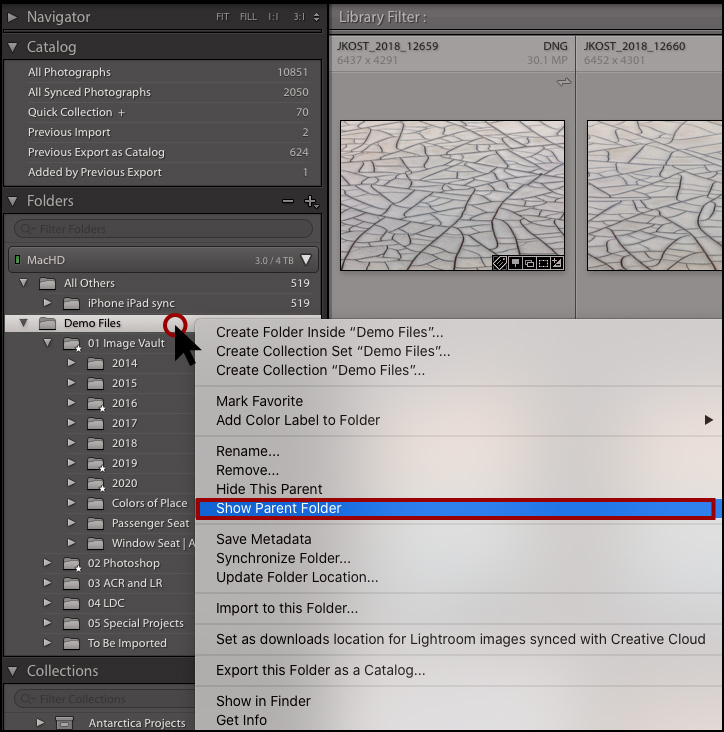
Showing and Hiding Folders — There may be times when you have imported multiple folders into Lightroom Classic yet can not see the parent folder (the folder higher up on the hierarchical structure). Control -click (Mac) | Right -click on a folder and choose “Show Parent Folder” to display the folder one level up in the directory.
If you have the opposite dilemma, where you have unwanted parent folders showing, Control -click (Mac) | Right -click (Win) the parent folder in the directory, and select “Hide This Parent” to hide the folder and promote the subfolder(s). Note: the parent folder remains on disk, “hiding” just tells Lightroom to “forget” about it. One caveat: if there are photos in the parent folder that you are removing, it’s just like removing any other folder and Lightroom will warn you that “If you continue, all photos in the root folder (the parent folder), will be removed from the Lightroom catalog but the folder and files will remain on disk”.
Show Photos in Subfolders — In Lightroom Classic, clicking on a folder in the Folder panel displays not only the photographs in the selected folder, but also any photographs in subfolders. This may be confusing if you are accustomed to viewing images in the operating system or in Adobe Bridge where the default view would display the photographs in the folder and folder icons for any subfolders. To change Lightroom’s default view to display only the photographs in a folder (hiding any images in subfolders) select the Library menu and disable Show Photos in Subfolders (or, on the Folders panel, click the + (plus) icon and disable Show Photos in Subfolders). Note: If you store all of your images in subfolders, don’t be alarmed if the parent folder displays a count of zero when you uncheck Show Photos in Subfolders because it’s no longer counting the photos in the subfolders). View this Quick Tip (How to use Lightroom’s “Show Photos in Subfolders” Feature) to see this in action.
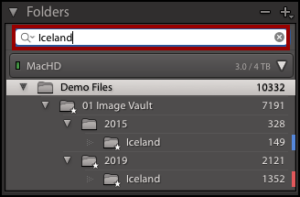
Filter/Search the Folder Panel — To quickly find a folder (especially those that might be burred deep within your hierarchy of folders and subfolders), click in the Filter/Search bar at the top of the Folders panel and start typing the name of the folder.
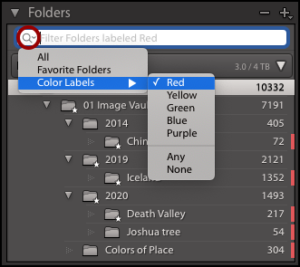
Adding Color Labels — Control -click (Mac) | Right-click (Win) on a folder in the Folder panel and choose Add Color Label to color-code a folder. Then, to filter based on folder color label, select Color Labels from the Folder Search drop down menu. To remove a color label, Control -click (Mac) | Right -click (Win) and select “None” from the “Add Color Label” option.
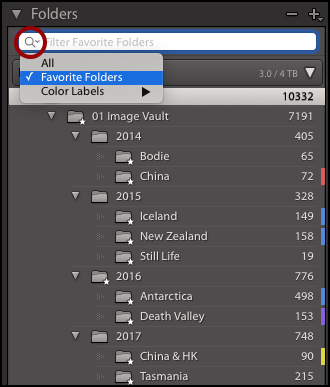
Favorite Folders — If you have folders that you return to time and again, Control -click (Mac) | Right -click (Win) on a folder and choose Mark Favorite from the context sensitive menu. Use the Folder Panel’s Search menu to view your favorites. Folders marked as Favorites can be accessed across modules by selecting them from the black bar at the top of the Filmstrip.
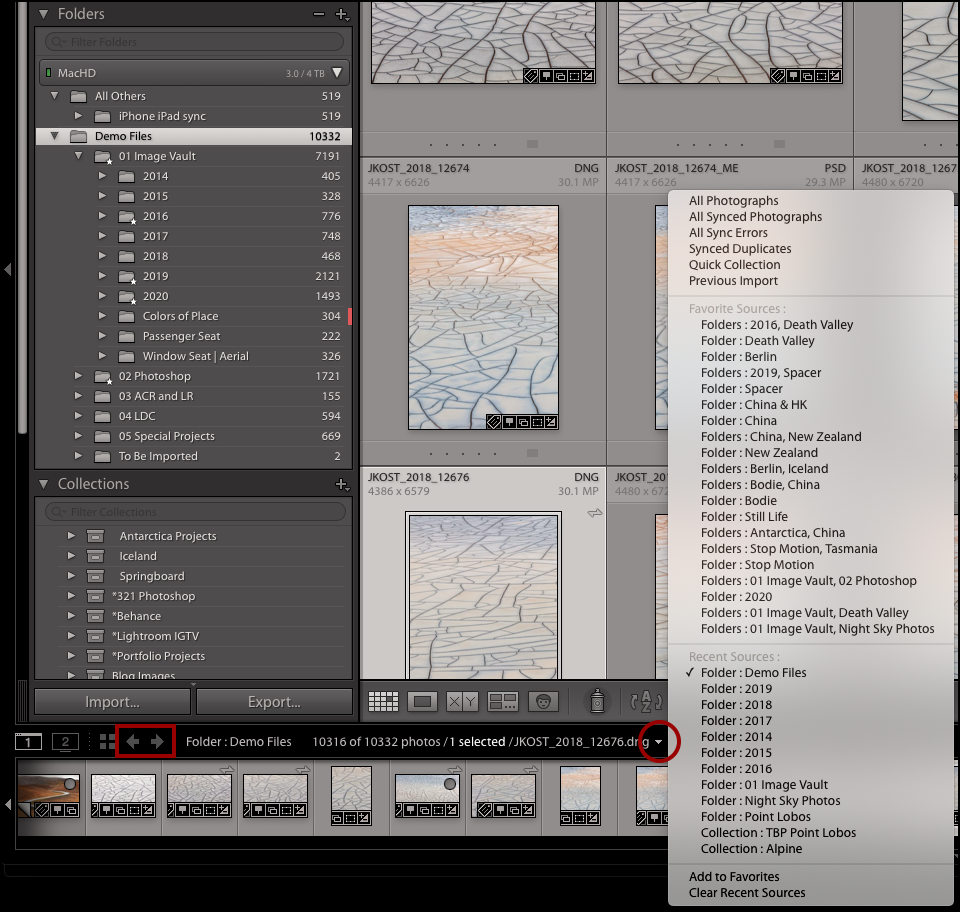
Navigating Folders — Use the back and forward navigation arrows (in the black bar above the filmstrip) to navigate recent folders, collections etc. To the right of the navigation arrows, Lightroom displays the path to the currently selected image. Click the path to display Default, Favorite, and Recent folders. If you navigate to specific folders often, use the option at the bottom of the list to add the folder as a “favorite” so that it remains accessible, as Lightroom will only display the 12 most recently visited folders/collections.
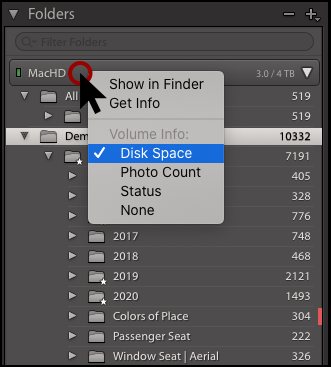
Displaying Disk Space, Photo Count, or Status in Lightroom Classic — To display Disk Space, Photo Count, or Status (on/offline) in the header for any drive, Control -click (Mac) | Right -click (Win) on the volume in the Folder panel and select the desired option. Lightroom also provides a hint as to the available disk space on a drive by displaying a color-coded Disk icon in the Folder panel’s header. Green means that you have a significant amount of free space, yellow hints that the space is becoming limited and red warns that the drive almost full. When the header of a drive is gray, the drive is off-line.
In addition, clicking the + (plus) icon on the Folder panel header provides three choice for displaying the Root folder’s path (the Root folder refers to the top most parent folder(s) in the panel). Choose from Folder Name Only, Path from Volume, or both Folder and Path.
Locating Files and Folders on the Hard Drive — With a a single image is selected, Command + R (Mac) | Control + R (Win) will displays the image in the Finder (Mac) | Explorer (Win). Control -click (Mac) | Right -click (Win) on a folder in the Folder panel to show the folder in the Finder (Mac) | Explorer (Win).
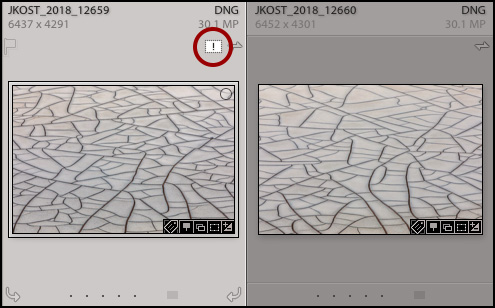
Relinking Folders and Files — If files and/or folders have been moved using the operating system (instead of from within Lightroom Classic), Lightroom will lose the link to the file and display a warning icon (!) next to the missing image in the Grid view (as well as in the Histogram panel) or next to missing folder in the Folder panel. Clicking the “!” icon will allow you to locate and re-link any files (Lightroom will prompt you to find the files that you moved. In the subsequent dialog, be sure to check the option to Find Nearby Missing Photos if more than one image from the same folder is missing).
Control -click (Mac) | Right-click (Win) on the folder name (in the Folders panel) and select Find Missing Folder to re-link folders that have been moved or renamed. To quickly view all missing files in your library, select Library > Find All Missing Photos. The video below demonstrates how to can avoid relinking files and folders in Lightroom Classic.
Redirecting Folders To Another Drive — This is a pretty rare occurrence, but I occasionally find that I have multiple copies of the same folder of images in two locations. For example, I might need a copy of a folder of images to use in a demo, or I might have changed my mind as to which folder of images (the one on my internal or external drive) contains my “working” files, or maybe I’ve just plain gotten confused and have made duplicates for some unknown reason! Note: I just want to be clear, I’m talking about an identical folder of images, that for whatever reason, appears in two different locations – not copies for redundant backup purposes.
Instead of deleting the unwanted folder from Lightroom Classic’s catalog (because that would remove the files from Collections, delete any virtual copies and, if I haven’t saved information to the files, discard metadata changes and develop settings), Control -click (Mac) | Right -click (Win) on the Folder and choose Update Folder Location. Then, navigate to and select the folder that you want to work with.
Synchronizing Folders — If you have added images to a folder that Lightroom is already aware of, instead of using the Import command to add those new files, Control -click (Mac) | right -click (Win) on the folder and choose Synchronize Folder to import/synchronize the additional images in that folder. In the subsequent dialog, choose whether or not to bypass the Import dialog, remove any missing folders, and/or scan for metadata options. This Quick Tip Synchronizing Folders in Lightroom Classic demonstrates how ro synchronize a folder.
Custom Sort Orders — The ability to create a Custom Sort Order depends on folder hierarchy. If the parent folder contains subfolders, it is impossible to create a custom sort order within the parent folder unless the option to “Include Items from Subfolders” is disabled. This quick Tip Creating Custom Sort Orders in Lightroom Classic demonstrates everything you need to know about creating and working with custom sort orders.