In this video you’ll discover the many different ways to zoom, pan, select, preview and customize the Grid and Loupe views in Lightroom Classic.
Moving Between Grid and Loup Views — To quickly move between views, use the following shortcuts:
- Tap “G” for Grid, “E” for Loupe, “C” for Compare, and “N” for Survey. Note: these shortcuts work across modules!
- Double-click an image thumbnail in Grid view to go to Loupe view and vice versa ( double click an image in Loupe view to return to Grid view).
- Tap the Spacebar to go from Grid view to Loupe View. Note: Tapping the Spacebar again will zoom in, so use one of the other shortcuts (such as tapping “G”) to return to Grid view as needed.
Decreasing/Increasing Grid Thumbnail Size — Use the Thumbnails slider in the Tool bar or, tap the “-” (minus) and “+” (plus) keys to decrease/increase the image thumbnail size in Grid view.
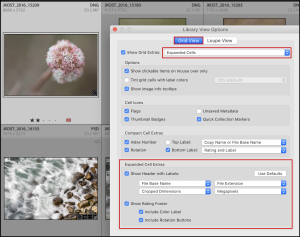
Grid View Options — Command + J (Mac) | Control + J (Win) displays the View Options where you can select what “extras” you want to have displayed. For example, in order to quickly view any image’s file type while in Grid view, I set Show Grid Extras to Expanded Cells. Then, in the the Expanded Cell Extras, I enable Show header with Labels and set the first menu item to display the File Base Name and the second to File Extension. This helps avoid the truncation of the file extension when thumbnails are small and file names are long.
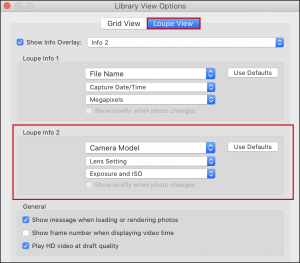
Loupe View Options — Use the Loupe View options to control what information is displayed in Loupe View. Tap “I” to cycle through the information overlays (No Overlay, Info 1, and Info 2). Note: the Info Overlay can be displayed in the Library, Develop, Book, and Print modules.
- Command + Shift + X (Mac) | Control + Shift + X (Win) will Hide Cell Extras (index numbers, star ratings, Color labels etc.).
- Taping the “J” key toggles through Hide Extras, Compact and Expanded views.
Moving from One Image to the Next — Use the arrow keys to move up/down/left/right in the Grid view. Use the left/right arrow keys to move to the previous/next image in Loupe view. Note: the left/right arrows also work in Full Screen (Tap the “F” key or select Window > Screen Mode > Full Screen Preview).
Working with Grids, Guides, and Layout Images — Choose View > Loupe Overlay > to display a Grid, Guides, or Layout Image.
- Once enabled, Command + Option + O (Mac) | Control + Alt + O (Win) toggles the visibility of the selected overlay.
- With the Grid overlay visible, Command (Mac) | Control (Win) displays options for Grid size and opacity. Click-drag left/right on Size to decrease/increase the grid size. Click -drag left/right on Opacity to decrease/increase the grid opacity.
- With the Guide overlay visible, Command -drag (Mac) | Control-drag (Win) on the intersection of the guides to reposition.
- With the Layout Image overlay visible, Command -drag (Mac) | Control -drag (Win) to reposition, change opacity and matte density.
Moving Images to Folders/Collections — Click -drag the thumbnail (not the outer gray “slide mount” area) of an image to move photographs between folders, add to collections etc. .
Thumbnail Badges — Lightroom Classic has several different badge icons to help identify what changes have been applied to images including: Keywords, Cropping, Develop Module Adjustments, Collections, and GPS Coordinates which can be viewed at the bottom right of the image thumbnail in Grid view a well as in the Filmstrip (as long as the image thumbnails are large enough to display them).
- Command + Option + Shift + H (Mac) | Control + Alt + Shift + H (Win) hides/shows Thumbnail Badges.
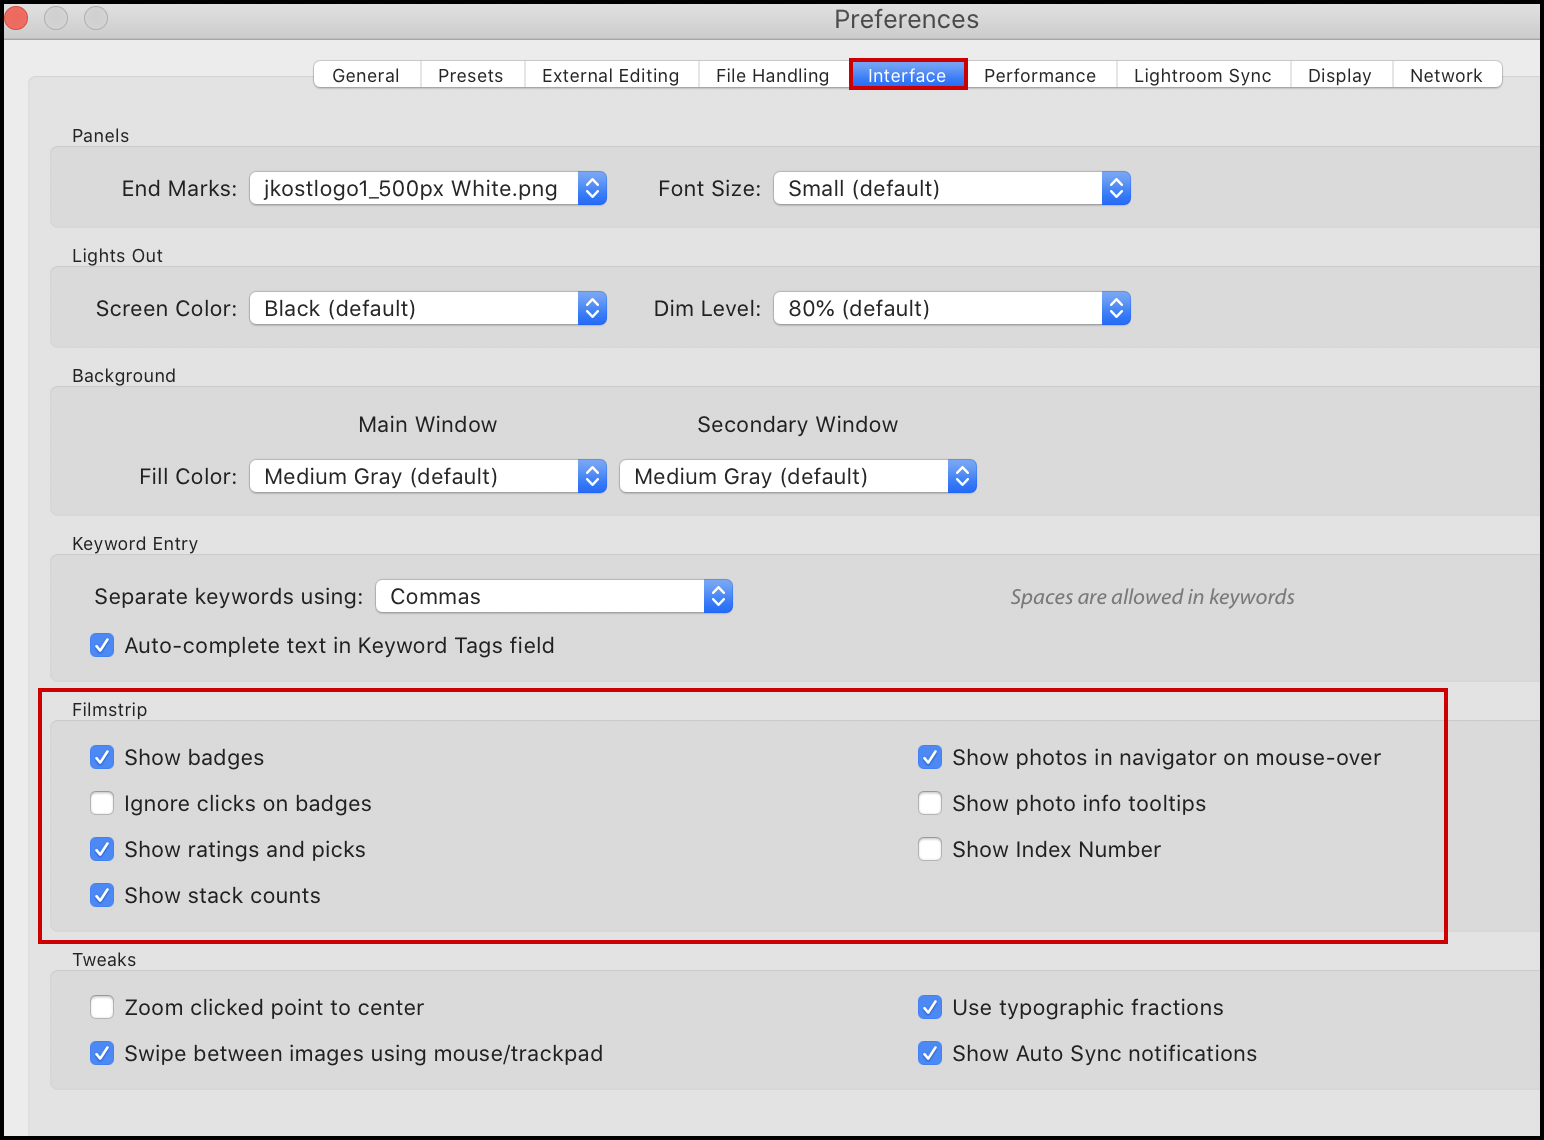
- To toggle the visibility of Thumbnail Badges in the Filmstrip, select Preferences > Interface > Filmstrip. If the image thumbnails in the filmstrip are too small, then neither Thumbnail Badges nor any of the View Options (including Rating and Picks, Index Numbers, Stack Counts, etc.) will be displayed. Note: Enabling Preferences > Interface > Filmstrip > Ignore Click on Badges can help prevent accidental clicks when the Filmstrip thumbnails are small.
Selecting and Deselecting Images — There are a number of ways to select multiple images including:
- Command + A (Mac) | Control + A (Win) selects all images.
- Command + D (Mac) | Control + D (Win) deselects all images.
- To select a range of images, click the first image, then Shift -click on the last image.
- Command -click (Mac) Control -click (Win) to select discontiguous images.
- Select Edit > Invert Selection quickly inverts the selection of images.
- With multiple images selected:
- “/” (forward slash) deselects the active photo.
- Command + Shift + D (Mac) | Control + Shift + D (Win) selects only the active photo (while deselecting any other photos).
- Clicking outside of the image thumbnail (in the gray “slide mount” area) deselects all selected images excluding the one clicked upon.
Full Screen Preview — Tap the “F key to toggle Full Screen Preview which displays an image Full screen with a black background. Use the left/right arrow keys to move from one image to another. Note: if you have a single image selected and enter Full Screen Preview, using the arrow keys will move through all images in the selected Folder/Collection. If you have multiple images selected, Lightroom will only cycle through just the selected images.
Full Screen Mode — Shift + F cycles through Normal, Full Screen with Menu Bar, and Full Screen screen modes. When working on a larger monitor the extra real estate isn’t super critical, but when working on a laptop, every pixel counts! Note: when in Full Screen screen mode on the Mac, positioning the cursor at the bottom of the screen won’t reveal the Dock. Instead, use Command + Tab to cycle through your open applications when Lightroom is in Full Screen screen mode.
Lights Dim/Out — In order to put the emphasis on the image and not on the interface in Lightroom tap the “L” key to enter Lights Dim mode. Tap it again to toggle to Lights Out. Tapping it again will toggle back to Normal mode. To toggle in the other direction add the Shift key. Choose Preferences > Interface to to set the Screen Color and Dim Level (50, 70, 80 or 90 percent).
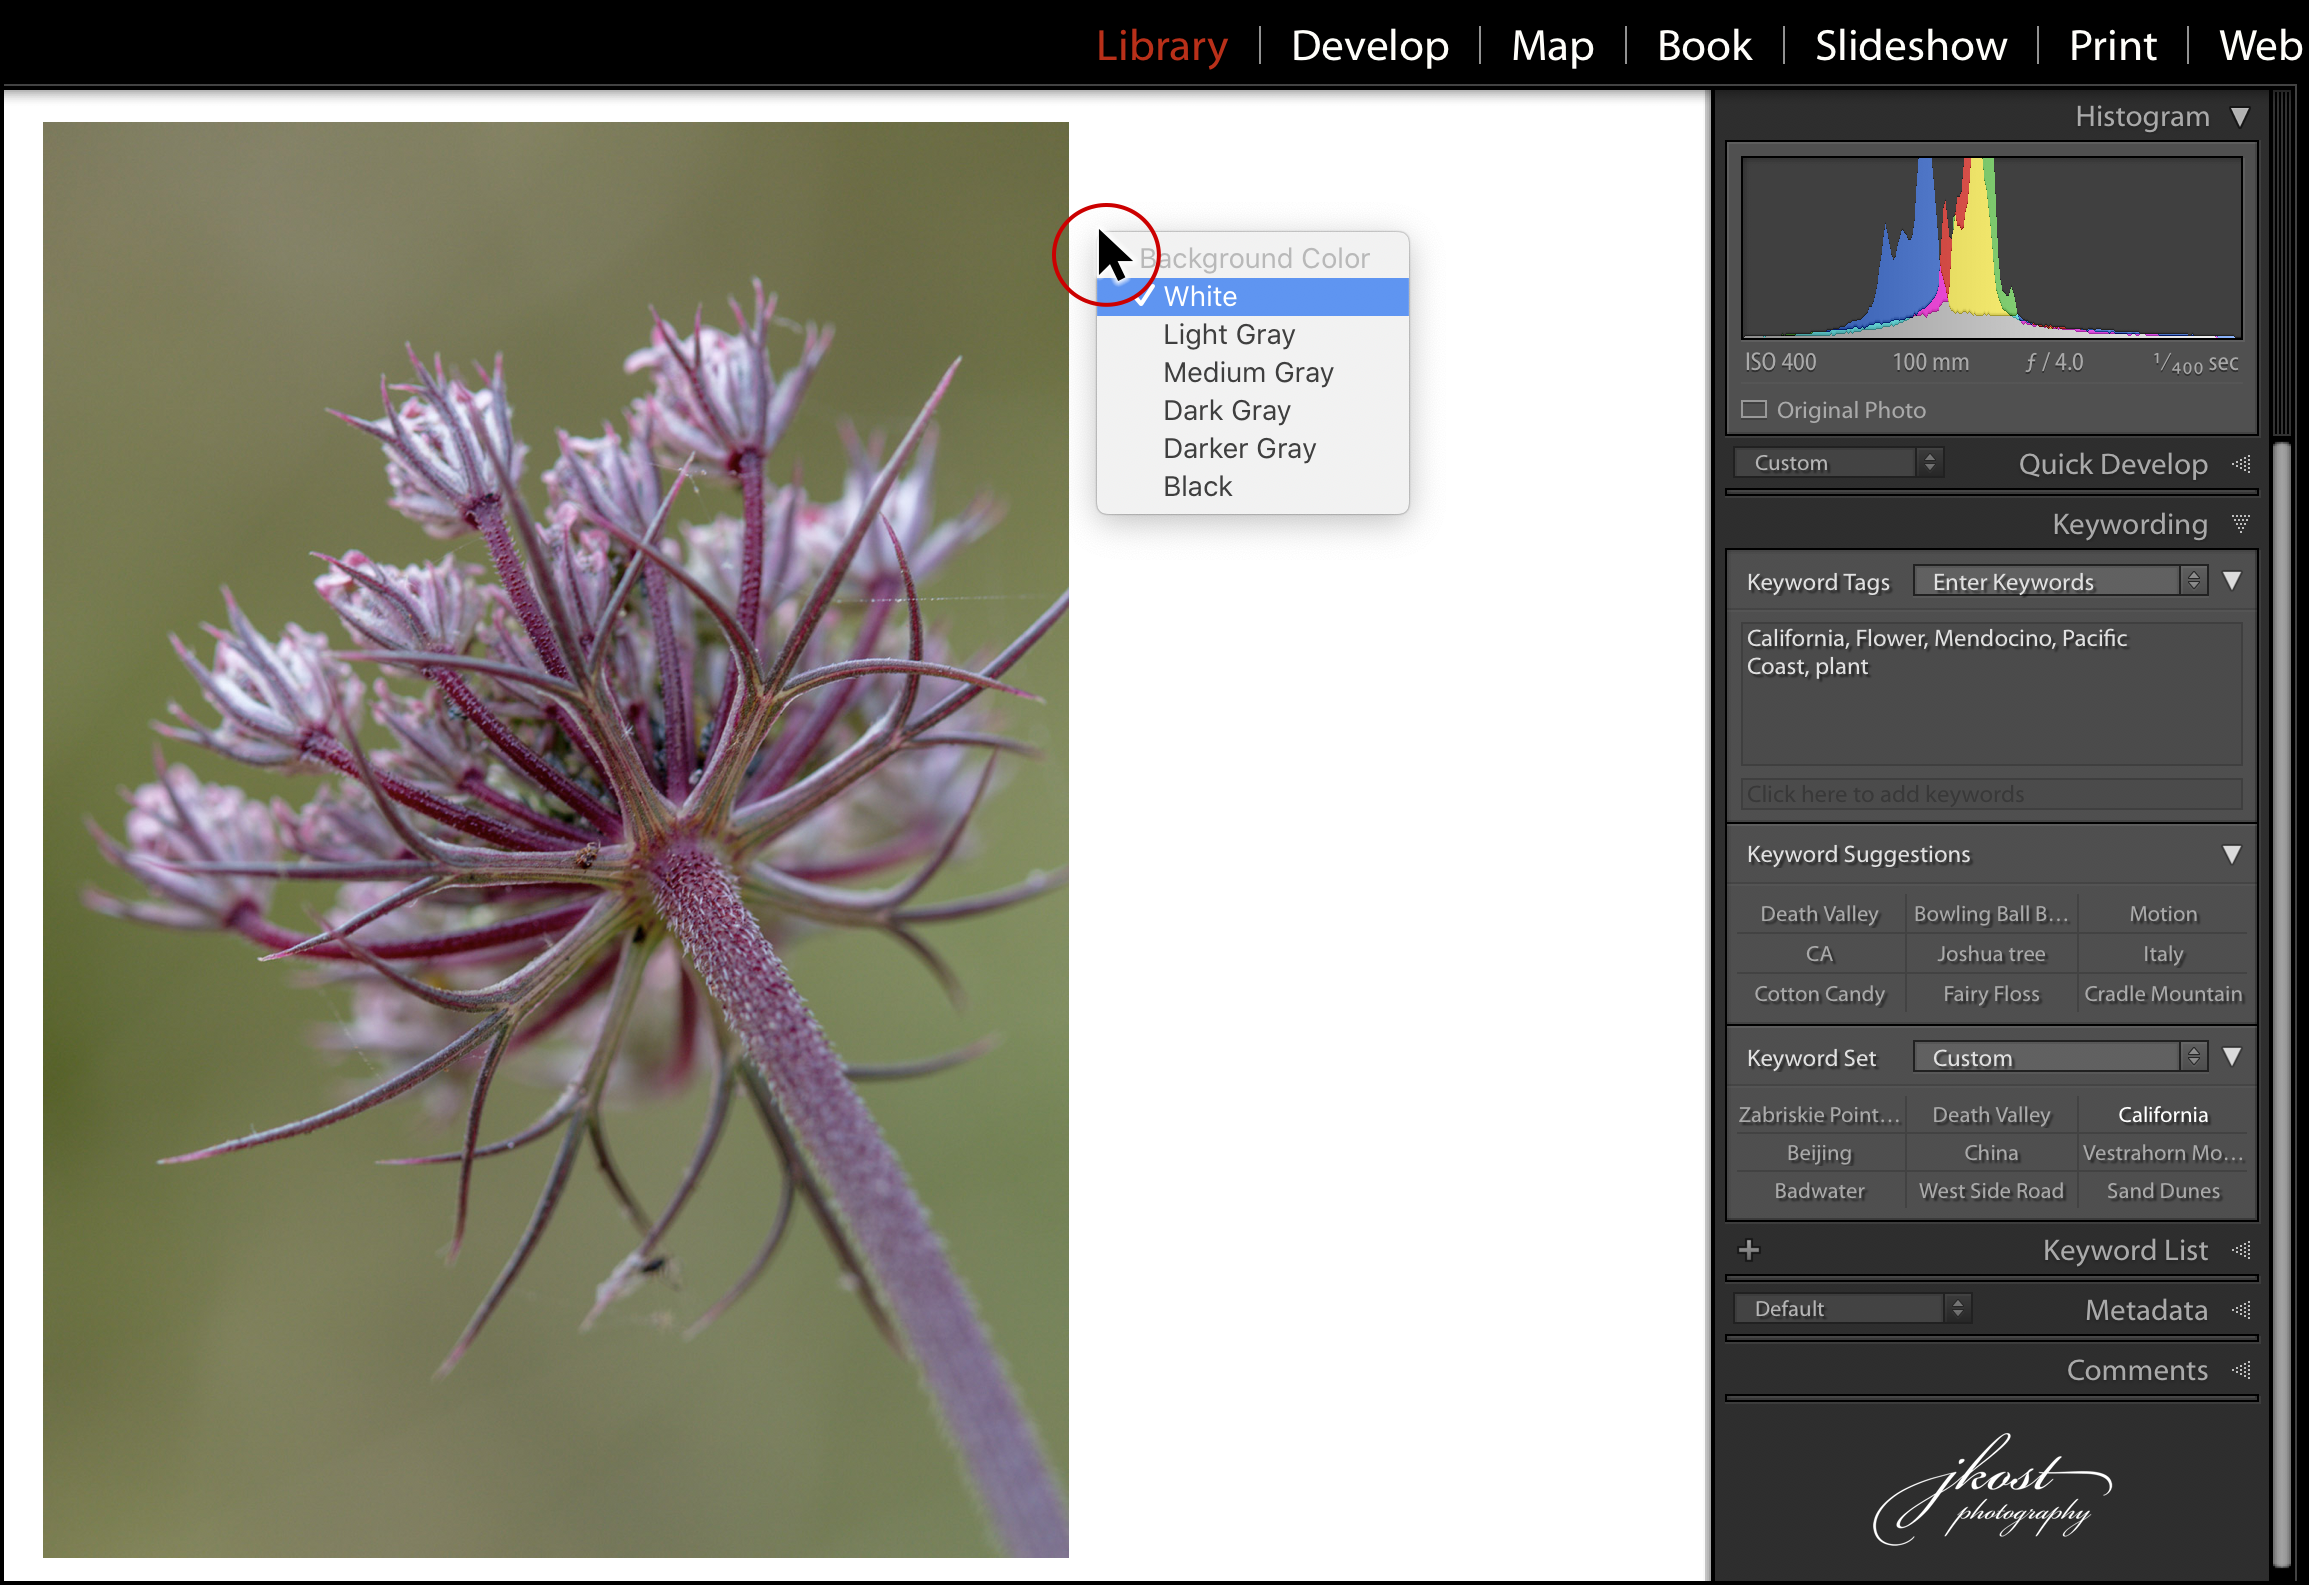
Customizing the Background Fill Color — To change the color of the area surrounding the image preview in Loupe view, Control -click (Mac) | Right -click (Win) in the border area surrounding the image (or, select Preferences > Interface > Background Fill Color) and select the desired Background Fill Color. This can help, for example, to preview what your image would look like when matted with a white matte. Note: changing the background fill color effects the Library, Develop, Book Slideshow and Print modules.
Rotating Images — Command + [ and ] (Mac) | Control + [ and ] (Win) rotates a photograph 90° clockwise / counter clockwise. This works in both the Library and Develop modules in Lightroom Classic.
Making Changes to Selected Images — By default, when multiple files are selected in the Library module, making changes to files in the Grid view will change all selected images. When viewing images in Loupe view, only the “most selected” image will be changed (the one that is being viewed). To change all selected images while in Loupe view, Command + Option + Shift + A (Mac) | Control + Alt + Shift + A (Win) toggles on Auto Sync (don’t forget to toggle Auto Sync off when finished).
Selecting Based on Flagged Status — To quickly select images based on flag status (reject/unflagged/flagged) use the following shortcuts:
- Command + Option + A (Mac) | Control + Alt + A (Win) selects all Flagged photos.
- Command + Option + Shift + D (Mac) | Control + Alt + Shift + D (Win) deselects all Unflagged photos.
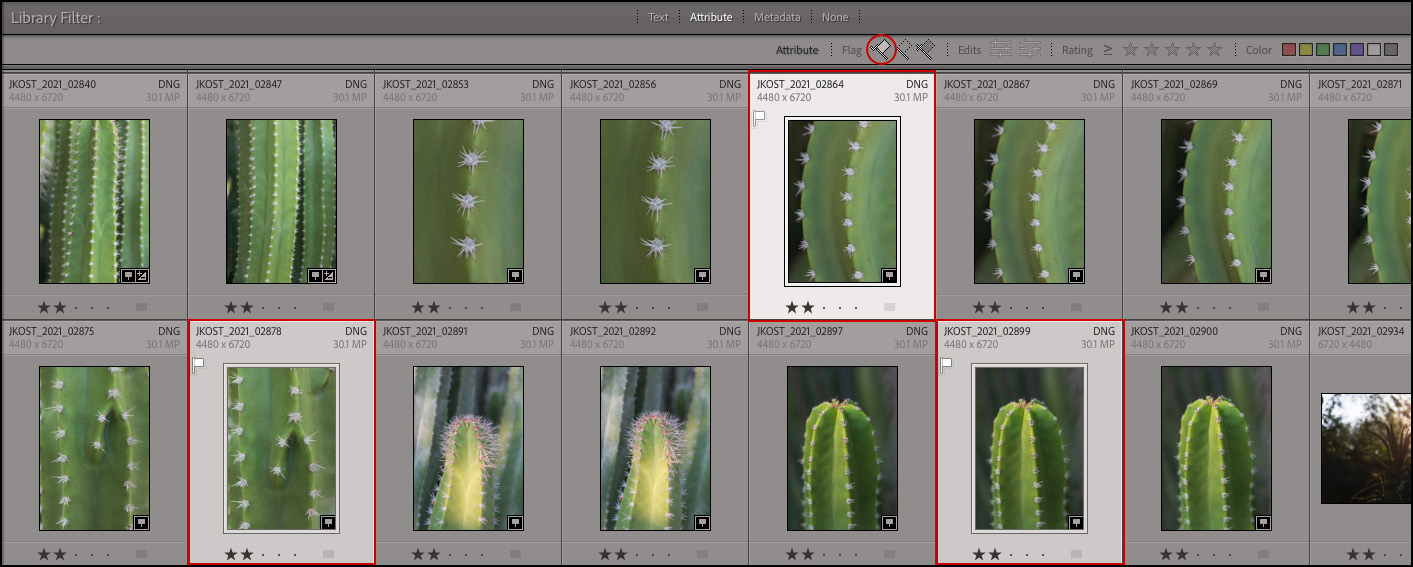
- Command -click (Mac) | Control -click (Win) the Flags or Color Ratings attributes in the Library Filter bar selects images tagged with that filter (it actually selects them, it doesn’t filter them).
Selecting Every Other Image — I recently needed to select only a subset of a series of images (I had a series of 600 images in a time-lapse series of some clouds moving over a mountain, but I only wanted to use 300 of them to turn into a short video clip in Photoshop). To select every other image, I adjusted the thumbnail size in Grid view so that I could see as many thumbnail icons at one time, and made sure that there were an even number showing in the rows. Then I selected the Painter tool, loaded it with the Flag attribute and swiped from top to bottom along every other column. Once I had flagged every other image, I filtered by flag, chose select all, and then put the 300 images into a collection.
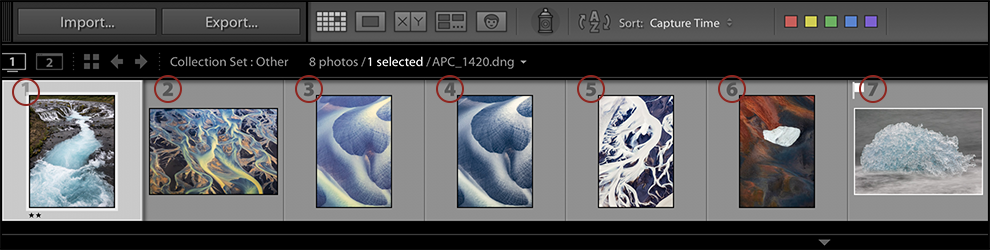
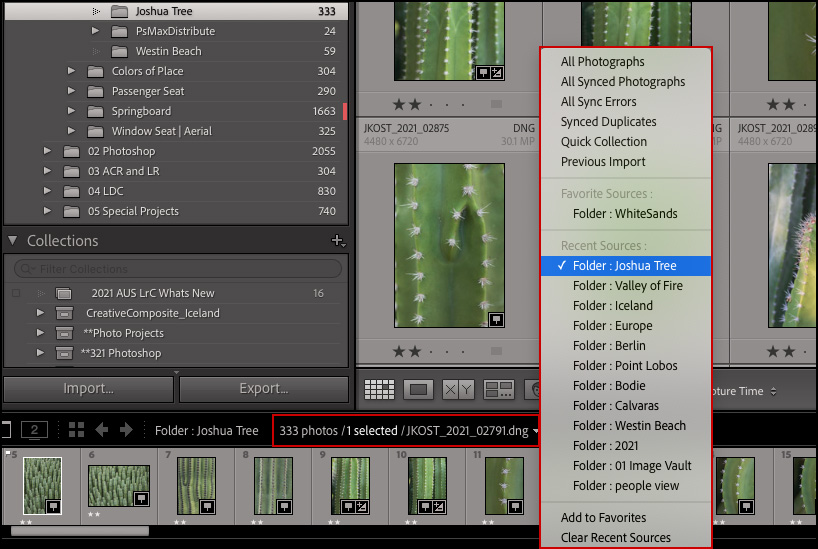
Selecting a different Folder/Collection/Recent Source — Click anywhere in the path of the currently selected image (in the black bar above the Filmstrip) to quickly navigate to recent sources. If you navigate to specific folders/collections often, choose Add as Favorite from the bottom of the drop-down so that it remains accessible as the Recent Sources area lists only the 12 most recent folders/collections visited.
The Tool Bar — “T” toggles the visibility of the Tool bar. Click the downward facing triangle (on the far right of the Tool bar) to customize which options are displayed.
Display the Index Number in the Filmstrip — Select Preferences > Interface to display the Index Number in the Filmstrip (this works like Index Numbers in Library Grid).
Index Number Displayed in Filmstrip — Select Preferences > Interface to display the Index Number in the Filmstrip (this works like Index Numbers in Library Grid).