In the video below, you’ll learn how to add metadata to photos, customize the metadata displayed in the Metadata panel, work with templates and shortcuts, save and export metadata and more.
Applying Metadata Templates — Metadata can be applied to images upon import as well as in the Library module. If you’ve forgotten to apply your metadata template when importing images into Lightroom Classic or want to apply metadata to a subset of images, select the images in the Grid view (in the Library module), and choose the desired template from the Preset drop down in the Metadata panel. This is not only a good way to add a “forgotten” metadata template but also to assign a more image specific metadata template to a subset of images. For example, you may have slightly different templates to apply different “Image Usage Rights” or other information to a subset of images.
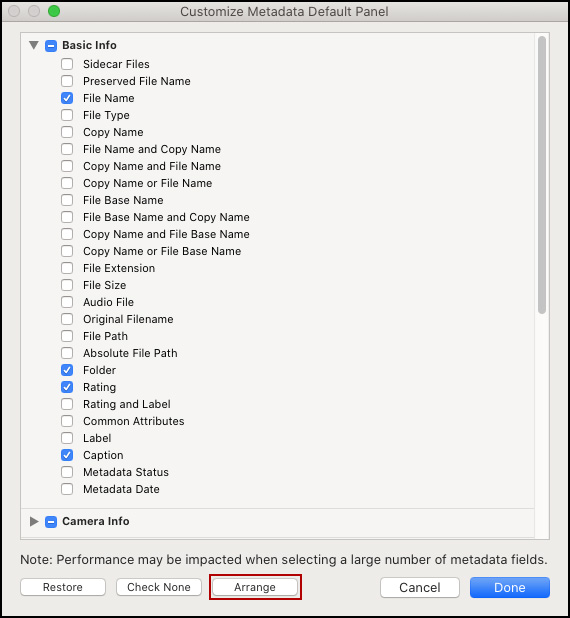
Customize the Default Metadata Panel — To customize the default Metadata Panel, click the Customize button to access the Customize Metadata Default Panel dialog.
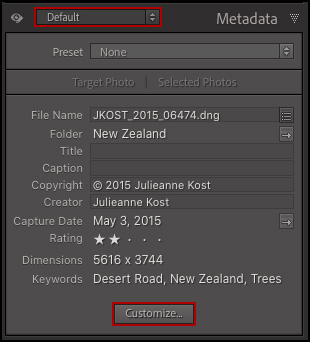
Then, use the check-boxes to toggle the visibility of the desired metadata fields. Click the Arrange button to rearrange the order of metadata fields. Note: Lightroom Classic automatically saves the original file name in the metadata of the file. To view the Original File name, enable the “Original Filename” field in the Basic Info section of the Customize Metadata Default Panel.
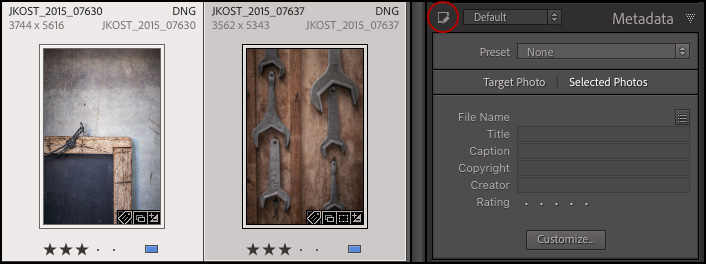
Target vs Selected Photo — By default, with multiple photos selected, Lightroom Classic displays the metadata for the target photo. Use the Target Photo | Selected Photo option at the top of the Metadata panel to show the metadata for either the Target Photo or for all Selected Photos.

Edit-Only Mode — To increase performance, when editing metadata for large volumes of images, use the Page icon on the Metadata panel to toggle Edit-Only mode. In Edit-Only mode, all fields that are not editable are hidden (making it easier to find and edit the desired metadata fields). One word of caution: In Edit-Only mode, Lightroom Classic doesn’t the load metadata values from the selected file(s) into the metadata fields in the Metadata panel. This means that if, for example, you have an image (or multiple images) selected and the image(s) have metadata applied, you will not see it in the metadata field and, if you enter new metadata into the field, Lightroom Classic will replace any existing metadata.
Metadata Panel Shortcuts and Filters — Click the arrow button to the right of a metadata field to quickly access additional options for the field.
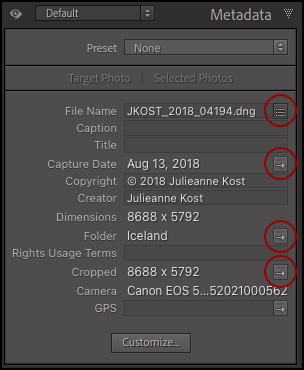
For example:
- Click the arrow button to the right of the Date Time Original to quickly filter All Photographs based on the capture date of the selected image.
- Click the arrow button to the right of the Folder name to automatically select the Folder.
- Click the arrow button to the right of the Cropping field to navigate to the Develop module and automatically select the Crop tool.
- Click the Batch Rename button next to the File name to display the Batch Rename dialog.
GPS Metadata Field — Click the arrow button to the right of GPS to view the image in the Map Module.
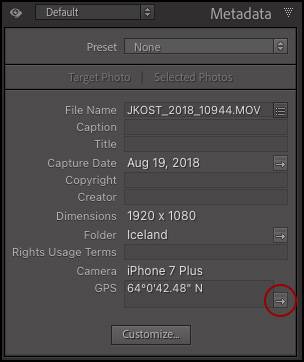
- Option -click (Mac) | Alt -click (Win) the GPS Map Location arrow to go to Google Maps in your default browser.
- To have Lightroom look up GPS coordinates and provide city, state, and country suggestions, select Catalog Settings > Address Lookup and enable “Lookup city, state, and country of GPS coordinates to provide address suggestions” and “Export address suggestions whenever address fields are empty”.
Adding Captions (and Titles) — Command + right arrow (Mac) | Control + right arrow (Win) moves to the next image while keeping the Caption or Title field highlighted.
- When adding long captions to images, you can make the caption field larger by selecting Large Caption view from the Metadata Set drop down menu (in the Metadata panel header).
- Option + Enter (Mac) | Alt + Return (Win) will set a line break in the Caption field.
- Click Caption (or Title, Copyright etc.) to reveal, select, and apply recently applied captions (titles/copyright metadata) from the list. To clear the list, choose Catalog Settings > Metadata > Editing and disable “Offer suggestions from recently entered values” or “Clear all suggest lists”.
- When you add metadata using the Metadata panel, the information (such as Captions and Titles) can be picked up and displayed in many of the output modules. If, however, you add metadata in the output modules (typing a caption under a photo cell in the Book or Slideshow module for example), the metadata will be saved with the specific book or slideshow (and will not be saved within the individual files).
- Adding a “Description” in Photoshop’s File Info is the same as adding a “Caption” in Lightroom’s Metadata panel.
Blank Metadata Fields — In the Edit Metadata Presets dialog, a blank metadata field with a “check” in the right hand column will overwrite (eliminate) existing data in that field when the metadata preset is applied. I find this feature useful when I need to remove all of the metadata that I have previously applied to images so that I can start a demonstration with a “clean” set of photographs.
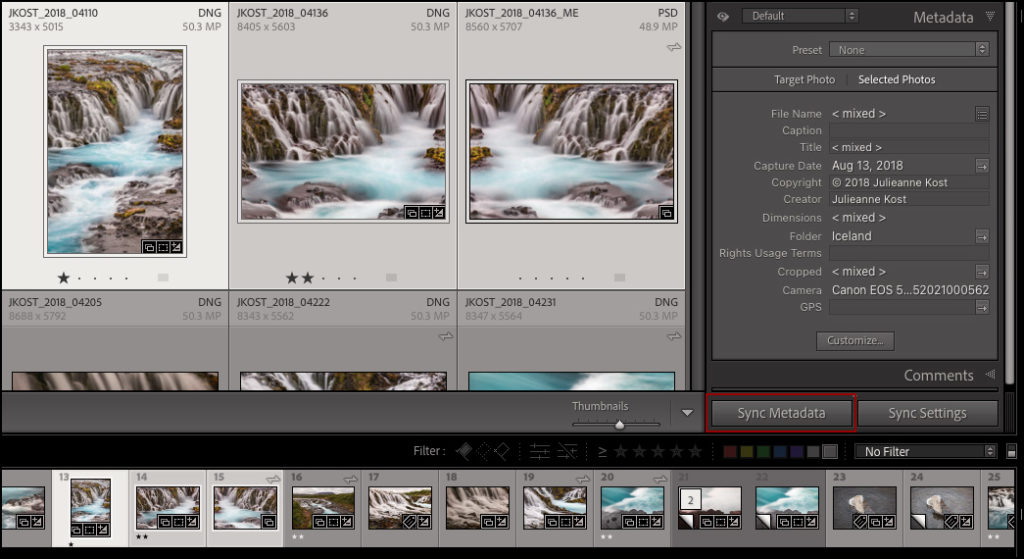
Sync and Auto Sync Metadata — To apply metadata (or keywords, quick develop settings etc.) to multiple images, select them in Grid view and make the desired changes. If you’ve already entered the metadata for one image and want to apply the same metadata to others, select the additional images and click the Sync Metadata button.
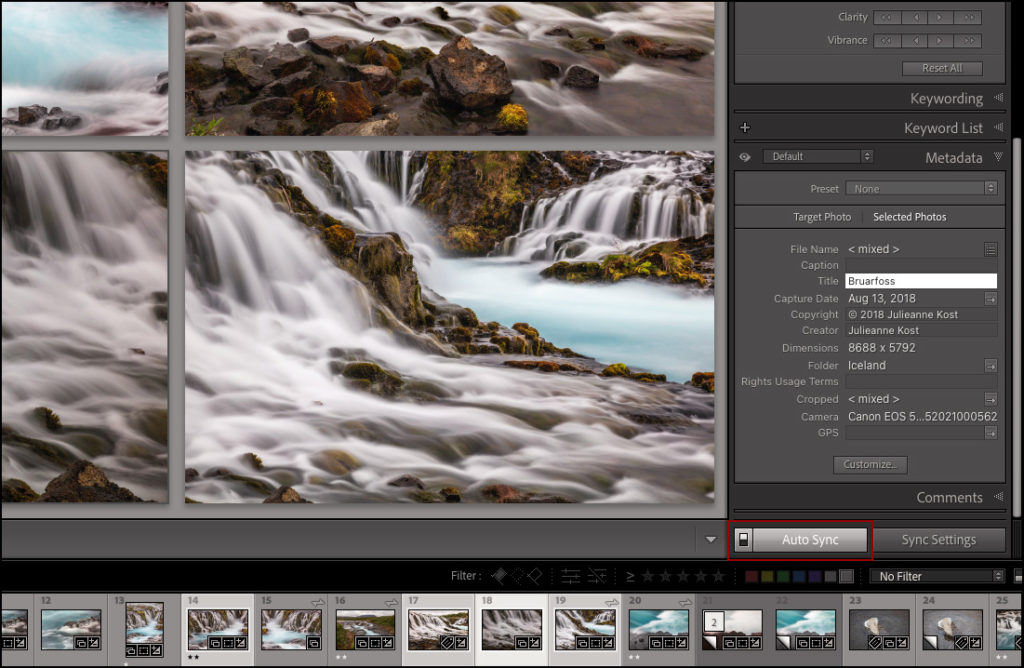
To apply metadata (or keywords, quick develop settings etc.) to multiple selected images when NOT in Grid view (for example when in Loupe, Compare, or Survey view), click the “light switch” next to Sync to enable Auto Sync. I find Auto Sync especially useful when using Survey mode. For example, lets say I start with 10 images and then remove the less important ones until I only have 4 left. If I want to flag, rate or label all four of those images at one time, without leaving Survey mode, I enable Auto Sync, apply the flag/rating/label and whatever I do to one, is done to all. Just don’t forget to flip off Auto Sync when you are finished.
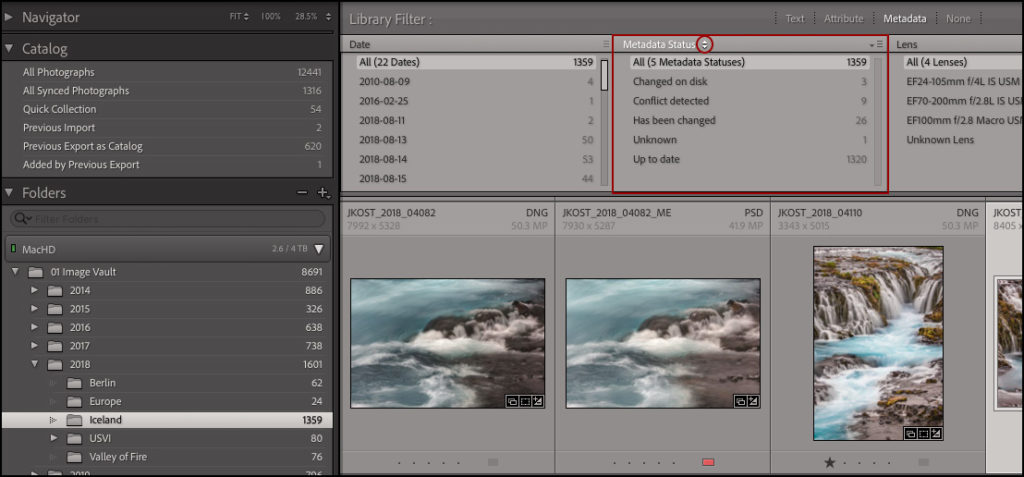
Filter Based on Metadata Status — You can filter and/or search images based on their Metadata status using the Filter bar at the top of the Grid view (use the pull-down menu at the top of a column to access Metadata). Images will be assigned one of several different statuses including Changed on Disk, Conflict Detected, Has Been Changed, Unknown and/or Up to Date). The most common reason that the Metadata for an image is not “up to date” is if changes are made to the image in another application such as Adobe Bridge/Camera Raw/Photoshop.
Saving Metadata to Files — By default, Lightroom Classic saves metadata changes made to an image in the Lightroom Catalog. To save the metadata (including develop settings, keywords, copyright info etc.) into the individual DNG, JPEG, PSD, and/or TIFF file, select the image(s) and choose Metadata > Save Metadata to File (or use the shortcut Command + S (Mac) | Control + S (Win). For proprietary raw files (.nef, crw etc.), Lightroom Classic generates XMP sidecar files to store the metadata instead of writing to the proprietary file format.
- If changes were made in another application and you want to use those changes instead of the changes made in Lightroom Classic choose Metadata > Read Metadata to File.
- To automatically write changes into files (or into XMP sidecar files) choose Catalog Settings > Metadata > Automatically Write Changes into XMP.
- Only the current state is written into a file (or into XMP), the history states (stored in the History panel) are not written.
In this Quick Tip: “Saving Changes to Files in Lightroom” you’ll find out how to save changes in Lightroom and view them in applications such as Adobe Bridge. https://youtu.be/oMRXAbxtanw
Including Metadata on Export — Typically photographers want metadata such as copyright and contact information to travel with their files but not necessarily other information such as camera settings, ratings, develop setting, etc.. In the Export window, under Metadata, Lightroom Classic has five options for including metadata including: Copyright Only, Copyright and Contact Info Only, All Except Camera Raw Info, All Except Camera and Camera Raw Info , and All metadata. In addition, you can choose whether or not to include Person info and Location Info. Note: if you choose not to include the Camera Raw info, any develop settings will still be applied to the image on export so the image will look as you intended, but the settings (the slider values etc) will not be embedded in the file.
Three Dimensional Projection — you can view and edit Three Dimensional Projections in the Metadata panel.