In the video below, you’ll discover how to make quick adjustments to your photos using the Quick Develop panel in Lightroom Classic.
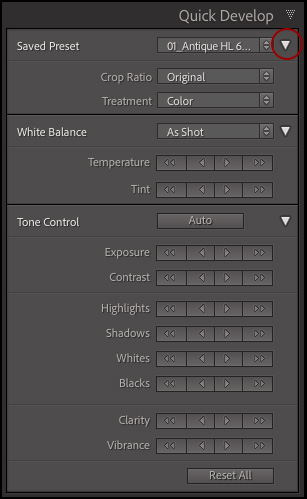
To quickly make adjustments and enhancements to your photographs in Lightroom Classic without moving to the Develop module, use the buttons in the Quick Develop panel in the Library module.
Adjustment Values — Clicking the double and single arrow buttons will make the following adjustments:
- Clicking the double arrow button decreases/increases Exposure slider in the Develop module by one stop. Clicking the single arrow button decreases/increases Exposure slider in the Develop module by 1/3 stop.
- Clicking the double arrow button decreases/increases Contrast, Highlights, Shadows, Blacks, Whites, Saturation, Vibrance slider value in the Develop module by 20. Clicking the single arrow button decreases/increases Contrast, Highlights, Shadows, Blacks, Whites, Saturation, Vibrance slider value in the Develop module by 5.
- Shift -click an arrow button to decreases/increases the slider in smaller increments (1/2 of the values stated above).
- Clicking the double arrow buttons decreases/increases Temperature and Tint sliders in the Develop module by 20 for JPEG files. Clicking the single arrow buttons decreases/increases Temperature and Tint sliders in the Develop module by 5 for JPEG files. When working with Raw files, the increments for Temperature and tint are calculated in relative percentage terms (Quick Develop translates the relative percentage amount to the absolute temperature and tint value using curve functions).
- Holding the Option (Mac) | Alt (Win) toggles Clarity and Vibrance options to Sharpening and Saturation.
Making Relative Adjustments to Images — Changes made in Quick Develop are relative (unlike the Develop module where changes are absolute). Lets imagine that yesterday I adjusted the Exposure slider for five different images in the Develop module (setting each image’s exposure to a different value). Today, I realize that all five images are a bit too dark, and I want to lighten them all by 1/3 of a stop. To make this adjustment, I would want to select the images in the Grid view (in the Library module) and use the Quick Develop panel to increase the Exposure values, (not the Exposure slider in the Develop module). Here’s why:
- If I select those five images in the Library module and click the single arrow button for Exposure in the Quick Develop panel, Lightroom Classic will add 1/3 of a stop of exposure to each image – regardless of what the Exposure slider was set to for each image. This means that if image one’s Exposure slider was set to +.5 and I add 1/3 of a stop (+.33), it would now be set to +.88. If image two’s Exposure slider was set to +.3 and I add 1/3 of a stop (+.33), it would now be set to +.63 and so on.
- If, on the other hand, I were to increase the Exposure slider on the first image by 1/3 of a stop in the Develop Module (dragging the Exposure slider from +.5 to +.88, and then used one of the many ways to “sync” that Exposure setting to the other images (Auto Sync/Previous/Copy and Paste), all of the other images’ Exposure values would then be set to the absolute value of +.85 (the change in value would not be calculated on a per-image basis as they were when using Quick Develop).
Applying Presets — Use the Saved Presets drop down list to quickly select and apply presets to images in the Library module.
