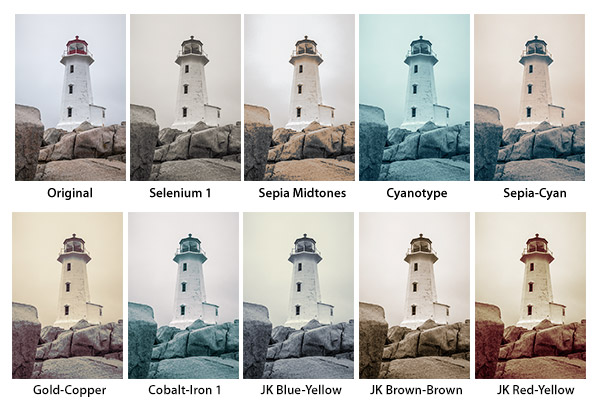
The Gradient Map Adjustment layer has new presets for toning and split‐toning photographs, however they are not loaded by default. To load this set, add a Gradient Map Adjustment layer and, on the Properties panel, click on the downward facing triangle to the right of the gradient. Click the gear icon and choose Photographic Toning from the list. To add these gradients to the default gradient set, choose Append. To replace the default set, choose OK. Note: you can always reset the Default gradients by clicking the gear icon and selecting Reset Gradients.

Click here to download the ColorToninGMAL.psd template to quickly preview your image with each of the Color Toning presets applied. To replace the lighthouse image with your own photograph, double click on the layer thumbnail for the Lighthouse layer so that it displays in it’s own window (Layer 1.psb). Then, copy and paste your own photograph into that document. You will most likely need to resize your image by choosing Edit > Transform > Scale so that it fits (centered) within the canvas area. Then, hide the lighthouse layer (Layer 1) or delete it. Save and Close the Layer 1.psb file. and the multiple instances of the original “lighthouse” smart object will be automatically updated.
After selecting the gradient that you prefer for your image, you will want to apply that gradient map to your original. You can do this in a variety of ways including:
• Opening your original, adding a new Gradient Map adjustment layer selecting the gradient that you prefer.
• Selecting the adjustment layer in the template and dragging and dropping that layer to your original file.
Note: the last 3 gradients, I added just for fun. Click here to download these gradients. Double click on the jkost_3ToningGradients.grd.zip file to unzip it and then double click again on the jkost_3ToningGradients.grd to install them.
hello Julieanne Kost this video aprece your computer “HP” which of course is to have a system opreracinal “windows” and a keyboard apple on the table, the apple symbol in the upper right. you can tell me this magic. thank you
I am using a HP monitor with an apple computer.
This is really cool and easy. A lot of work went into putting this together for us. Thank you!
When extracting the .zip file, which folder should holder the unzipped template? Should the template be saved in one of the CS6 folders?
The ColorToninGMAL.psd file is the template and it can be stored anywhere. Double click the jkost_3ToningGradients.grd.zip to unzip it, and then double click on the jkost_3ToningGradients.grd file and Photoshop will automatically load it to the correct location for you.
Thanks for the great suggestions with toning gradients
How wonderfully generous of you dear Julianne, I always enjoy your “The complete picture” series, it has served to teach so much. Thank you!
great turtorial
Thanks Julieanne great work and most useful
I tried double clicking on the jkost_3ToningGradients.grd file but all it did was launch Photoshop (running windows’ OS). It did not load the gradients. Does Photoshop need to be open when you double click on the file for them to install?
Double clicking the file should add the jkost gradients to the end of your gradients.
No matter what I do your gradients don’t load and show up anywhere in my gradienst list. I can see them in the ColorToninGMAL. PSD file but no where else. Is there another way to add them to the photographic toning gradients.
I never did get it to work by double clicking, but I did figure out how to copy the GRD file into Program files > Adobe > Photoshop CS6 (64bit ) > Presets > Gradients — which worked.
Will these work in CS5? Thanks!
Murry
The gradients are new to PSCS6 but yes, the template will work.
I just upgraded to CS6 from CS5 thinking that the photographic toning would not show up in the list but it does not. Is it an addon?
Ignore my previous question; apparently I opened CS5 instead of CS6. It came up with the new interface so I did not realize it was the wrong one. 🙂