This video demonstrates ten helpful shortcuts for working with Layer Masks in Photoshop:
Adding Layer Masks
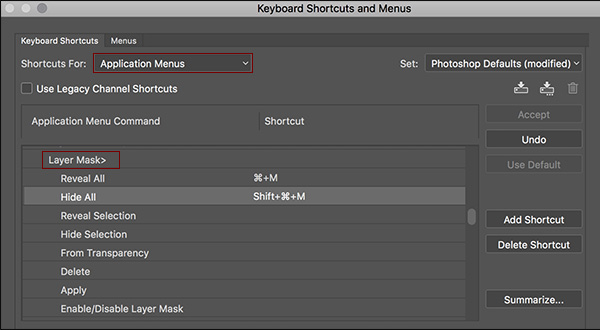
- To add a layer mask to a layer, click on the “Add Layer Mask” icon in the Layers panel or, to create a custom keyboard shortcut for adding layer masks, select Edit > Keyboard Shortcuts. Set the “Shortcuts For” to Application Menus and toggle the disclosure triangle for the Layer menu. Scroll down to Layer Mask> and add your own shortcuts by clicking in the blank area to the right of the command. Note that there are separate options for adding layer masks while ignoring/respecting the current selection.
- Option -click (Mac) | Alt -click (Win) the layer mask icon to add a layer mask to automatically hide the content of the layer (or the active selection).
- Command + I (Mac ) | Control + I (Win) will invert a layer mask (or, click the Invert button on the Properties panel).
Deleting Layer Masks
- Target the mask on the Layers panel and click the Trash icon to delete a layer mask. Or, Control -click (Mac) | right -click (Win) on the layer mask to choose between Delete Layer Mask or Apply Layer Mask from the context sensitive menu.
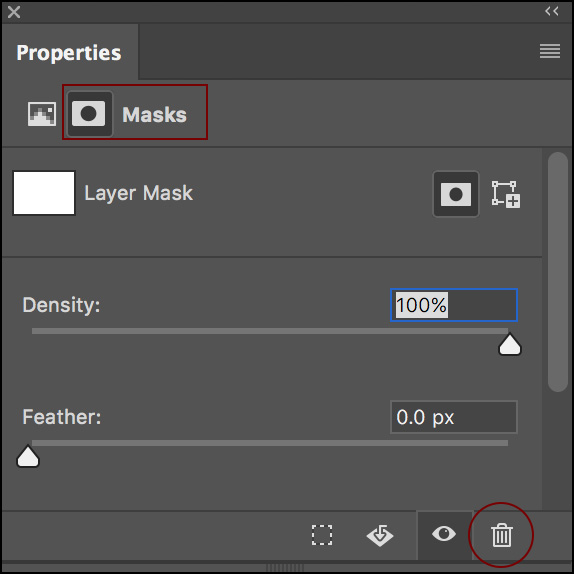
- Or, on the Properties panel, target the Layer mask and click the Trash icon at the bottom of the panel.
Moving and Duplicating Layer Masks
- Drag the layer mask thumbnail in the Layers panel to move it from one layer to another.
- Option -drag (Mac) | Alt -drag (Win) the layer mask thumbnail in the Layers panel to create a copy of the mask.
- Option + Shift -drag (Mac) | Alt + Shift -drag (Win) the layer mask thumbnail to create copy of a layer mask while simultaneously inverting the mask. Note: if the mask’s Density or Feather sliders has been changed using the Properties panel, this shortcut will not work. In this situation, (Option -drag (Mac) | Alt -drag (Win) the layer mask thumbnail to duplicate the mask, then use the shortcut Command + I (Mac) | Control + I (Win) to invert the mask (or click the Invert button in the Properties panel).
Targeting the Layer Mask
- Command + \ (Mac) | Control + \ (Win) targets a layer mask.
- Command + 2 (Mac) | Control + 2 (Win) targets the layer.
Viewing Layer Masks
- Option -click (Mac) | Alt -click (Win) the layer mask thumbnail in the Layers panel to target and view the mask.
- Or, tap “\”(backslash) to display the layer mask as an overlay (tap “\” again to hide the overlay).
Temporarily Disabling / Enabling Masks
- Shift-click in the layer mask thumbnail in the Layers panel to temporarily disable a layer mask. Click the layer mask thumbnail again to enable it.
- Or, Control -click (Mac) | right -click (Win) on a mask in the Layers panel and choose Enable/Disable Layer Mask.
Unlinking Masks from Layers
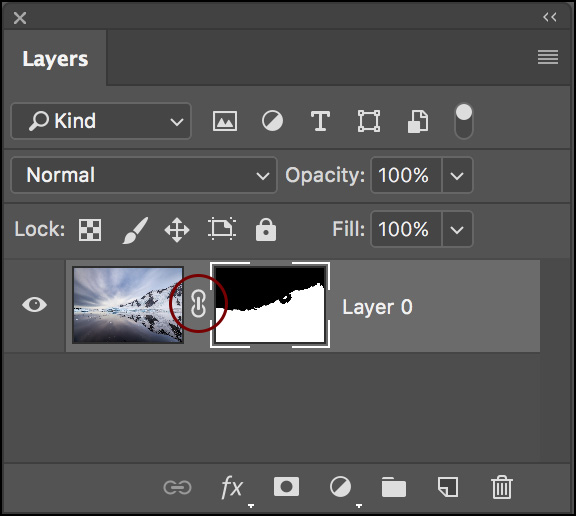
- Click the link icon (between the layer icon and layer mask icons) to unlink the mask from the layer (allowing either to move independently of the other).
Pasting Content into a Layer Mask
- To paste content from the clipboard into a layer mask, Option -click (Mac) | Alt -click (Win) the Layer mask icon on the Layers panel to make it visible. Then, select Edit > Paste.
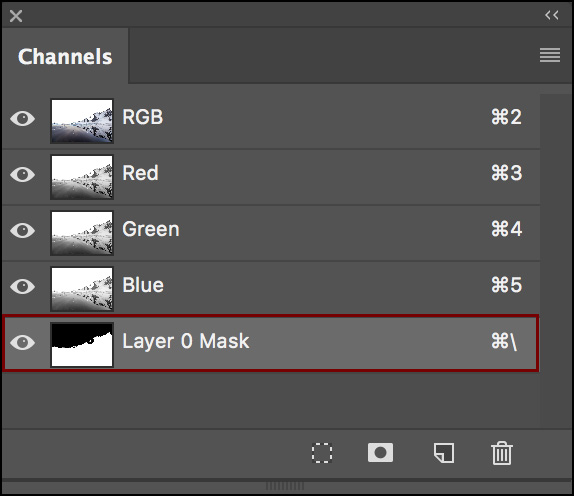
- Or, on the Channels panel, click on the Layer mask to target it AND click in the empty well to toggle the visibility of the layer mask (the mask will be displayed as a red overlay), and choose Edit > Paste. To hide the red overlay, click the eye icon.
- In this Quick Tip, Julieanne reveals a simple technique to paste content directly into a layer mask in Photoshop.
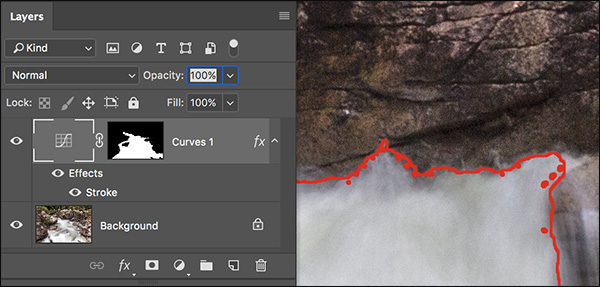
Delicate Mask Clean-Up
- After adding a layer mask, it can sometimes be difficult to determine if there are any small bits of the layer that have been accidentally left unselected. In this case, it might be helpful to temporarily add a layer effect such as a bright red stroke (Layer > Layer Style > Stroke, and click the color swatch to choose a vibrant color). The stroke will appear around any small areas of the mask that you may need to clean up. When finished, simply delete the layer effect.
Create Layer Mask from Transparency
- In order to automatically convert the transparent areas of a layer into a mask, select Layer > Layer Mask > From Transparency.
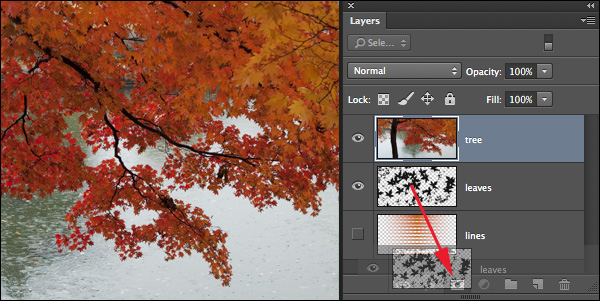
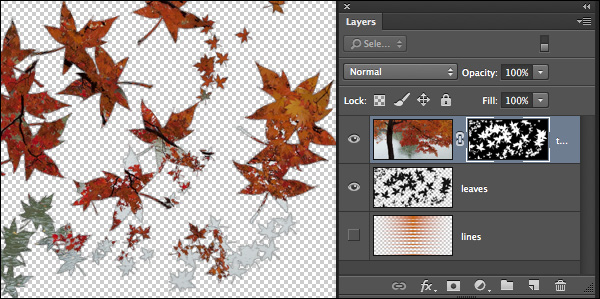
- To create a mask on a layer based on the transparency of another layer, in the Layers panel, select the layer that you want the mask to be added to. Then, drag the layer that you want to become the contents for the mask to the Add Mask Icon at the bottom of the Layers panel. Important: don’t click and release the mouse on the layer that you want to become the contents of the mask – clicking will select the layer, you need to drag that layer instead.
Non-destructive Edge Softening of Layer Masks
- When working with layer masks, instead of trying to guess the feather value needed to soften the edges of a mask (because the feather amount will vary depending on the resolution of the image and the desired softness of the edge that is being feathered), use the non-destructive Feather slider on the Properties panel. If the image is resized or other adjustments are made at a later time, the feather can be appropriately adjusted.
Changing the Density of a Layer Mask Non-destructivly
- Use the Density slider in the Properties panel to reduce the opacity (density) of the mask non-destructively.
Painting in a Layer Mask
- Changing the blend mode of a painting tool can be very helpful when painting in a layer mask. For example, when drawing with the default gradient in a mask, if the mask isn’t quite right, it’s easy to draw another gradient to replace the first one. If, however, you want to draw a secondary gradient that will add to or subtract from the mask (instead of replacing it), change the blend mode for the Gradient tool to Multiply (to add black) or Screen (to add white) and then drag the second gradient.
Converting a Layer Mask into a Selection
- To convert a Layer Mask to a selection, Command -click (Mac) | Control -click (Win) on the Layer Mask thumbnail in the Layers panel. You can then add, subtract or intersect the resulting selection with another Layer Mask using the following shortcuts:
Command + Shift (Mac) | Control + Shift (Win) to add additional Layer Mask to the selection.
Option +Command (Mac) | Alt +Control (Win) to subtract another Layer Mask from the selection.
Option +Command + Shift (Mac) | Alt +Control + Shift (Win) to create the intersection of two Layer Masks.
Customizing Keyboard Shortcuts
- To customize Photoshop’s keyboard shortcuts to add a layer mask, select Edit > Keyboard Shortcuts. Set the “Shortcuts For” to Application Menus and toggle the disclosure triangle for the Layer menu. Scroll down to layer Mask and add your own shortcuts by clicking in the blank area to the right of the command. Click Accept and then OK. Assigning shortcuts is a quick way to add a layer mask while ignoring/respecting the current selection.
Creating a Mask from a Layer
- To create a mask on a layer based on the transparency of another layer, in the Layers panel, select the layer that you want the mask to be added to. Then, drag the layer that you want to become the contents for the mask to the Add Mask Icon at the bottom of the Layers panel. Important: don’t click and release the mouse on the layer that you want to become the contents of the mask – clicking will select the layer, you need to drag that layer instead.
Flatten All Layer Masks — To quickly flatten all Layer Masks select File > Scripts > Flatten All Masks.
Cool! Great tutorial! You make it looks so simple! Thank you!
Simply Amazing! Best Tutorial Out There. Thank you. 🙂