If you’ve ever created a special style or “look” to apply to your images using multiple layer adjustment and blending options, then the ability to create and export Color Lookup Tables (LUTs) in Photoshop CC could potentially save you a significant amount of time. Although historically Color LUTs have been used primarily by the film industry, I believe that many photographers and designers will find the ability to remap any color in an image to any other color quite powerful. If you’re not familia with Color Lookup Tables in Photoshop, then this Quick Tip video (Color Lookup Tables in Photoshop), can help you become acquainted with them.
These “looks” can be used to simply color correct an image, or they can be used to take an image to the extreme! Certainly we can use presets in Lightroom and/or Camera Raw to make creative color manipulations, but in Photoshop, we can use Color Lookup Tables to incorporate not only the entire range of Adjustment and Fill Layers (such as Curves, Selective Color, Channel Mixer, Gradient Fill, even other Color LUTs!) but even more features including blend modes, opacity, and the advanced blending sliders.
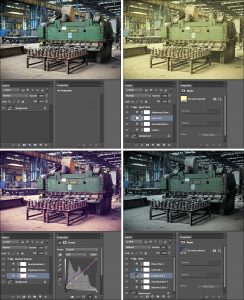
For example, the image below has three different “looks” applied using a variety of layer adjustments and blending options. (Click on the image to view it larger.)

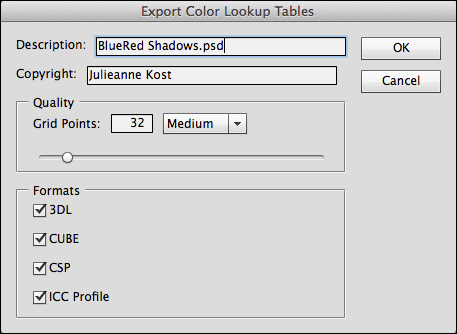
Now, instead of having to apply each series of adjustments to another image, these adjustments can be exported as a single Color LUT (File > Export > Color Lookup Tables). Note: I chose to save my LUTs as ICC Profiles because it isn’t dependent on a color space, but you can also export a 3D LUT file or a Device Link. Click here for more information on the types of LUTs.

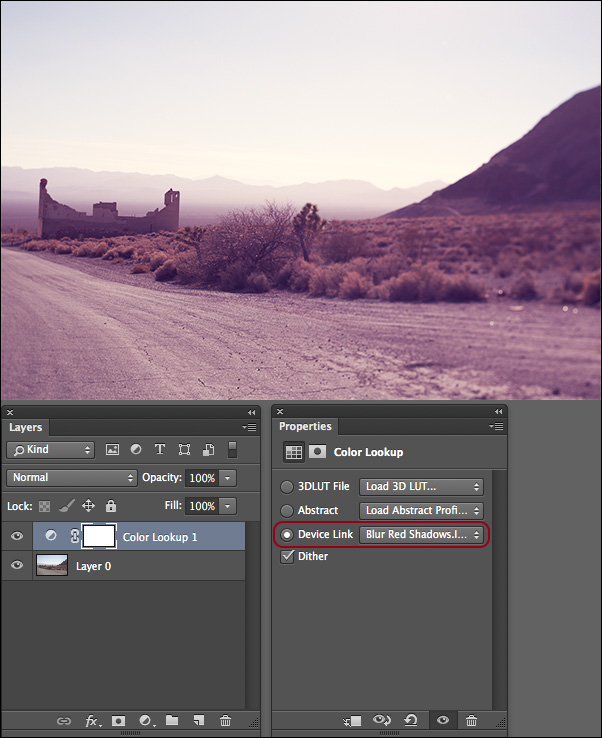
To load and apply a Color Lookup Adjustment Layer to another document, choose Layer > New Adjustment Layer > Color Lookup and, in the Properties panel, load the custom LUT. And don’t forget, the Color Lookup Adjustment layer can then be selectively hidden/revealed using the Adjustment Layer mask as well as blended using blend modes and opacity for additional creative opportunities.

For those of you who might be asking “Why not just drag and drop the adjustment layers onto another file?” Well, color LUTs created in Photoshop can be used in Photoshop, After Effects, Premiere, SpeedGrade and other applications that use 3D LUTs to help get the same look and feel across images and other media (like video), even though these applications don’t share the same math and color correction techniques. The Color Lookup Table can also include the results of dozens of adjustments, and apply those to images in different colorspaces (which doesn’t always work when dragging adjustment layers between documents).
Note: there is one caveat, you can not use layer masks to selectively hide or reveal any of the adjustments while making the color lookup table – they need to be applied to the entire image (canvas) area.
Click here for more information (as well as a downloadable file to quickly see your own image with each default LUT applied).
Loads in ”other” not Photoshop
Hi there, this is great, one question, is there a reason that I would not be seeing the Export LUT option under File->Export? None of my installs of CC or CC 2014 seem to have it enabled. Is it a plug-in?
Do you have a document open?
Yes, with a Background, and adjustments layers, the save LUT is just not showing up.
The File -> Export -> Export Color Lookup Tables command is always there in Photoshop CC 2014, unless you’ve deleted the presets/scripts folder. Of course, it won’t appear in previous versions of Photoshop (some people launch CC by mistake instead of CC 2014).
Thank you, had replaced most of my presets from CC, apparently Scripts got caught up in that mix.