Because I use Smart Objects so heavily in my workflow that I thought I would gather all of my posts on Smart Objects to make them easier to find. If you’ve never used Smart Objects, they offer a non-destructive, flexible way to work with layers in Photoshop (especially when resizing, transforming, compositing, filtering, working with templates and more). Below is a short overview video and below that is more in-depth information about Smart Objects.
1) Opening/Placing Files as Smart Objects
There are several ways to add an image as a Smart Object in Photoshop:
- From Lightroom Classic select Photos > Edit In > Open as Smart Object in Photoshop (this will place an embedded Smart Object).
- From Bridge use File > Place > In Photoshop (this will place an embedded Smart Object).
- From Photoshop use File > Place Embedded or File > Place Linked.
- Drag-and-drop a document from Bridge or Lightroom on to an open document in Photoshop (this will place an embedded Smart Object).
- Option (Mac) | Alt (Win) drag-and-drop a document from Bridge to an open document in Photoshop and create a linked Smart Object.
- Option (Mac) | Alt (Win) drag-and-drop a document from Lightroom on Mac to an open document in Photoshop and create a linked Smart Object.
- Open an image in Camera Raw. Then, hold the shift key to toggle the Open Image button to Open Object and click to open the image as an embedded Smart Object into Photoshop. Note: to set Camera Raw to open as Smart objects by default, click the link at the bottom of the Camera Raw dialog to display the Workflow Options. Under Photoshop, enable the Open in Photoshop as Smart Objects option. Close the dialog. In Bridge, you can then choose to bypass the Camera Raw dialog, by Shift -double clicking the file in Bridge to open it directly into Photoshop as a Smart Object.
02) Smart Object Preferences
Navigate to Photoshop’s Preferences > General for additional control when placing files as Smart Objects:
- Always Create Smart Objects when Placing —converts the file to be placed into a Smart Object. If you have reason to place an image as a regular, pixel based layer, uncheck this option.
- Resize Image During Place —automatically resizes files to fit in the open document and displays the free transformation handles. Because Photoshop converts the placed file into a Smart Object before resizing, the original data is there if you need to transform it larger.
- Skip Transform when Placing —automatically resizes files to fit in the open document and automatically confirms (applies) the transformation
Note: To help with the placement/alignment/scale of an object that is being placed the placed layer’s Opacity, Fill, and Blend Mode can be modified using the Layers panel before committing to the transformation.
3) Convert the Background to a Smart Object
Control -click (Mac) | Right -click (Win) the Background layer (in the Layers panel) to convert the Background to a Smart Object in a single click.
4) Editing the Contents of a Smart Object
Double click the Smart Object’s thumbnail in the Layer’s panel to Edit the Contents of a Smart Object or, use the shortcut Command + Option + Shift + E (Mac) | Control + Alt + Shift + E (Win).
5) The Difference Between Duplicating a Smart Object and Creating New Smart Object via Copy
If you select a Smart Object in the Layers panel and duplicate it using one of the three methods below, editing the contents of ANY of the instances of the Smart Object will update ALL instances of that Smart Object.
- Layer > Duplicate Layer
- Layer > New > Layer Via Copy or Command + J (Mac) | Control + J (Win)
- Option -drag (Mac) | Alt -drag (Win) the Smart Object in the Layers panel
On the other hand, if you select a Smart Object in the Layers panel and choose Layer > Smart Objects > New Smart Object via Copy, a new copy of the smart object is created. Editing the contents of the new copy will only edit that Smart Object.
This video demonstrates the difference between duplicating a Smart Object and creating a new Smart Object via Copy.
6) Linked Smart Objects in Photoshop
In the video below, you’ll learn how to embed and link Smart Objects, update modified content using the Properties and Layers panel, resolve missing files, and filter layers based on Smart Object attributes.
Note: at 7:21 I say that you can’t change an embedded Smart Object to a linked Smart Object (because this video was recorded before the 2014 release of Photoshop). In more recent versions, right -click on the Smart Object layer and use the context sensitive menus to convert from Linked to Embedded (or vice versa).
7) Converting Embedded Smart Objects and Packaging Linked Files in Photoshop
In the video below, you’ll discover how to convert an Embedded Smart Object to a Linked Smart Object as well as package Linked files when collaborating with others.
8) Updating “Modified” Linked Smart Objects
In the illustration below, I have placed an illustration created in Adobe Illustrator into my Photoshop document (this also works with other file types including PSD, TIF, raw, etc.). Let’s imagine that the illustration is still being refined by another artist on the team.
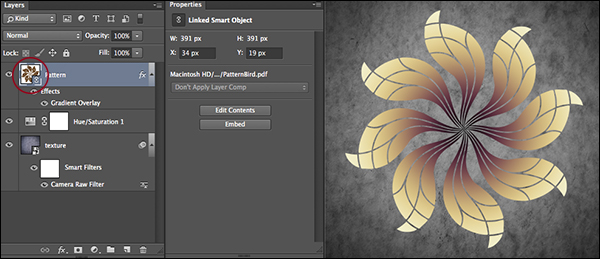
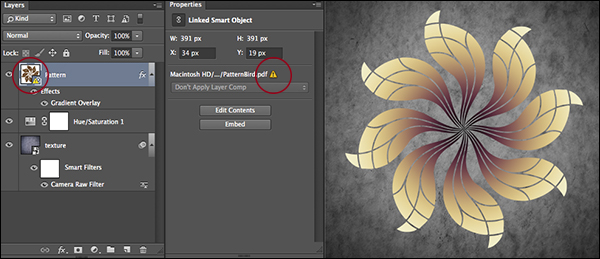
If the linked document (the illustration) is updated, Photoshop will display a warning icon in both the Layers and Properties panel the next time you open the file. Note: Photoshop doesn’t automatically update the master document with the updated linked file as you may not want the updated version.
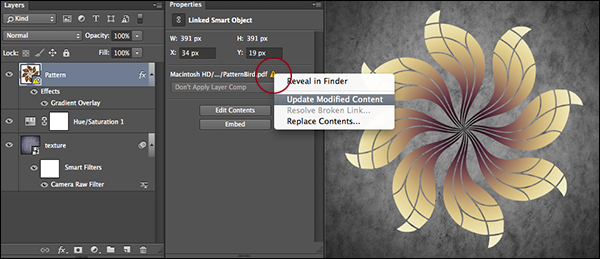
To update the link, click the warning icon in the Properties panel and choose Update Modified Content.
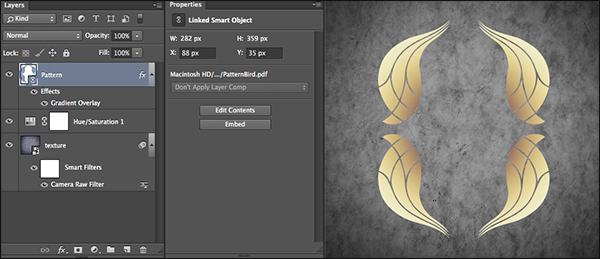
The Smart Object (in the master document) will be updated with the new artwork.
9) What Happens if a Linked Smart Object is Missing?
If you loose the link to a Smart Object (perhaps you’ve moved the image on disk or the linked smart object is off-line), Photoshop will display a dialog when the file is opened that will enable you to relink the asset. Click Relink to locate and relink the asset, or click OK if you don’t have access to the asset or want to relink it at another time using the Properties panel (or, by right-clicking on the linked asset’s thumbnail in the Layers panel).
If the option to “Maximize PSD and PSB File Compatibility” (in the File Handling Preferences) was enabled when the file was saved, Photoshop can still print a document with a missing linked Smart Object (at the same size as it was saved or smaller) because Photoshop will have included a flattened version of the entire document within the PSD or TIFF file. Note: you can not modify the contents of a missing linked Smart Object.
10) Using Linked Creative Cloud Smart Objects
This video demonstrates how to add a graphic to the Libraries panel and how to make change to the Linked Creative Cloud Smart Object. If you’re already familiar with saving different types of assets to the Libraries panel, jump to 2:34 (and stop at 5:11 when I switch to talking about brushes).
11) Copying and Pasting Illustrator Artwork s as a Linked Creative Cloud Smart Object
When copying and pasting artwork from Illustrator to Photoshop, you can choose to Paste the artwork as a Smart Object and “Add to your current library” which automatically converts the artwork to a Linked Creative Cloud Smart Object.
12) How to Extract a Raw File with Settings from a Smart Object in Photoshop
To extract a raw file with it’s settings from a Smart Object, double click on the Smart Object’s thumbnail in the Layers panel (or choose Layer > Smart Object > Edit Contents) and, in the Camera Raw dialog, click the Save Image button in the lower left corner. (My first thought was to select the Smart Object in the Layers panel in Photoshop and choose Layer > Smart Objects > Export Contents but that method doesn’t export any edits made to the Smart Object.)
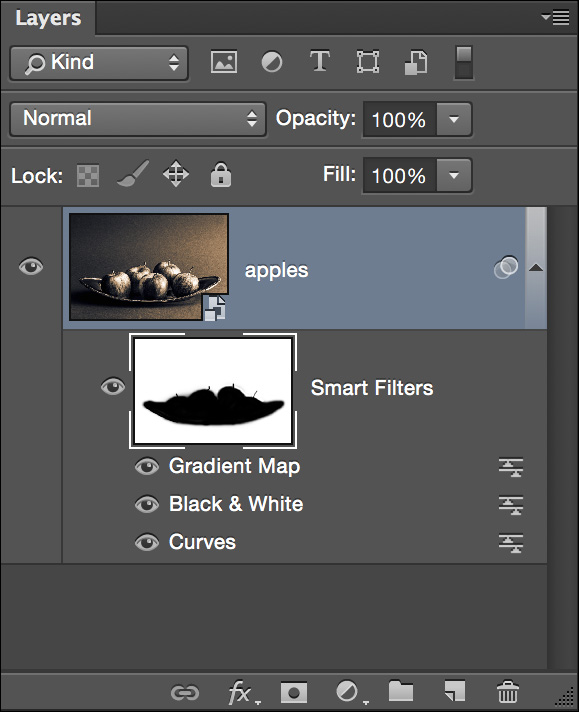
13) Adding Smart Filters to Smart Layers
The video below (Five Reasons to use Smart Filters inPhotoshop), demonstrates how to edit, mask, stack, move, duplicate, and change the blend modes nd opacity of Smart Filters
14) Adding Image > Adjustments to Smart Objects
After converting layer(s) to Smart Objects, applying Image > Adjustments > (xxx), adds the adjustment as a Smart Filter. This can be helpful when the same mask is needed for all adjustments. Available adjustments are: Brightness/Contrast, Levels, Curves, Exposure, Vibrance, Hue/Saturation, Color Balance, Black and White, Photo Filter, Channel Mixer, Color Lookup, Invert, Posterize, Threshold, Gradient Map, Selective Color, and Shadows/Highlights. Note: you could also achieve this by placing all adjustments within a Layer Group and adding the mask to the group.
15) New Addition 11/2019 – Unpack the Contents of a Smart Object – You can now “unpackage” the contents of Smart Objects into their regular layers by choosing Layer > Smart Objects > Convert to Layers, Control -click (Mac) | right -click (Win) on the Smart Object in the Layers panel, or selecting Convert to Layers on the Properties panel. If the Smart Object contained multiple layers, Photoshop creates a Layer Group and places the layers into the group.
When converting Smart Objects that have Transforms (including Warps) applied:
- If the Smart Object contains only a single layer and has a Transform applied, selecting Convert to Layers displays a dialog with the option to retain or discard Transforms. If you choose to retain the transforms, the Smart Object will be rasterized. If you choose “No”, the transformation will be discarded but any Layer Masks, Layer Effects and Vector Masks that were applied to the layer will be retained.
- If a Smart Object contains multiple layers and has a Transform applied, selecting Convert to Layers will separate the layers and discard the transformations.
- Likewise, if a Smart Filter(s) is applied to single or multi-layer Smart Object, you have the choice to retain (apply) or discard it. Note: this also applies to Image>Adjustments (including Image>Auto Adjustments, Auto Tone, Auto Contrast) that are applied to Smart Objects as Smart Filters.
- If there are nested Smart Objects (Smart Objects within a Smart Object), then only the parent Smart Object is converted to Layers (the nested Smart Objects remain as Smart Objects).
- Converting a Smart Object to Layers that contains a raw file will rasterize the raw data (convert to pixels).
16) How to Work with Smart Objects in Lightroom Classic and Photoshop — This video (When to use Virtual Copies and Snapshots in Lightroom), demonstrates the power of Smart Objects and Snapshots in Lightroom Classic and Photoshop.