The Eyedropper Tool
• Tap I to access the Eyedropper tool.
• Click in the image area with the Eyedropper tool to select the foreground color. Option -click (Mac) | Alt -click (Win) in the image area to select the background color.
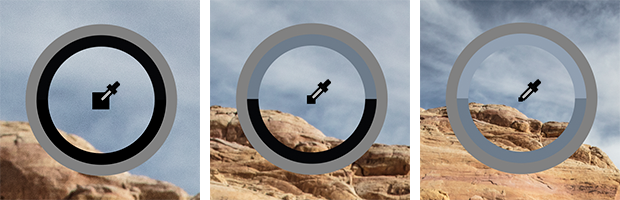
• By default, clicking in the image area with the Eyedropper tool displays a sample ring . The “new” color (the one being sampled) is displayed in the upper half of the ring while the current (or foreground color before sampling) is displayed in the bottom half. The ring is surrounded by gray to help neutralize surrounding colors that may influence color choices. The sample ring can be toggled off/on by unchecking/checking Show Sampling Ring in the Options bar.
• Choose a sample size from the list in the Options bar from Point Sample to 101 by 101 Average. Because the Eyedropper tool samples color based on a specific number of pixels on-screen, zooming in or out on an image will (most likely) change the sampled color. In the illustration below, the Eyedropper tool’s sample size is set to 51 by 51 Average. The black rectangle in the image is 60 by 60 pixels. When the image is zoomed 1:1, and a sample is taken from the middle of the black rectangle, the sampled color is black. When the image is zoomed to 50%, the sampled color is a lighter blue as now some of the sky is included. When the zoom percentage is set to 25%, the sampled color is even lighter as more of the clouds are included.
• Use the pull-down menu in the Options bar to choose to sample from different combinations of layers including: Current Layer, Current & Below, All Layers, All Layers No Adjustments, and Current and Below No Adjustments.
• The Eyedropper tool’s Sample Size affects the Magic Wand, Magic Eraser, and Background Eraser.
• The Eyedropper tool can sample colors from outside of Photoshop. Make the color visible (on the desktop, in another application etc.). Then, begin by clicking to sample a color with the Eyedropper within the image area in Photoshop and (without releasing the mouse), drag over the desired color to sample it from the desktop/other application.
Note: with a Painting tool selected, holding Option (Mac) | Alt (Win) temporarily enables the Eyedropper tool in order to quickly sample a color from the image area.
The Color Sampler Tool
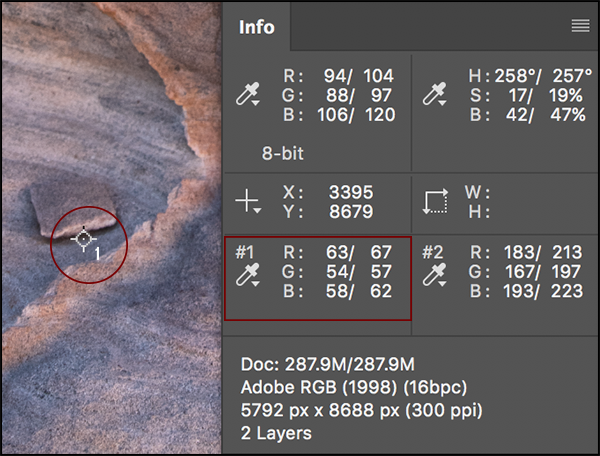
• To keep track of multiple color readouts, click in the image area to set up to ten color samplers. Use the Info panel (see below) to access the Color Sampler’s color readouts.
• Option -click (Mac) | Alt -click (Win) the Color Sampler to delete it, (the icon will change to a pair of scissors)
Note: with the Eyedropper tool selected, Shift-click in the image area to set a Color Sampler. Option + Shift (Mac) | Alt + Shift (Win) -click on the Color Sampler to delete a Color Sampler (With the Eyedropper tool selected).
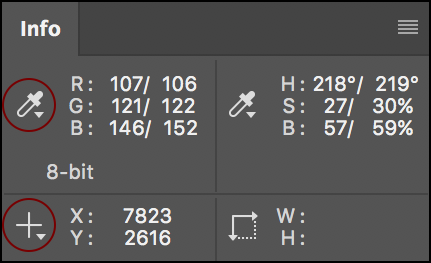
The Info Panel
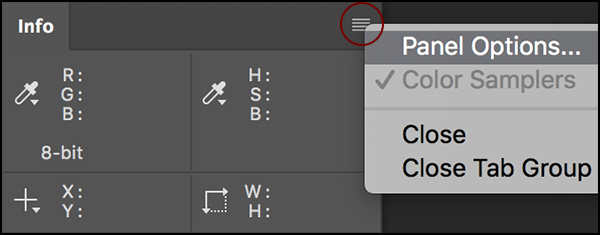
• Choose Window > Info to display the Info panel and access information about the open document. To customize the Info panel, use the fly-out menu to access Panel Options…
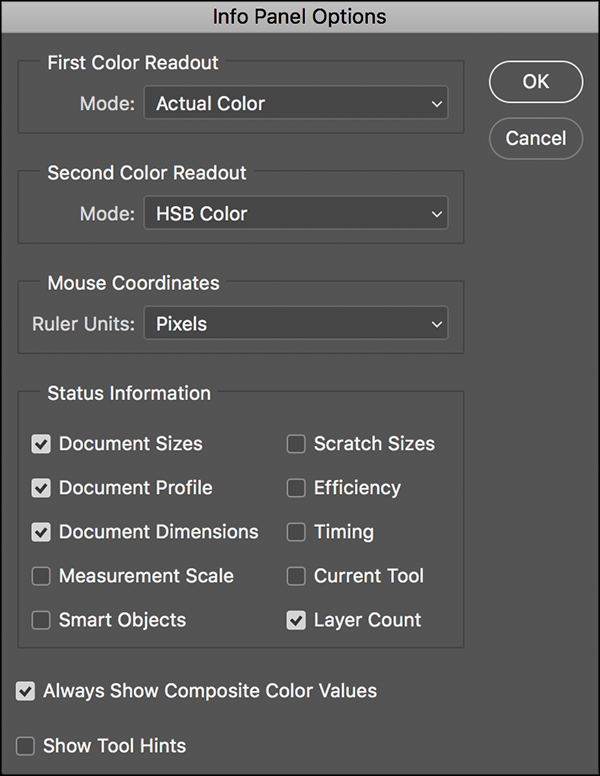
Color Readouts — choose the desired ColorReadout settings from the drop down list (Actual/Proof Color, Color Mode, Total Ink/Opacity and Bit Depth).
Mouse Coordinates — choose the desired Ruler Units of measurement
Status Information — check to enable additional status information. Note: while most of the status information can be viewed using the Status bar (located at the bottom of the document window), I find it helpful to display them here when using Full Screen mode(s) as the document status bar is hidden. The Status bar can display two options that are not available in the Info Panel 32-bit Exposure and Save Progress.
In Photoshop’s default state, the Info panel displays two sets of values for tracking changes made to an image. To display only the composite values, use the fly-out menu to access Panel Options and enable “Always Show Composite Color Values”.
Choose to show/hide Tool Hints (brief suggestions for using the currently selected tool).
• To quickly change Color Readout settings (without using the panel options), click-hold the eyedropper icon in the Info Panel and select from the list. Option -click (Mac) | Alt -click (Win) the eyedropper in the Info panel to change all Color Readout settings all at once. Click-hold the cross-hairs icon to quickly change the units of measurement used to track cursor coordinates.
Merci beaucoup pour votre tutoriel ☺️ le Top