A blend mode allows you to control how the pixels on one layer work with or affect (or blend with) other pixels in Photoshop. They can be found throughout the program in such areas as the Layers panel, Layer Styles, Painting tools, Smart Filters, the Fill, Stroke, and Fade commands, and the Apply Image and Calculations commands. Within each of these different areas of Photoshop, the available blend modes vary based on which modes are useful and appropriate for each command. Except where noted, these modes work on a per channel basis (i.e., they treat an RGB image like three grayscale images).
When using blend modes, it’s helpful to think of the effects in terms of the following three colors:
• The base color is the original color in the image (which can be the color on a layer or a cumulative combination of layers).
• The blend color is the color being blended (the painting or editing color).
• The result color is the color resulting from the blend.
In addition, some of the blend modes have what are called Neutral colors, or colors that have no effect when they are blended. For example, the Multiply blend mode has a Neutral color of white (white has no effect), the Screen blend mode has a Neutral color is black (black has no effect), and the Overlay blend mode has a Neutral color of 50% gray (gray has no effect).
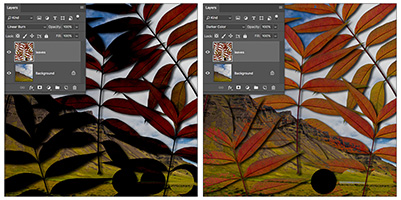
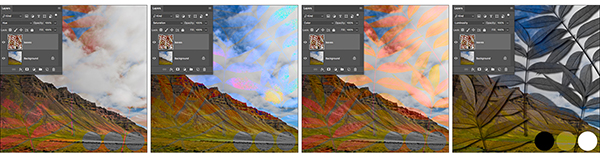
In this example there are two layers in the Photoshop document – the Background layer is a photo of a mountain and the top layer is a photo of leaves with three circles (black, white, and gray) added to demonstrate the effect of the Neutral color of the Blend Mode.
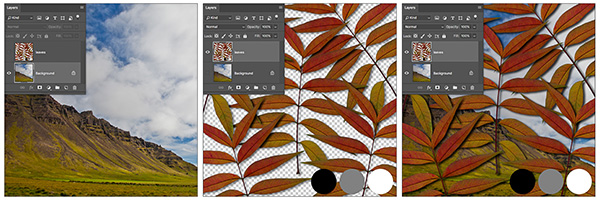
In the first illustration, the Background layer (the photo of the mountains) is visible. In the second illustration, the photo of the leaves is visible. In the third illustration, both layers are visible but with the Blend Mode for the leaves layer set to Normal, there is no blending between layers.
The first group of Blend Modes (the ones at the top above the first dividing line) contains from one to four blend modes depending on the feature: Normal, Dissolve, Behind and Clear. Note: the Fill command and the painting tools are the only ones that list the Behind and Clear Blend modes and are only available when working on layers that can have transparency. In this grouping, there is no Neutral color – all blend colors will effect the base colors. When used at 100% opacity, the blend color will replace the base color. (I point out that I’m using 100% because lowering the opacity of the layer (or paint or fill etc.) will change the way that the blend color is combined with the layer below.)
• Normal – This is the default mode. Pixels don’t blend. Results are as expected – the contents of a layer are displayed without any blending. A photo will appear as the original or, if you paint with a color, the result color is the color that you chose. Note: the Normal Blend mode changes to the Threshold Blend Mode when working with indexed-color and/or bitmapped images.
• Dissolve – Edits or paints each pixel to make it the result color; however, the result color is a random replacement of the pixels with the base color or the blend color, depending on the opacity at any pixel location. Lowering the opacity (in this example the opacity of the Layer) reveals a speckled effect which is either the blend color or the base color – never a combination of the two. In this case, the result looks a bit like a mezzotint.
• Behind – Edits or paints only in the transparent areas of a layer. This mode is available for the painting tools and the Fill command. It’s like painting on the back side of acetate, underneath the image. This mode works only in layers with Lock Transparency deselected. Note: it could be more flexible to paint on a separate layer but I’m sure that people have reasons to do it this way!
• Clear – Makes all affected pixels transparent – essentially the same result as using the Eraser tool. This mode is available for the painting tools, the Fill command, and the Stroke command. Note: you must be in a layer with Lock Transparency deselected to use this mode.
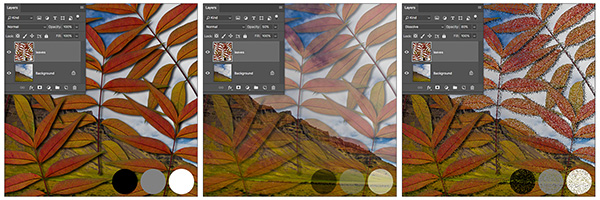
In the first illustration, the Blend Mode is set to Normal – layers don’t blend. In the second illustration, the Blend Mode is set to Normal – the layers – blend because the Opacity of the leaves was was lowered to 50%. In the third illustration, the opacity is lowered and the Blend Mode is set to Dissolve.
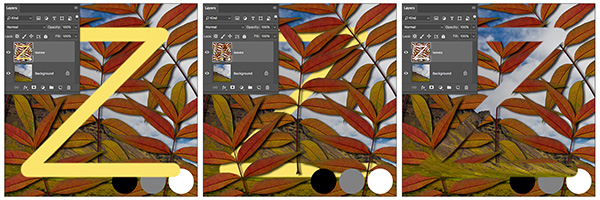
In the first illustration, the “Z” is painted with the Brush set to Normal. In the second illustration, the Brush was set to the Behind Blend Mode. Note: it would be more flexible to paint on a separate layer but I’m sure that people have reasons to do it this way! In the third Illustration the Brush was set to the Clear Blend Mode – creating essentially the same result as using the Eraser tool.
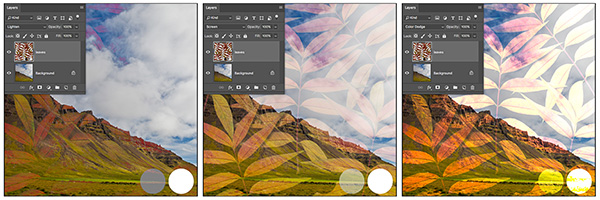
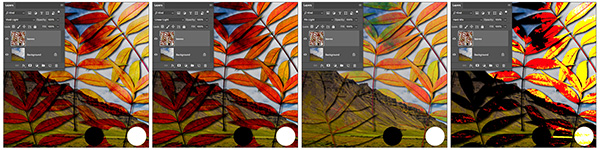
The second group of Blend Modes (Darken, Multiply, Color Burn, Linear Burn and Darker Color) have a Neutral color of white. This means that white as a blend color will have no effect on the result color (white simply disappears). These blend modes all have stronger effects as the blend color becomes darker. Using the Fill slider on Layers palette using blend modes from this group may modulate this effect rather than performing a simple opacity blend the way normal mode does. By definition:
• Darken – Looks at the color information in each channel and selects the darker of the base or blend color as the result color. Pixels lighter than the blend color are replaced, and pixels darker than the blend color do not change.
• Multiply – Looks at the color information in each channel and multiplies the base color by the blend color. The result color is always a darker color. Multiplying any color with black produces black. When you’re painting with a color other than black or white, successive strokes with a painting tool produce progressively darker colors, producing an effect similar to drawing on the image with multiple magic markers. Multiply is similar to sandwiching two pieces of slide film (positive images) and projecting them together.
• Color Burn – Looks at the color information in each channel and darkens the base color to reflect the blend color by increasing the contrast. The result will always be darker and have more contrast.
• Linear Burn – Looks at the color information in each channel and darkens the base color to reflect the blend color by decreasing the brightness and – unlike multiply – it will clip values while doing so. It has a stronger darkening effect than either multiply or color burn. Linear Burn is a combination of color burn and multiply.
• Darker Color – Compares the total of all channel values for the blend and base color and displays the lower value color. Darker Color does not produce a third color, which can result from the Darken blend, because it chooses the lowest channel values from both the base and the blend color to create the result color.
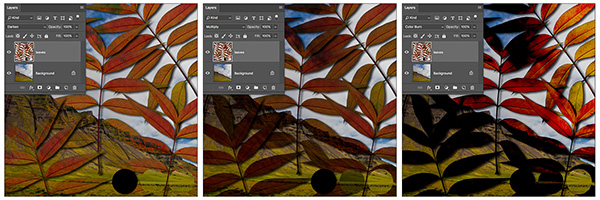
Blend Modes set to Darken, Multiply, Color Burn, Linear Burn and Darker Color.
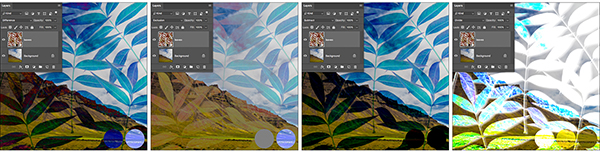
The third group of Blend Modes have a neutral color of black. This means that black as a blend color will have no effect on the result color. These blend modes all have stronger effects as the blend color becomes lighter. Using the Fill slider on Layers palette and using blend modes from this group may modulate this effect rather than performing a simple opacity blend the way normal mode does. The lightening modes are essentially the inverses of the darkening modes.
• Lighten – Looks at the color information in each channel and selects the lighter of the base or blend color as the result color. Pixels darker than the blend color are replaced, and pixels lighter than the blend color do not change.
• Screen – Looks at each channel’s color information and multiplies the inverse of the blend and base colors. The result color is always a lighter color. The effect is similar to projecting multiple photographic slides onto the same screen. Screen reduces contrast and can produce and effect similar to painting an area with bleach.
• Color Dodge – Looks at the color information in each channel and brightens the base color to reflect the blend color by decreasing the contrast. Color Dodge is an exception to the neutral color rule in this group – it is the only lightening mode that preserves blacks. Color Dodge is similar to moving the input white triangle in Levels. As such, color dodge increases contrast but may clip the brighter portions of the lower colors to white.
• Linear Dodge – Looks at the color information in each channel and brightens the base color to reflect the blend color by increasing the brightness. Linear dodge is the combination of color dodge and screen. As such, it has a stronger lightening effect than either of them. Linear Dodge will clip bright values, unlike Screen.
• Lighter Color Compares the total of all channel values for the blend and base color and displays the higher value color. Lighter Color does not produce a third color, which can result from the Lighten blend, because it chooses the highest channel values from both the base and blend color to create the result color.
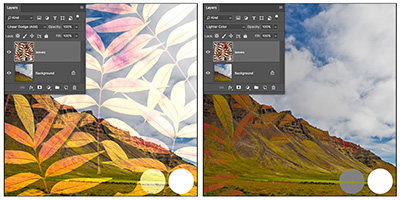
Blend Modes set to Lighten, Screen, Color Dodge, Linear Dodge, and Lighter Color.
The fourth group of Blend Modes have a neutral color of 50% gray. This means that 50% gray as a blend color will have no effect on the result color. All of the light modes (except for Overlay) lighten when using colors brighter than 50% gray and darken when using colors darker than 50% gray. This happens on a channel-by-channel basis so they can actually both lighten and darken at once.
• Overlay – Multiplies or screens a scaled version of the blend color into the base color based on whether the lower color is darker or lighter than 50% gray. Colors darker than 50% are multiplied, colors lighter are screened. Patterns or colors overlay the existing pixels while preserving the highlights and shadows of the base color. The base color is not replaced but is mixed with the blend color to reflect the lightness or darkness of the original color.
• Soft Light mode – Darkens or lightens the colors, depending on the blend color. If the blend color (light source) is lighter than 50% gray, the image is lightened as if it were dodged. If the blend color is darker than 50% gray, the image is darkened as if it were burned in. Painting with pure black or white produces a distinctly darker or lighter area but does not result in pure black or white. It uses gamma adjustment s to darken or lighten. The effect is similar to shining a diffused spotlight on the image.
• Hard Light – Multiplies or screens the colors, depending on the blend color. If the blend color (light source) is lighter than 50% gray, the image is lightened, as if it were screened. This is useful for adding highlights to an image. If the blend color is darker than 50% gray, the image is darkened, as if it were multiplied. This is useful for adding shadows to an image. Painting with pure black or white results in pure black or white. The effect is similar to shining a harsh spotlight on the image.
• Vivid Light – Burns or dodges the colors by increasing or decreasing the contrast, depending on the blend color. If the blend color (light source) is lighter than 50% gray, the image is lightened by decreasing the contrast. If the blend color is darker than 50% gray, the image is darkened by increasing the contrast. Vivid Light uses color burn and color dodge to darken or lighten.
• Linear Light – Burns or dodges the colors by decreasing or increasing the brightness, depending on the blend color. If the blend color (light source) is lighter than 50% gray, the image is lightened by increasing the brightness. If the blend color is darker than 50% gray, the image is darkened by decreasing the brightness. Linear Light uses linear burn and linear dodge to darken or lighten.
• Pin Light – Replaces the colors, depending on the blend color. If the blend color (light source) is lighter than 50% gray, pixels darker than the blend color are replaced, and pixels lighter than the blend color do not change. If the blend color is darker than 50% gray, pixels lighter than the blend color are replaced, and pixels darker than the blend color do not change. Pin Light uses darken or lighten modes to darken or lighten. This is useful for adding special effects to an image.
• Hard Mix – Lighter colors lighten the result. Darker colors darken the result. Lowering the fill opacity creates less posterization/thresholding.
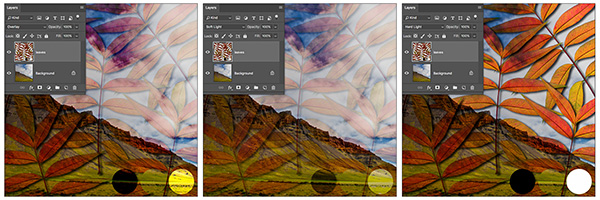
Blend Modes set to Overlay, Soft Light, Hard Light, Vivid Light, Linear Light, Pin Light, and Hard Mix.
The fifth group of Blend Modes have a neutral color of black. This means that black as a blend color will have no effect on the result color. The Divide blend mode has a Neutral color of white.
• Difference – Looks at the color information in each channel and subtracts either the blend color from the base color or the base color from the blend color, depending on which has the greater brightness value. Blending with white inverts the base color values.
• Exclusion – Creates an effect similar to but lower in contrast than the Difference mode. Blending with white inverts the base color values. Blending with black produces no change. The effect is a bit like using one image to solarize the other.
• Divide and Subtract – Both are intended for us with calibrated imaging however interesting creative effects are also possible. For astronomy and microscopy: you want to subtract background values (dark frames, factoring out hot pixels, etc.), and divide by a flat field image (removing vignetting and other lens defects, bringing insensitive pixels back up to normal range, etc.). You can remove lens falloff even if you have something that Lens Correction can’t handle (like mirror lenses, dust on the lens, etc.). Of course you can also use them for HDR toning tricks (or experimentation).
Blend Modes set to Difference, Exclusion, Divide, and Subtract.
The sixth group of Blend Modes have no neutral colors. They work in a hue, saturation, luminance space that is similar to but different from both HSB and HSL. In particular, while hue is the same in all three spaces, all of the spaces define saturation and brightness/lightness/luminance somewhat differently. All of the combinations described below are subject to clipping to keep the values in the valid RGB range.
• Hue – Creates a result color with the luminance and saturation of the base color and the hue of the blend color.
• Saturation – Creates a result color with the luminance and hue of the base color and the saturation of the blend color. Painting with this mode in an area that has no (0) saturation (gray) causes no change.
• Color – Creates a result color with the luminance of the base color and the hue and saturation of the blend color. This preserves the gray levels in the image and is useful for coloring monochrome images and for tinting color images. Color yields a result with the same hue and saturation as the upper color and the luminance of the lower color.
• Luminosity – Creates a result color with the hue and saturation of the base color and the luminance of the blend color. This mode is the inverse of Color mode.
Blend Mode set to Hue, Saturation, Color, and Luminosity.
The video below demonstrates some of the most commonly used Blend Modes for compositing images using the Layers panel (Multiply, Screen, Overlay and Soft Light):
The video below provides a quick overview of the most common uses of the blend modes used with Adjustment layers (Hue, Saturation, Color and Luminosity):
While each Blend Mode has it’s own custom keyboard shortcut (see below), holding the shift key and tapping “+” (plus) or “-” (minus) will quickly cycle through the list of blend modes ( + moves forward and – moves backwards). If a tool painting tool selected, then these shortcuts change the blend modes for the painting tool. If a tool is selected that doesn’t have a Blend Mode option in the options bar, then this shortcut will change the blend modes on the Layers panel.
All Blend Modes begin with the same keyboard modifiers: Option + Shift (Mac) | Alt + Shift (Win) and then add a single letter. For example, Option + Shift + N (Mac) | Alt + Shift + N (Win) is the shortcut for the Normal blend mode.
- Dissolve – I
- Darken – K
- Multiply – M
- Color Burn – B
- Linear Burn – A
- Lighten – G
- Screen – S
- Color Dodge – D
- Linear Dodge – W
- Overlay – O
- Soft Light – F
- Hard Light – H
- Vivid Light – V
- Linear Light – J
- Pin Light – Z
- Hard Mix – L
- Difference – E
- Exclusion – X
- Hue – U
- Saturation – T
- Color – C
- Luminosity – Y
- Behind – Q Note: The Behind blend mode is only available with the brush tools, not layers.
- Clear – R Note: The Clear blend mode is only available with the brush tools, not layers.
Note: Neither the Subtract nor the Divide blend modes have shortcuts