When soft proofing images (in the Develop module):
- Tap “S” to toggle Proof Preview on/off.
- In Proof Preview view, Shift + S toggles the Destination Gamut Warning on/off.
- With Soft Proofing enabled, the first time that you make a change to your image, Lightroom presents a dialog asking if you want to “Create virtual copy for soft proofing?” If you choose “Create Proof Copy”, Lightroom automatically creates a virtual copy allowing you to preserve your previous settings (in the master file), and create a new rendition (or version) tailored to the specific soft proofing options that you choose. If you choose “Make this the Proof” Lightroom will make the changes on the master file. Because everything that you do in Lightroom is nondestructive, if you ever choose “Make this the Proof” and then want to undo the changes, in the Develop Module, select Setting > Proof and disable it.
- With Proof Preview enabled, tap “Y” to toggle between the Current / Proof Preview state. Use the Before menu (in the Tool bar) to choose to view the Before State or Current State as the “Before”. “\” (backslash) toggles Before / Proof Preview full screen (one view showing at a time).
- Lightroom Classic can preview and manage CMYK files (select the profile from the list). If, however, any adjustments are added to a CMYK file (in Quick Develop or the Develop module) and that file is opened in Photoshop (using the option to “Edit a Copy with Lightroom Adjustments”), Lightroom will open the CMYK file as RGB.
In this Quick Tip — Seven Tips for the Print Module in Lightroom Classic, you’ll discover how to print a subset of images in a collection, display page info, add captions, watermarks and more!
In this Quick Tip — Adding a Background Image in the Print Module in Lightroom Classic, you’ll discover how easy it is to create a lightened version of an image to use as a background image when using the Custom Layout Style in the Print Module in Lightroom Classic.
In this Quick Tip — Printing Multiple Images to a Single JPEG in Lightroom Classic, you’ll learn how to easily print multiple images to a single JPEG file (perfect for printing banners, diptychs etc., to post online. Note: the smallest JPEG image that Lightroom Classic can print from the print module is 400 px on either dimension.
In this episode of the Complete Picture (Print a Book from a Single Sheet of Paper, I demonstrate how to quickly create a print template in Lightroom to layout a simple 8 page book from a single sheet of paper.
The Print Module — Command + P (Mac) | Control + P (Win) selects the Print module.
- Command + Shift + P (Mac) | Control + Shift + P (Win) opens the Page Setup dialog.
- Command + Option + Shift + P (Mac) | Control + Alt + Shift + P (Win) opens the Print Settings dialog.
- Command + Option + P (Mac) | Control + Alt + P (Win) prints one copy.
Working with Templates — Command + N (Mac) | Control + N (Win) creates a new template (to save the current print settings for future use).
- Command + Shift + N (Mac) | Control + Shift + N (Win) creates a new folder for templates.
Working with Guides — Command + Shift + G (Mac) | Control + Shift + G (Win) toggles the visibility of all selected options in the Guides Panel.
- Command + R (Mac) | Control + R (Win) toggles the visibility of the Rulers.
- Command + Shift + J (Mac) | Control + Shift + J (Win) + Shift toggles the visibility of the Page Bleed.
- Command + Shift + K (Mac) | Control + Shift + K (Win) + Shift toggles the visibility of the Image Cells.
- Command + Shift + U (Mac) | Control+ Shift + U (Win) toggles the visibility of dimensions.
Selecting Different Images — While in the Print module, instead of returning to the Library module to select different images, you can:
- Choose a different collection using the Collections panel.
- Use the Go Back and Go Forward navigation icons to view recently viewed folders (located in the black bar above the filmstrip).
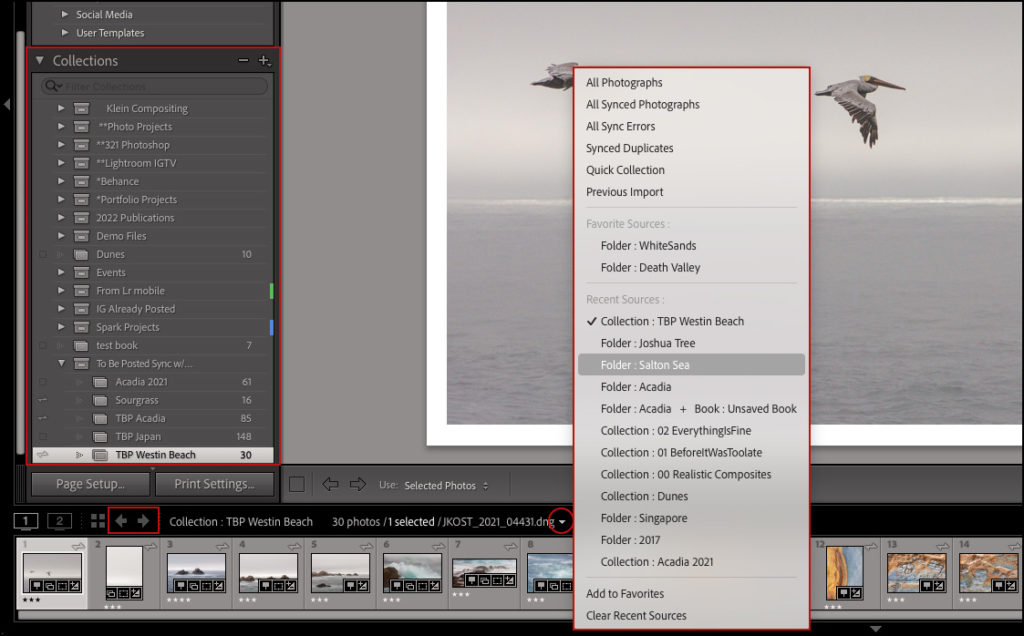
- Click the path for the currently selected image (located in the black bar above the filmstrip) and choose from Recent and Favorite Sources.
Filtering the Selected Source — Use the Content Selector drop down menu to quickly filter and print: All Filmstrip Photos, Selected Photos, or Flagged Photos.
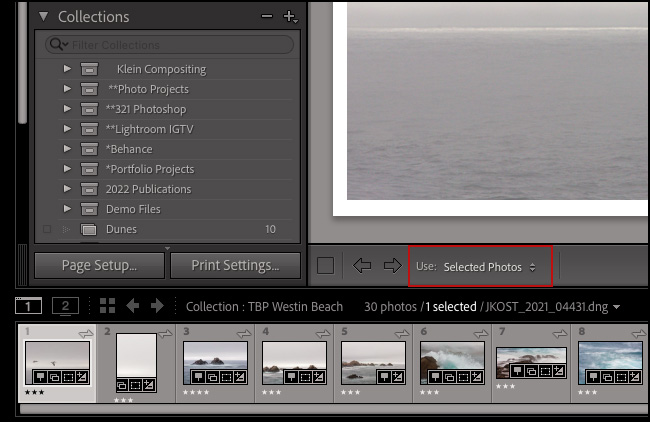
- Use the Filter drop down menu to quickly filter and print based on flags, edits, ratings, labels and filter presets.

- Use the filmstrip to reorder photos without having to return to the Library module.
Page Navigation — Command + Shift + Left/Right Arrow (Mac) | Control + Shift + Left/Right Arrow (Win) moves to first/last page. Command + Left/Right Arrow (Mac) | Control + Left/Right Arrow (Win) moves to previous/next page.
Reposition a Crop — Command -drag (Mac) | Control -drag (Win) to reposition an image within a cell (when the aspect ratio of the cell doesn’t match the image).
Picture Package Layout Engine — When using the Picture Package Layout Engine, Option -drag (Mac) | Alt -drag (Win) duplicates the cell.
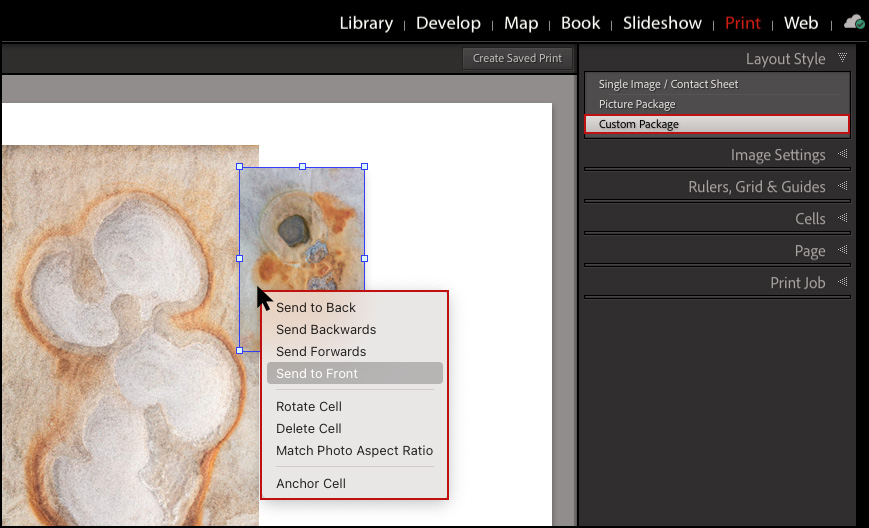
Custom Package Layout — When using the Custom Package Layout, Option -drag (Mac) | Alt -drag (Win) to duplicate a cell.
- Right -click (or Control -click on Mac) in a cell to change the stacking order of two overlapping cells.
- Command -drag (Mac) | Control -drag (Win) repositions the image within cell (when the aspect ratio of the cell doesn’t match the image).
- Control -click (Mac) | Right -click (Win) in a cell to change the stacking order or two overlapping cells (Send to Back, Send Backwards, Send Forwards, Send to Front), Rotate Cell, Delete Cell, Match Photo Aspect Ratio, and Anchor Cell.
- To print images on top of a “branded” template (or example), create an Identity Plate using the “branded” template. Then, add the Identity Plate to the Custom Package layout and enable Render Behind Image.
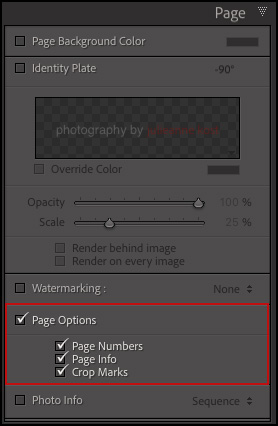
Page Numbers — While using the Single Image/Contact Sheet Layout Style, enable use the Page panel to add Page Numbers, Page Info (sharpening, profile, and printer information), and Crop Marks to the page.
Print To JPEG — In the Print Job panel, selecting Print To: JPEG prints layouts to JPEG files (perfect for printing banners, diptychs etc., to social media).
Create Saved Prints — In order to save print settings with a set of images, click Create Saved Prints at the top of the creation’s preview area or use the shortcut Command + S (Mac) | Control + S (Win). When you choose to create a Saved Prints, the project is saved in the Collections panel. To create a duplicate of any saved project (to create additional Prints with the same layout but different images for example), right -click (or Control -click Mac) on a collection and choose Duplicate Collection from the context sensitive menu.
Print Sharpening — Lightroom Classic automatically adjusts the amount of sharpening in the Print Module based on the size of the original and the size of the printed piece. The different “Print Sharpening Amounts” (Low, Standard and High), should be selected based on the content of the image (as well as personal preferences). It can be helpful to print a small number of “typical” images on the paper stocks that you use most frequently to see what “amount” you typically prefer as these settings are applied “on the fly” and are not visible in the print preview area.
Printing Diptychs — Because of the aspect ratio of most displays, when creating a slideshow of my photography, I typically show a single image when it’s orientation is landscape, and two images when the orientation is vertical. Although it may be more work to find images that work well together, displaying two vertical images better fills the space, provides the opportunity to show more images, and helps change the rhythm of the images in the presentation.
To create the diptychs, sort the images into pairs (I prefer using collections to do this). Then, in the Print module, create a template at the correct size using the Print Job panel (19.20 x 10.80 at 100 ppi for HD videos for example).
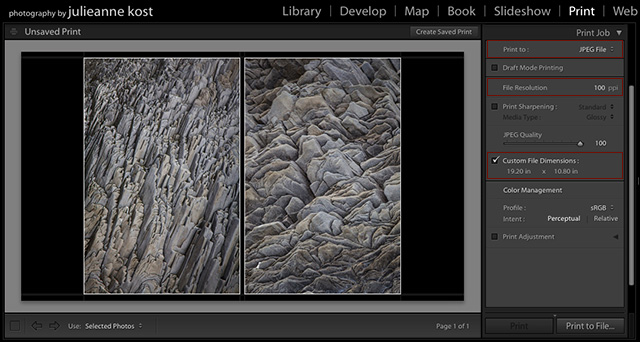
Select the images, and choose Print To File. Import the new diptychs into Lightroom, reorder as needed, move to the Slideshow module, and you’re on your way to a more interesting presentation of your work!