In the video below, you’ll learn how to customize your default processing settings across multiple camera models using the Raw Defaults preferences and presets in Lightroom Classic.
Lightroom Classic — Raw Defaults
Lightroom Classic’s Raw Defaults options (Preferences > Presets) provide an easier and more intuitive way to assign and manage the default rendering of your raw files across multiple camera models. For example, you may want to change the default rendering setting (such as apply a custom camera profile, change the amount of sharpening, or enable lens profile corrections), on all of the images that you import from one camera model, but not from another. Raw Defaults enable you to set custom defaults instead of having to first import files and then change settings. Note: Raw defaults are also applied when/if an image is reset if the image is already in your catalog.
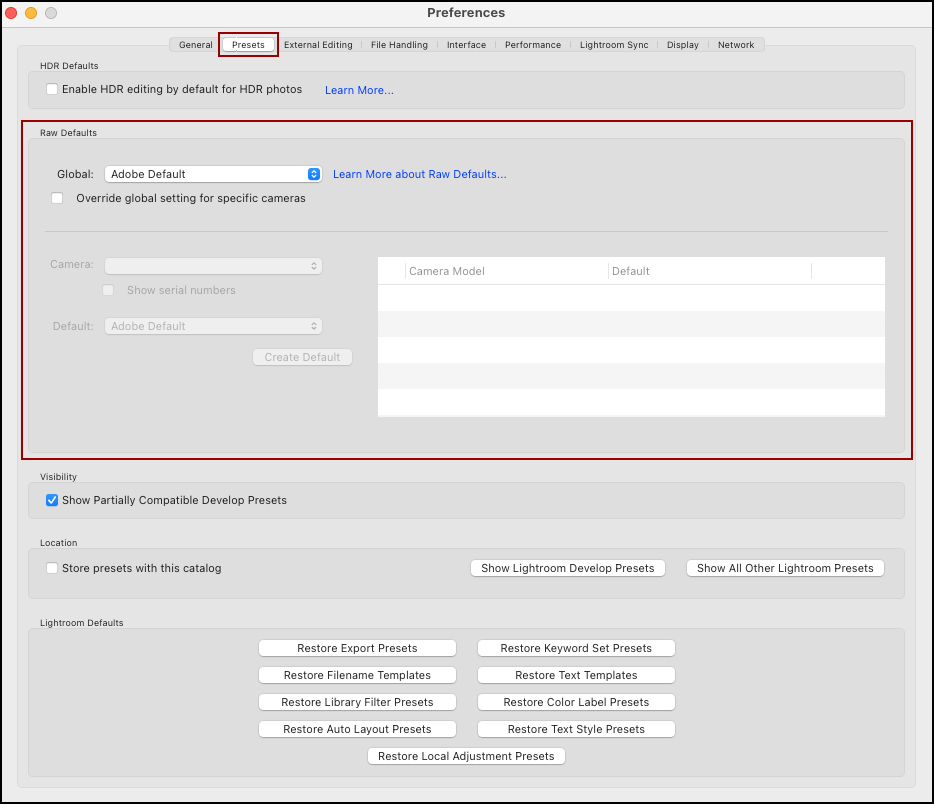
Raw Defaults can be applied universally (across all cameras), or customized by camera model, ISO speed, and even serial number. To apply the same Raw Defaults universally, use the Global (Master in Previous versions) drop-down menu and select from either Camera Settings or Preset.
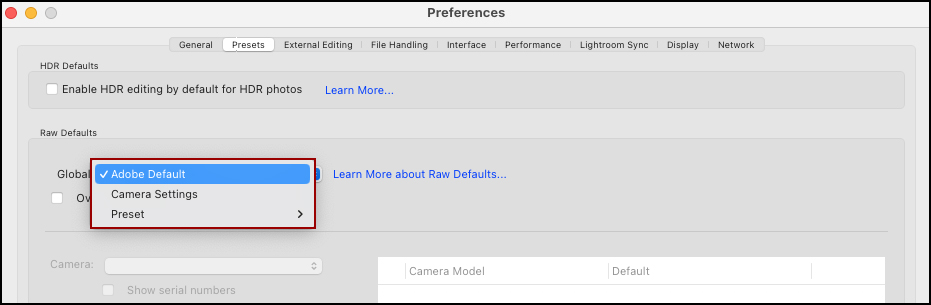
- Choose Camera Settings to honor picture styles or profiles settings that you’ve set in-camera and preserve the “as shot” look whenever possible (Creative Styles for Sony, Picture Styles for Canon, Film Simulations for Fuji, Picture Controls for Nikon etc.).
- Choose Preset to apply a Develop Preset as your Raw Default settings.
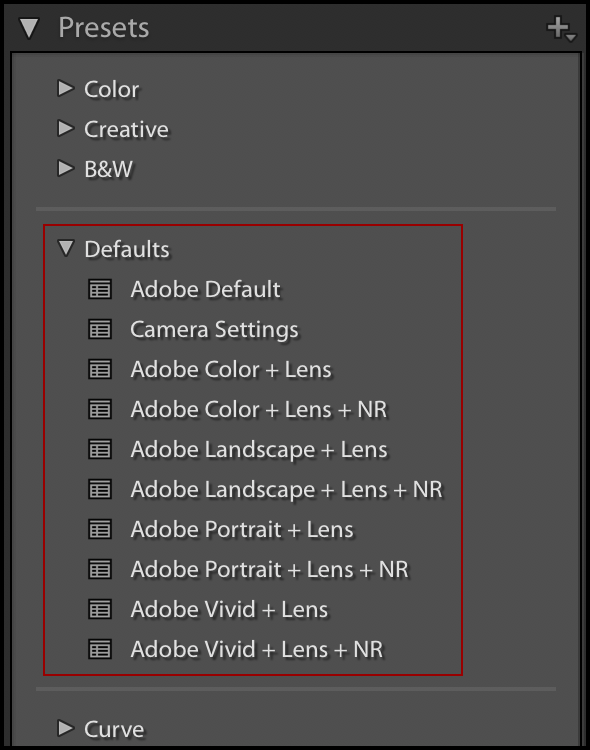
You can apply one of Lightroom Classic’s “Defaults” presets (Lightroom Classic installs nine different combinations of Profiles/Lens Correction/Noise Reduction options which can be applied as Raw Default settings) or, create one of your own.
Note: If you want to create and use your own preset(s), you will need to first create the preset. Then, select Preferences > Raw Default in order to apply it. To create a preset, see “How to Create a Preset in Lightroom Classic” and “Creating and Working with ISO Adaptive Presets in Lightroom Classic” below.
• To return to Lightroom Classic’s default settings, choose Adobe Default.
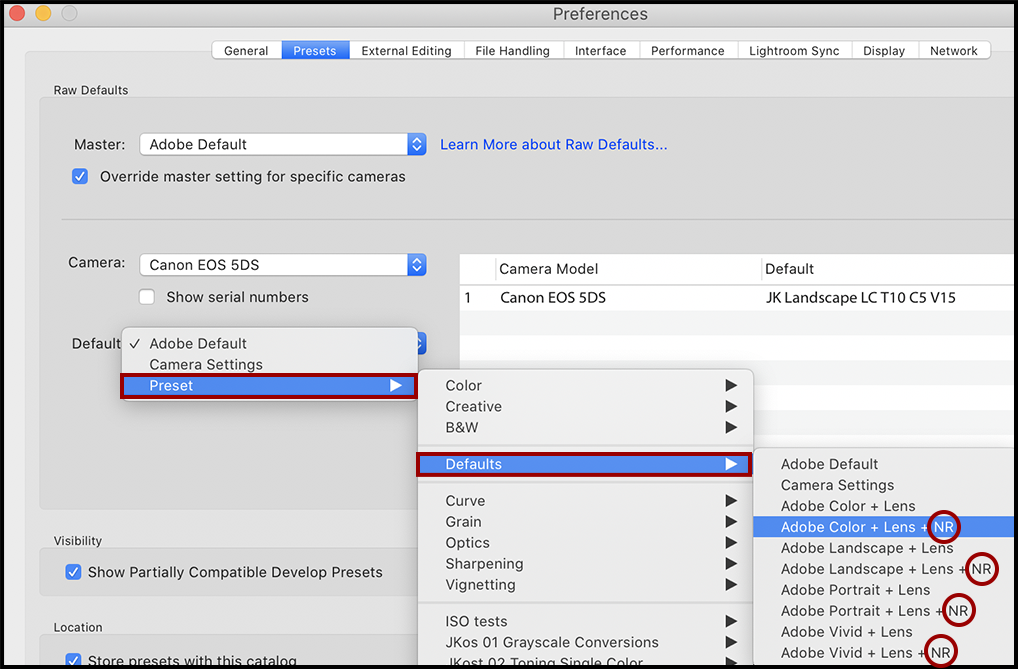
To set different Raw Defaults for each camera model, enable “Override global setting for specific cameras”. Then, select the desired camera from the Camera drop-down menu.
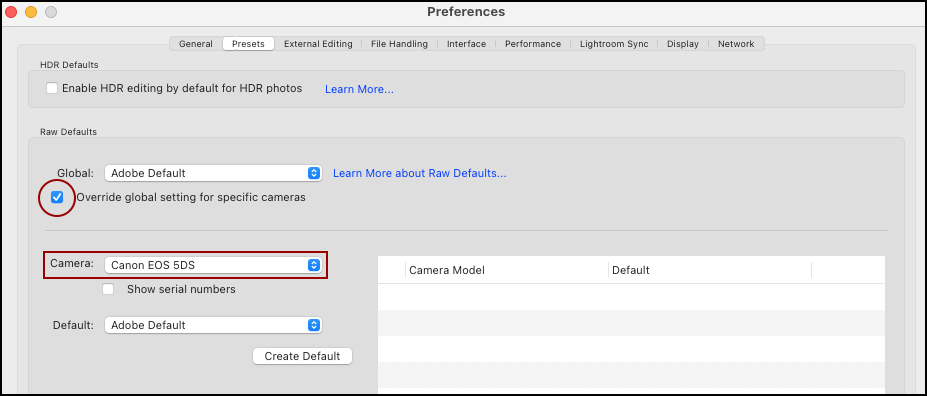
Use the Default drop-down menu to choose between Camera Settings or Preset. In the example below I have selected a preset from the Defaults group that applies the Adobe Landscape profile, Lens Corrections, and Noise Reduction.

After selecting either Camera Settings or a Preset, click “Create Default”.
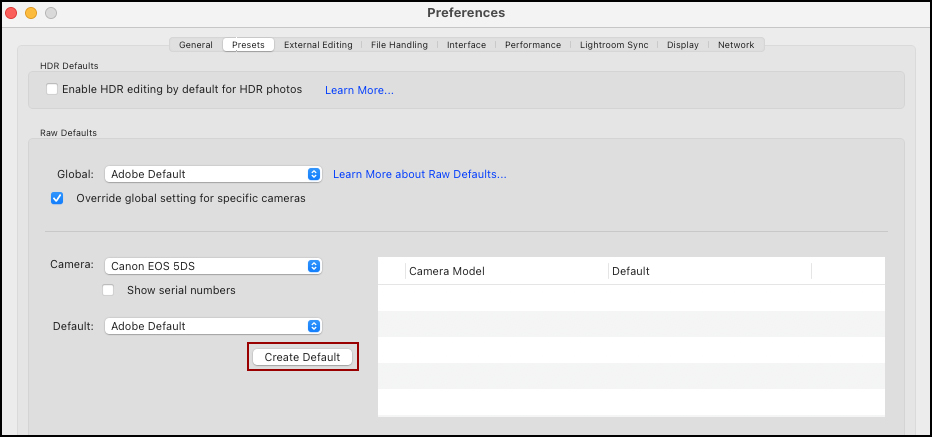
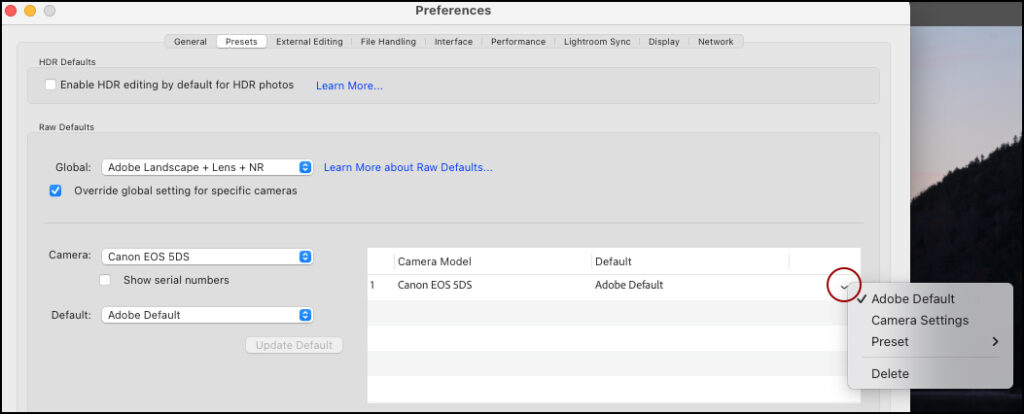
The Camera Model and the Default applied are displayed in the box to the right making it easy to keep track of multiple camera’s with different settings applied. To reset, change, or delete a Default setting, click the downward facing chevron to the right of the camera model/default and select the desired option. Note: after selecting a different option you will need to click “Update Default” to accept the changes.
Once Raw Defaults are set, all newly imported files will be rendered using the custom Raw Defaults. Lightroom will not change or auto-update any settings on images that were imported prior to changing the Raw Defaults preferences.
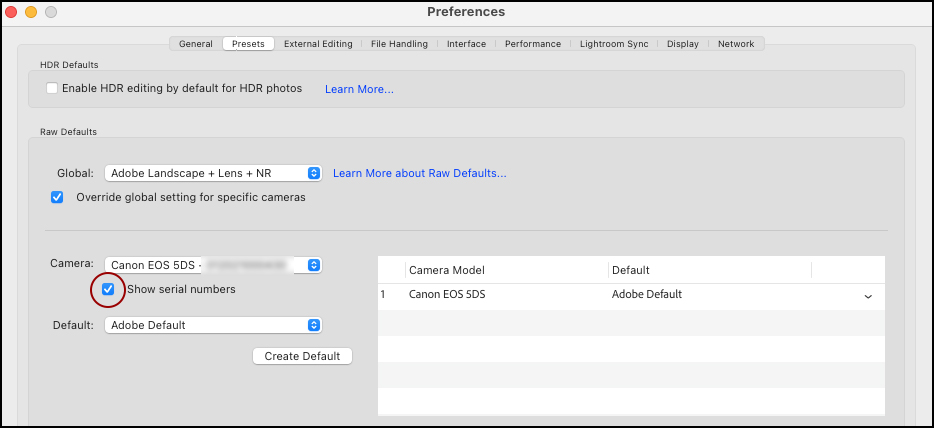
To customize the defaults for multiple cameras of the same model, enable “Show serial number”.
Note: It’s important to note that presets applied on Import (Import > Apply During Import > Develop Settings), is applied on top of (after) the Raw Defaults.
How to Create a Preset in Lightroom Classic
With the new set of Default presets, many photographers will not need to create their own custom preset. If however, you have a different combination of sliders that you prefer to apply as Raw Defaults, here’s how to create a preset:
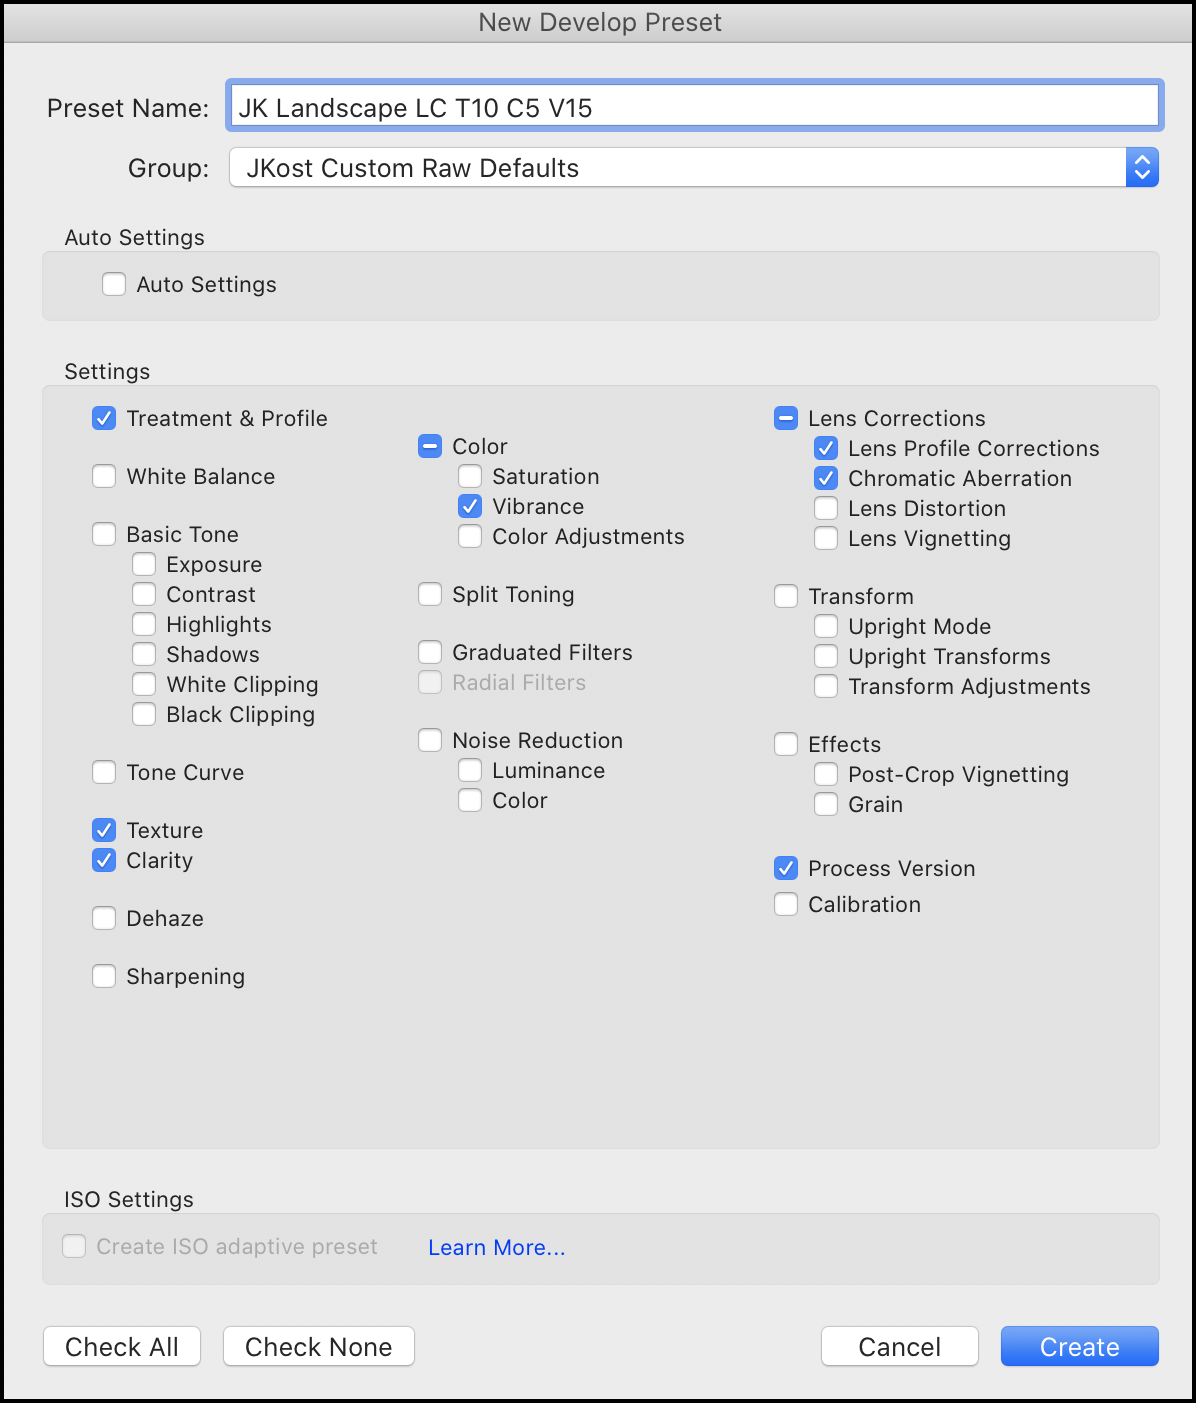
- First, make the changes to the photo that you want to include in the preset. In the example below, I’ve changed the Profile to Adobe Landscape, enabled Remove Chromatic Aberration and Enable Profile Corrections and slightly increased the amount of Texture, Clarity, and Vibrance.

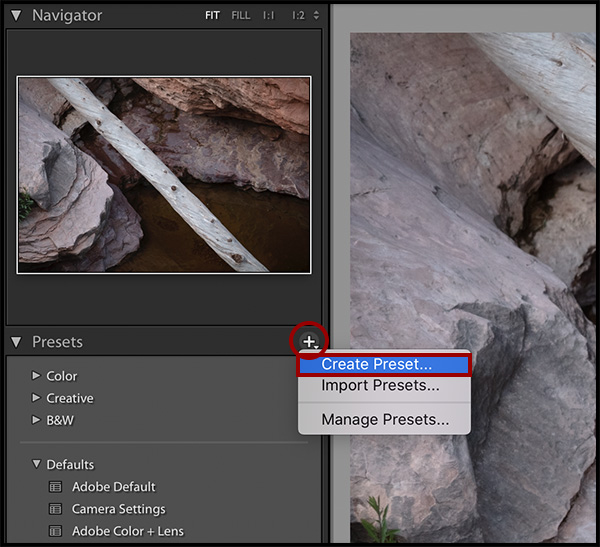
- Then, click the Plus (+) icon on the Presets panel and choose Create Preset…
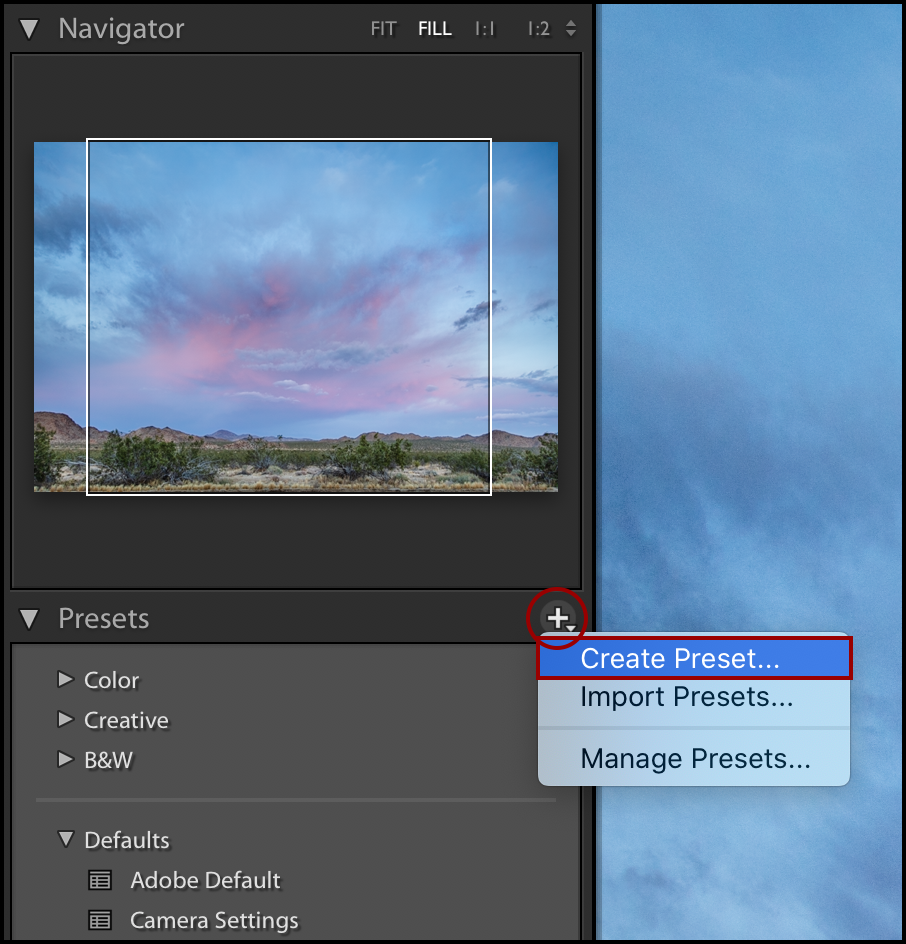
- Give the preset a name, select a Group to place it into, enable (check) the settings that you want to be saved as a part of the preset, and click Create. The preset will then be available for you to select as a Raw Default (Preferences > Presets).
Creating ISO Adaptive Presets in Lightroom Classic
In Lightroom Classic v9.3, you can create ISO Adaptive Presets which allow a single preset to apply different edit settings to different photos depending on their ISO settings. For example, you can create an ISO Adaptive Preset that applies different levels of noise reduction or sharpening to high ISO verses low ISO images. Creating your own ISO adaptive preset is really only necessary only if you prefer different values than Adobe’s default settings.
With ISO adaptive settings, you only need to assign the values to two or more images from the same camera. Those values will be interpolated based on the actual image’s ISO. Lightroom ships with four Adaptive ISO presets – specifically designed to be applied as Raw Defaults which apply different Noise Reduction values based on the ISO of the image.
To create your own ISO Adaptive Preset, do the following:
- Select two or more images, with different ISO values that were taken with the same camera. (That’s the only way in which an ISO adaptive preset is meaningful and practical).
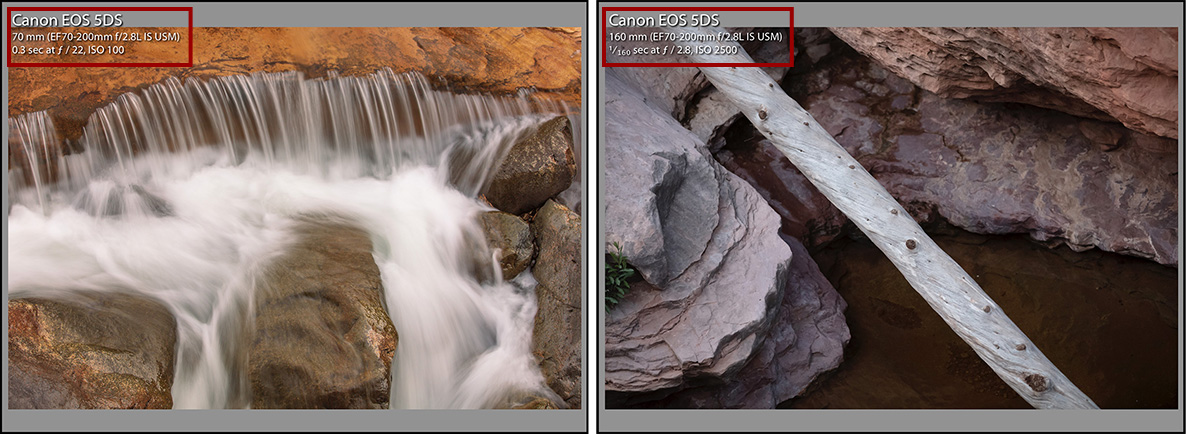
- Edit the setting for the images as desired.
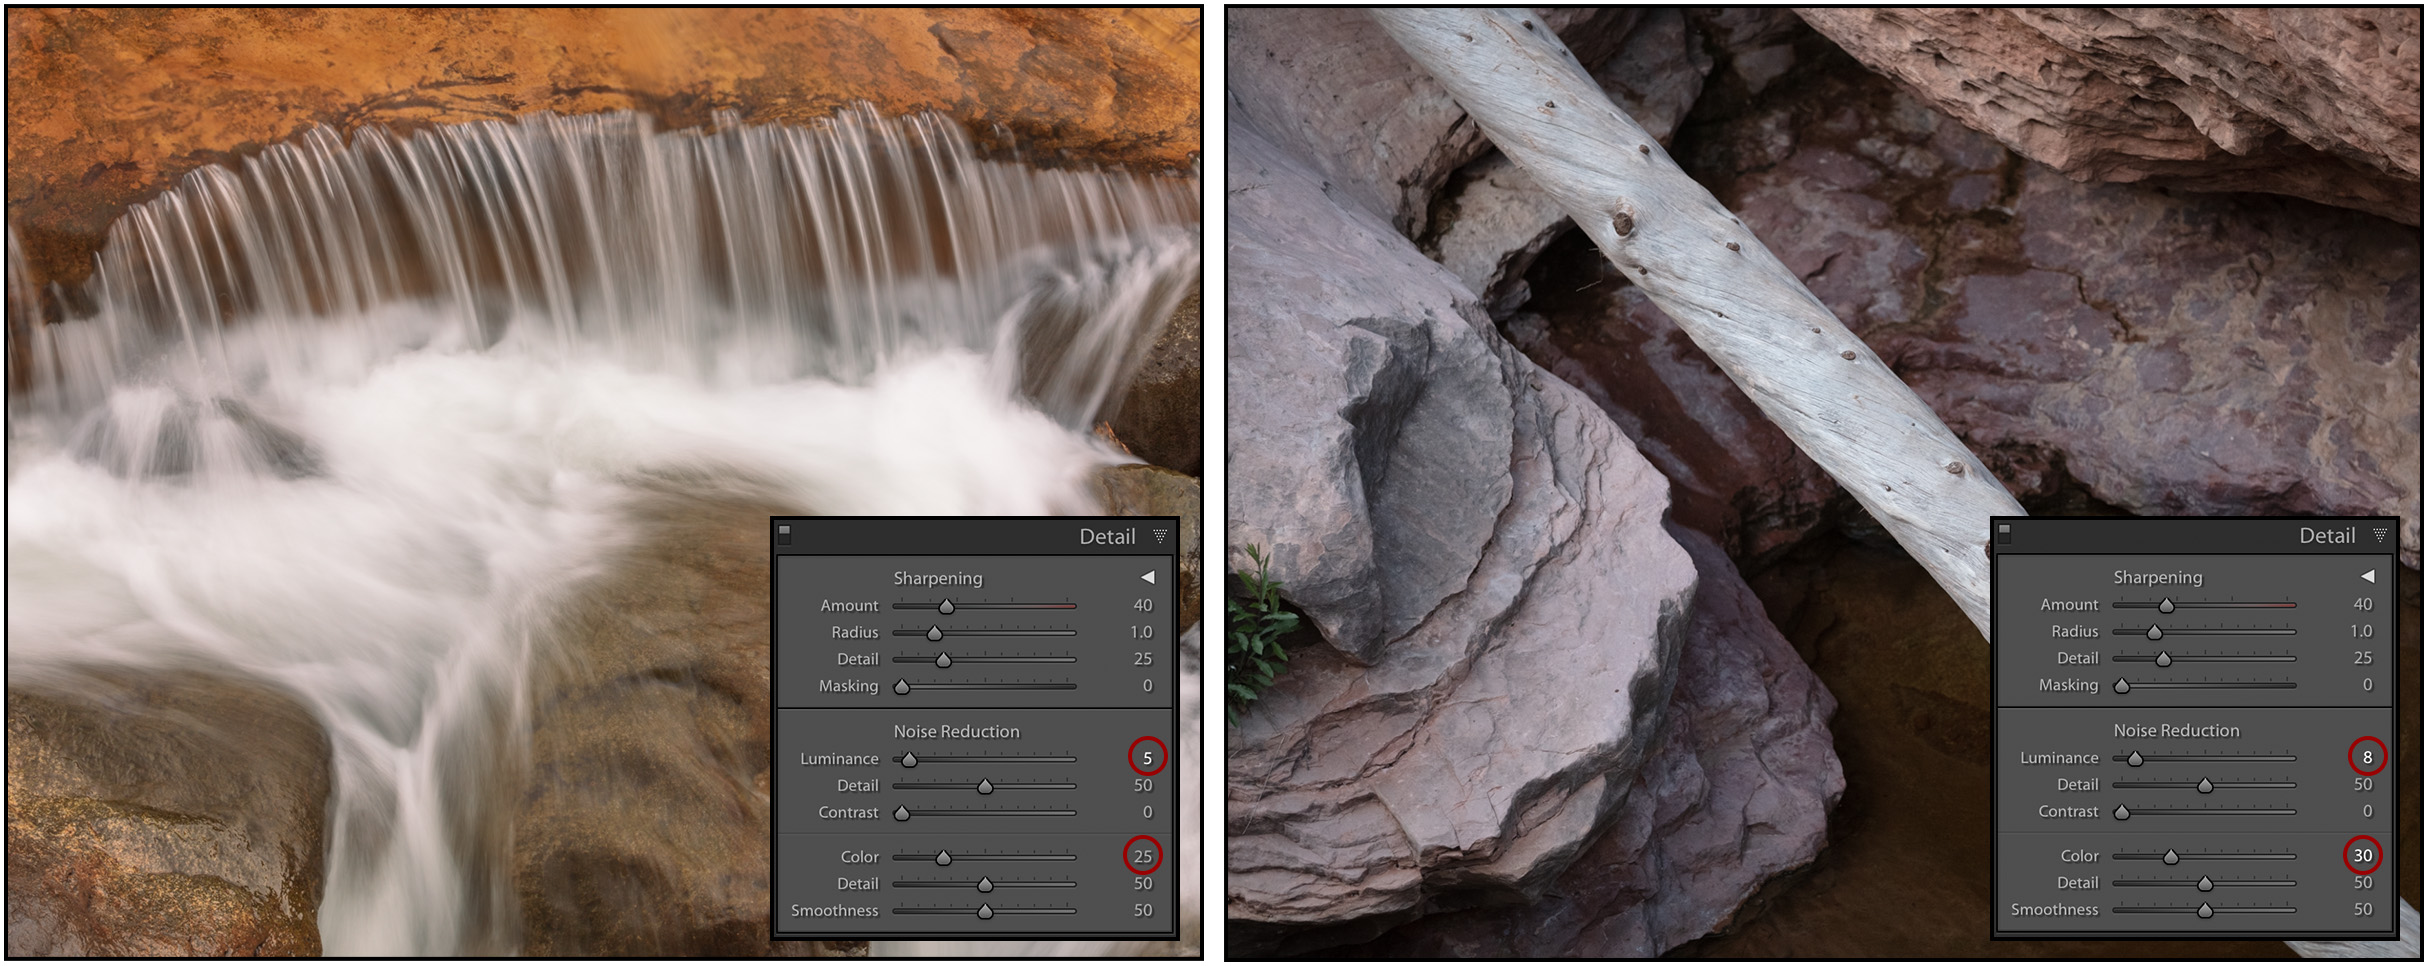
- With the images still selected, click the Plus (+) icon on the preset panel and choose Create Preset.
- In the New Develop Preset dialog, select the desired settings to include in the preset and be sure to enable “Create ISO adaptive preset” under ISO Settings. Note: as ISO adaptive presets aren’t visually different, you may want to include ISO as part of the name or place the ISO adaptive presets in their own preset group.
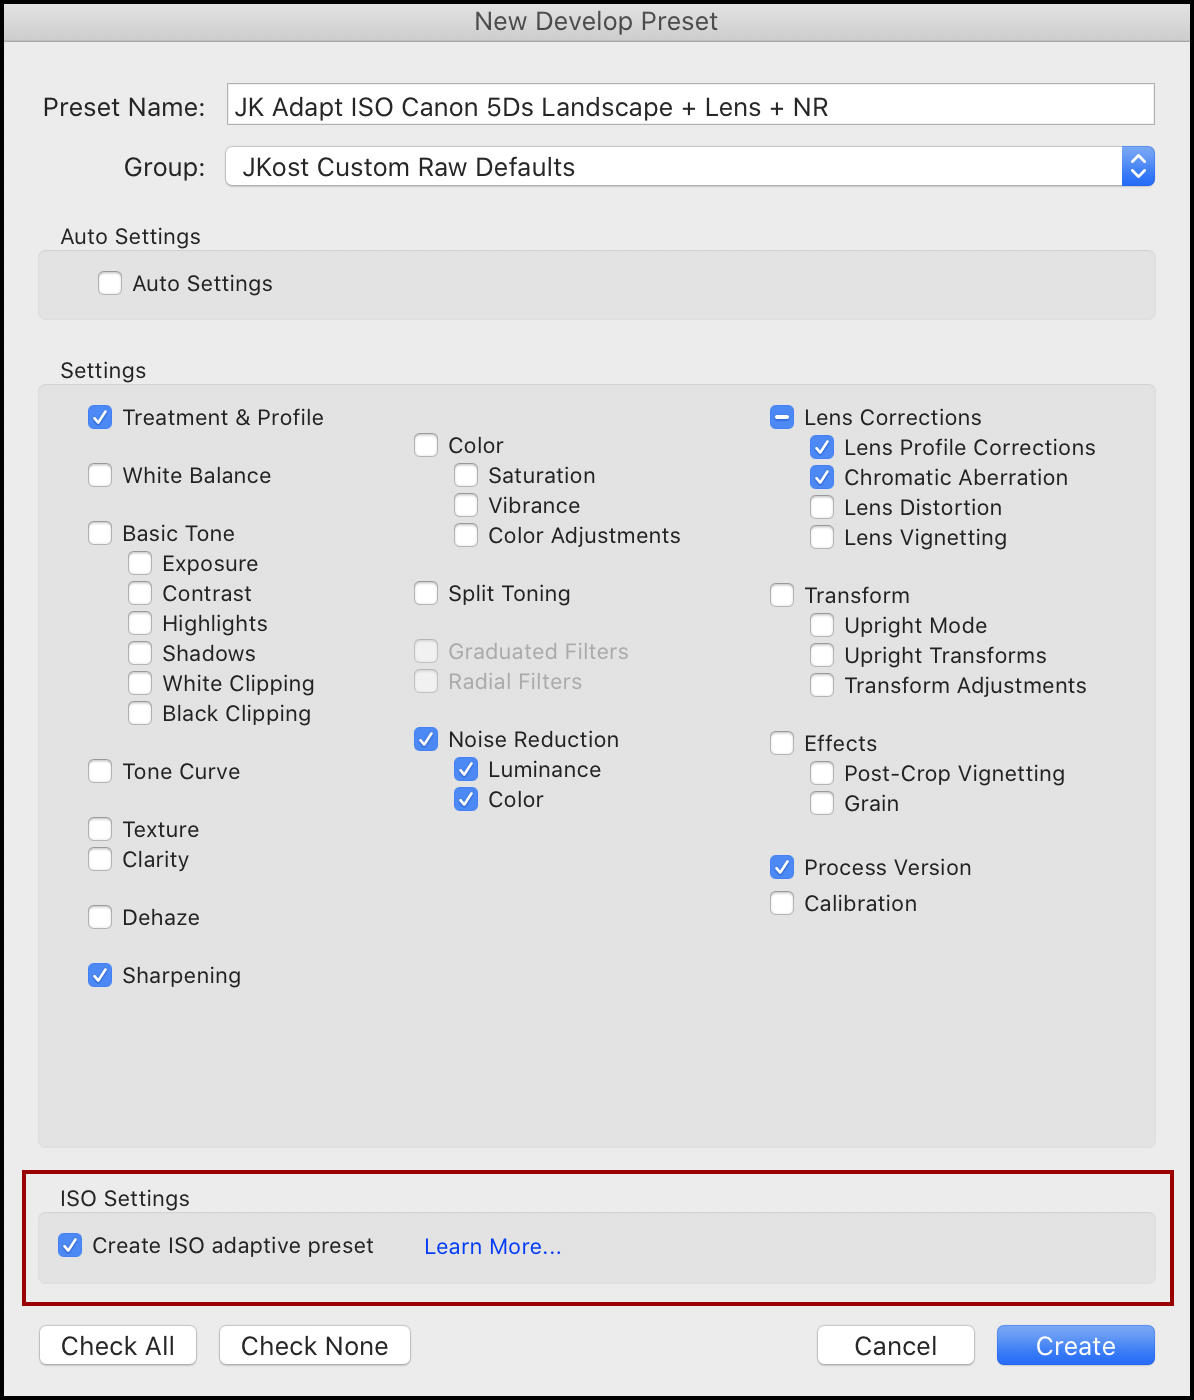
- Click Create to make the = ISO Adaptive preset. Note: If two or more images, with different ISO values, are not selected, “Create ISO adaptive preset” will be disabled. When applying the preset, Lightroom Classic will automatically interpolate the correct amount of noise for images with different ISO values.