Actions were designed to remove the need to manually apply the same sequence of commands over and over again. They can help increase our productivity and help eliminate repetitive tasks. The following videos and tips will get you up to speed quickly!
This video (A Short Course in Automating Photoshop) will give you a great overview of Action (and while it was recorded a number of years ago, it’s held up nicely. You’ll see some additional features in your current version of Photoshop (such as conditional actions), but the basic concepts remain the same for creating and editing actions.
This video (Advanced Automation – Actions, Droplets And Scripts) covers more advanced techniques including droplets, integration with LR and scripts.
This video (Helpful Hints for Creating Actions in Photoshop) is another “oldie but goodie” and had additional tips and tricks for working with actions (some of which are included below).
This video (Working with Variable in Photoshop) demonstrates the incredible power or Variables for tasks such as automating event photography, creating web banners and producing graphics.
In this episode of (3, 2, 1, Photoshop! Ten Tips for Working with Actions), Julieanne shares ten essential tips for working with Actions in Photoshop.
I also have a complete course — Photoshop Automation: Tips, Tricks, and Techniques on LinkedIn Learning. The course focuses on how to automate repetitive tasks in Photoshop, so that you can accomplish more in less time. In it, I discuss a variety of productivity-boosting techniques including; creating single and multi-step actions, saving and loading action, inserting stops, menu items, and conditionals, tips for working with layers, using the Batch command, creating droplets, automatically creating graphics from layers using Generator and working with Variables and scripts.
I’ve also included a number of shortcuts below for those of you who prefer to read about features rather than watch a video.
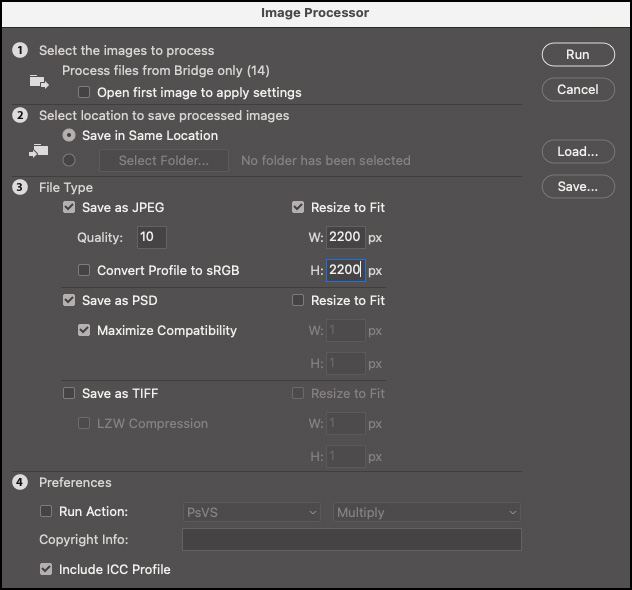
The Image Processor Script — When saving large volumes of images to JPEG, TIFF or PSD, Photoshop’s Image Processor script may be exactly what you need. Access Image Processor from within Photoshop as well as Adobe Bridge:
Photoshop: File > Script > Image Processor.
Bridge: Tools > Photoshop > Image Processor. Note: The advantage of starting within Bridge is that you can select a subset of files from within a folder.
In the Image Processor dialog, you’ll have the opportunity to choose a source and the destination for the processed files, the file format, size and more.
Quickly Saving Raw Files as Different File Formats — When working with raw files, select the desired files in Bridge and click the Open in Camera Raw icon. Then, in the Camera Raw dialog, select the files in the filmstrip and click the Save Images icon. When saving, you’ll have the opportunity to rename files, change file format, color space and bit depth, resize, add sharpening, and even save presets. Note: If you’re working with Lightroom Classic, you can use the Export options to export your raw files as different formats.
Create a New Action Set —To create a new folder (to organize your Actions), click the folder icon at the bottom of the Actions panel.
Create a New Action — Click the New Action icon at the bottom of the Actions panel to create a new action.
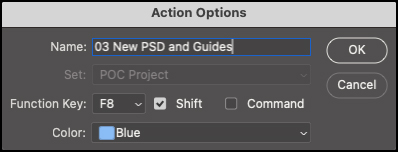
Renaming Actions — Double click on the name of an action in the Actions panel to rename the action “inline”, or double click to the right of the action’s name to access the Actions Options or using the Action’s panel’s fly-out and selecting Action Options.
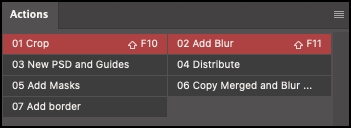
Assigning F-keys to Actions — Assign a function key to run an action when creating an action or, assign one after the fact by double clicking to the right of the actions name or using the Action’s panel’s fly-out and selecting Action Options. The shortcut will appear to the right of the action’s name in the Actions panel. Note: different operating systems assign F-keys for certain tasks. To use those F-keys in Photoshop, they must be disabled or changed in the operating system (in Windows, you cannot use the F1 key, nor can you use F4 or F6 with the Ctrl key).
Color Coding Actions — Assign a color to an action to help identify them when creating an action or, assign one after the fact by double clicking to the right of the action’s name or using the Action’s panel’s fly-out and selecting Action Options.
Duplicating Commands — Drag to reposition commands within an action (in the Actions panel) or, drag commands between action. Option -drag (Mac) | Alt -drag (Win) to copy a command within an action or to another action.
Saving Actions — On the Actions panel, select a Set (folder) of actions and use the fly out menu to choose Save Action. You must select a set, not an individual action in order to save it – if you only want to save a single action, place it into it’s own set. If there are multiple actions within the set, they will all be saved.
• When saving actions to the default folder, they appear within the list of default actions in the fly-out menu (after closing and reopening Photoshop). These are the default folders on Mac and Win:
MAC: (User) Applications/AdobePhotoshop <version >/Presets/Actions
WIN: C:\Users\<username>\AppData\Roaming\Adobe\Adobe Photoshop <version>\Presets\Actions
• Actions are cross platform so regardless if they’re recorded on Mac or Win, you can share the .atn files cross platform.
Loading Actions — If you have received an action from someone, you can load it by double clicking on the action in the operating system, double clicking on the action within Bridge, or using the fly-out menu on the Actions panel to choose Load Actions.
Deleting Actions — To delete an action or a Set of actions, drag it to the trash icon in the Actions panel.
Viewing Action Steps and Details — Option -click (Mac) | Alt -click (Win) the disclosure triangle next to an action to collapse or expand all components of that action.
To Play a Single Step in an Action — Double clicking on a single command in the Actions panel will play the command if there are no options associated with the command (Select> All or Edit > Copy for example). If, however there are options associated with the command (such as Image > Image Size), Photoshop will display the corresponding dialog box. This is an excellent feature if you want to make changes to that command – but beware, whatever you enter in the dialog box will now become the recorded value in the action. To bypass the dialog (playing the command using it’s recorded options), add the Command (Mac) | Control (Win) key when double clicking the name of the recorded command.
Button Mode — In the Actions Panel, use the fly-out menu to select Button Mode to view your actions as buttons (clicking the button runs the action). If you’re working with several actions in a production environment, you might want to undock and reposition the Actions panel so that it fits horizontally along the bottom of your screen, making more actions accessible without scrolling (even move the Actions panel to a second monitor and/or save it as a workspace. The disadvantage to working in Button Mode is that you can’t create new actions in Button mode, nor can you target individual states within an action.
Insert Menu Item — To add a command which can’t be recorded (such as View > Fit on Screen), use the fly-out menu to select Insert Menu Item and, with the Insert Menu Item dialog open, choose the command from its menu to add it to the action.
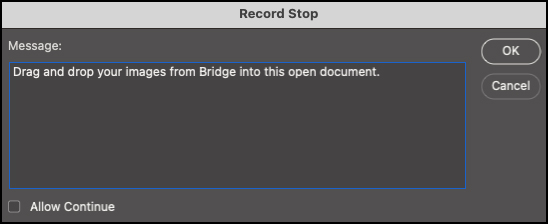
Insert Stop — You can include a “stop” in an action that let you perform a task that cannot be recorded or add a note (for example, you may need to add a note to explain how to modify a mask or add a reminder to manually perform another task before continuing the action).
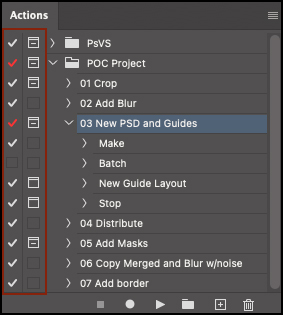
Toggling Commands and Modal Dialog Box Controls On and Off — There are two columns to the left of recorded actions/commands in the Actions panel. The first column controls whether or not the command in the action is to be played or skipped (when checked the command will play, when empty, the command is skipped). The second column determines if a “modal” dialog box will be displayed when the command is played (when checked the dialog will appear, when empty, the dialog will not appear).
• To force a break in the action, click the empty “well” to the left of the name of the command. If the command has a dialog box associated with it, Photoshop will display the dialog and wait for you to change any settings as needed. When you apply the command, Photoshop will continue running the action. If there is a toggle state (such as with the Crop tool or Free Transform), Photoshop will display the crop, but not continue the action until you apply the command. Note: commands that do not display a dialog box are blank in the second column and can not have a break applied (nor can commands added using Insert Menu Item).
• Option -click (Mac) | Alt -click (Win) the icon or empty well to toggle the state of all commands/modal controls with in an action.
Entering Values in Dialog Boxes — Be sure to enter values in dialog boxes if you want them to be recorded (even if the values are already set to that value), otherwise, Photoshop may not record the values. For example, if you start with an image that is 12×4 inches at 300 ppi and record an action that changes the width to 6 inches, you may not think that you need to enter 300 ppi for the resolution (because the document is already set to that resolution). However, if you don’t enter the resolution and then playback that action on images that have varying resolutions, the action will only change the width (because you didn’t enter a value for the resolution while recording).
Resizing Images Using Actions — Three common ways to resize images using Actions are:
• Image > Image Size: if all of the images are the same aspect ratio, use the Image Size dialog to enter a width, height, and resolution for the images
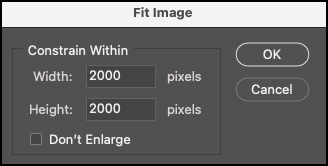
• File > Automate > Fit Image: enter values to define the longest dimension of the width and height in pixels. Note: After using the Fit Image command, it might be necessary to select Image > Image Size to redistribute the total pixel count to the desired width, height, and resolution for outputting to devices such as printers.
• The Crop Tool: enter a width, height, and resolution in the Options bar to set the crop to resize the result of the crop to a specific size. Click the empty “well” to the left of the Crop command to force a break in the action to adjust the position of the crop for each image.
Running Actions on Different Size Images — Recording actions that will be played back on different size documents can get complicated. It might help to record the action with the units of measurement set to percentage (instead of inches or pixels for example) so that placement of elements such as shapes or text will remain proportional within the set of images. However, resolution-dependent commands such as type size, feather amount, even sharpen or blur settings are going to create different results on different size documents.
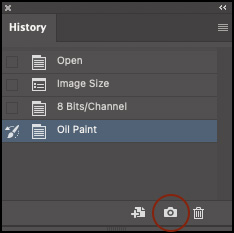
Returning to the Before State — To create an action that will allow the person to return to the “before” state of the document, you might want to record the taking of a snapshot (to create a snapshot, click the camera icon at the bottom of the History panel). This is especially important if the action is long (as the person wouldn’t be able to go back far enough in history), if you want to leave layers alone or, if they have history turned off to improve performance.
Working with Smart Objects — When moving a Smart Object from one file to another, use the Layer > Duplicate command to duplicate the Smart Object from one Document to another (instead of using copy and paste).
Including “Just-in-Case” Commands — If images have different attributes (such as color space, bit depth, varying layer count (flat image vs layers) etc.), you can record and include commands that, even when they don’t apply to the image, the action will continue to play. For example, if you want to apply a filter that requires that your image be in 8 bit, but you have a mix of 8 and 16 bit images, record (and include in the action) Image > Mode > 8 bit. If the image is in 16 bit, the action will convert it to 8 bit. If the image is already in 8 bit, the action will simply continue playing.
Selecting and Repositioning Layers — The following shortcuts are useful when recording actions as they can select and change the stacking order of layers without recording the specific “name” of the layer in the action.
• Option + “[“ or “]” (Mac) | Alt + “[“ or “]” (Win) targets the layer above or below the currently targeted layer.
• Option + Shift + “[“or “]“ (Mac) | Alt + Shift + “[“ or “]“ (Win) adds the next layer up or down to the targeted layer(s). Note: When you get to the top or bottom of the layer stack, Photoshop will “wrap around” to continue adding/subtracting layers.
• Option + “,“ or “.” (Mac) | Alt + “,“ or “.” (Win) targets the bottom/top -most layer.
• Option + Shift + “,“ or “.” (Mac) | Alt + Shift + “,“ or “.” (Win) targets all layers that fall between the currently targeted layer to the top or bottom of the layer stack.
• Command + “[“or “]“ (Mac) | Control + “[“ or “]“ (Win) moves the selected layer(s) down/up.
• Command + Shift + “[“or “]“ (Mac) | Control + Shift + “[“ or “]“ (Win) moves the selected layer(s) to the bottom or top of the layer stack.
Using Merge Visible Instead of Flattening Layers within Actions —If you need to create a flattened copy of your layers to use in an action (while leaving the underlying layers in tact), while recording the action you can use these steps:
• Create a new, blank layer at the top of the layer stack.
• Use the shortcut Command + Option + Shift + E (Mac) | Control + Alt + Shift + E (Win) to Flatten a copy of the layers onto the empty layer (that you just created at the top of the layer stack).
• Although you will see “Merge Visible” as the recorded step in the action, you will also see the disclosure triangle to the left of the Merge Visible command. Click the triangle to reveal that using the shortcut to “Merge Visible” is different from using the menu item to “Merge Visible” as the shortcut merges the visible layers on the new layer that you created in step 1 (as oppose to merging the visible layers into a single flattened layer).
Recording Painting Tool Options — Most tools record not only the selection of the tool, but also the settings in the Options bar. For example, the crop tool will remember whether or not the option to Delete Cropped Pixels was enabled/disabled when the Action was recorded. However the painting tools do not. To solve this problem, when selecting a painting tool, first set the tool options, then save them as a Brush (or Tool) preset. When recording the Action, first select the painting tool, then select the preset. Note: If you plan on distributing the actions (or using the action on multiple machines), you will need to have the Brush/Tool preset on all of the machines.
Recording a Brush Stroke — To record a brush stroke with a painting tool, you’ll need to first enable Allow Tool Recording from the Actions panel’s fly-out menu.
Sharing Actions — When recording actions, some commands (such as Open, Save, Import and Export) are saved as exact paths. When distributing Actions that include these types of commands, the receiver of the action will need to re-record the specific commands (since the user and folder structure typically change). In the case of the Save location, they can use the Batch command to override the Save location (while still saving to the file format specified in the action).
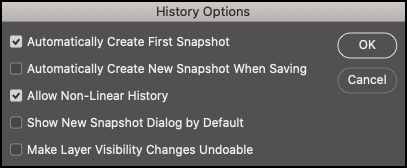
Improving Batch Processing Performance — To improve batch processing performance, in the History panel, use the fly-out menu to select History Options and uncheck “Automatically Create First Snapshot”. Depending on the length of your action, you might also want to reduce the number History States in the Preferences > Performance panel (just don’t forget to increase the number of states when you finished batch processing if you want to have more flexibility as you work).
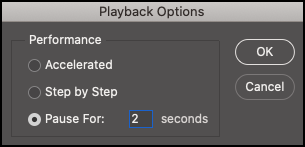
Trouble Shooting Actions — To watch an action play step by step, select the Playback Options from the Actions panel’s fly-out menu and choose “Step by Step” or “Pause For” and enter the number of seconds.
Working with Conditional Actions — To apply different actions to images based on specific attributes (orientation, document mode, bit depth number of layers etc.), use the fly-out menu on the Actions panel to select “Insert Conditional” to enable ‘if then” statements when using Actions. This video (Julieanne’s 5 favorite features in PS 13.1) will show you how. Here is a list of the available conditional attributes.
Document is Landscape | Square | RGB
Document Mode is CMYK | Grayscale | sRGB
Document Depth is 8 Bits per Pixel | 16 Bits per Pixel | 32 Bits per Pixel
Document has unsaved Changes | a Selection | Layers
Document has Alpha Channels | is open | is Background
Layer is Pixel Layer | is Adjustment Layer | is Shape Layer | is Layer Group
Layer is Locked | is Visible | has Pixel Mask | has Vector Mask | has Layer Effects
Saving Actions as Text — Save the steps in an Actions as a text file by pressing Command + Option (Mac) | Control +Alt (Windows) while selecting Save Actions from the Actions panel fly-out menu. This is handy for reviewing or printing the contents of an Action. Note that ALL of the Actions in all sets are printed out, so you may want to limit the number of actions you have loaded to eliminate a lot of deleting of unnecessary information.
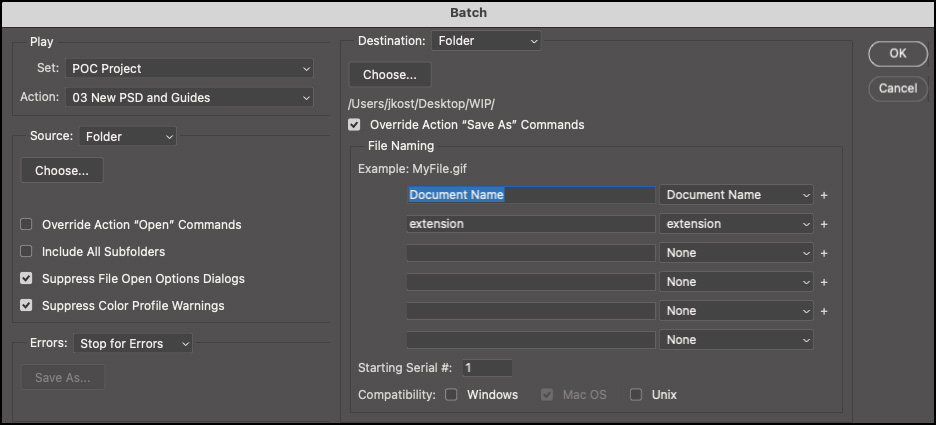
Batch Processing — To run actions on large volumes of images, use the Batch command:
In Photoshop, chose File > Automate > Batch
In Bridge, choose Tools > Photoshop > Batch Note: The advantage of starting within Bridge is that you can select a subset of files from within a folder.
Including “Save As” in an Action — When including a Save as In an Action, Photoshop records both the file format and the destination. If you choose to save to a Folder in the Batch command, be sure to check the “Override Action Save In Commands”. This will instruct Photoshop to ignore the location stored in any Save commands recorded in the action, but will still save the file in the file format designated by the Save command.
Including a Batch within an Action — The Batch command can be recorded as part of an action to perform multiple batches in sequence.
Batch Process Aliases — You can batch process multiple folders without reorganizing them on the hard drive by creating aliases within a folder to point to the other folders you want to process. Note: be sure to select the Include All Subfolders option in the Batch command dialog box.
Creating Droplets — Droplets are self running executables that play actions when you drag and drop files onto them. To create a droplet select File > Automate > Create Droplet. Droplets reference the selected Actions inside Photoshop so don’t discard your Actions after creating the droplet!
Droplets and Lightroom Classic — First, create the droplet in Photoshop. Then, in Lightroom Classic select the images and choose File > Export.
• In the Export dialog, under Post Processing, choose “Go to Export Actions Folder Now”. This will display the folder in the operating system.
• Copy (or move) the droplet into the Export Actions folder.
• Return to Lightroom Classic, select the droplet from the list, and run the Export. Lightroom Classic will export the images, and then batch process the files using the droplet.
Moving Droplets Cross Platform — When moving a droplet created in Windows to Mac OS, drag the droplet onto the Photoshop icon. Photoshop will launch and update the droplet for use in Mac OS. On the Macintosh, add the extension .atn for actions and .exe for droplets for cross platform compatibility. Note: It might be beneficial to zip a droplet before moving from one platform to another.
Working with Variables — Variables, also known as data-driven graphics are a powerful way to automate the creation of graphics using multi-layered Photoshop files and data sets. Here are 5 tips for working with Variables:
• You can assign three different types of variables:
Visibility variables let you show or hide the content of a layer.
Pixel Replacement variables let you replace the pixels in the layer with pixels from another image file using different “fitting” option.
Text Replacement variables let you replace a string of text in a type layer.
• The data set can be entered manually, but for large data sets, use a comma- or tab-delimited text file.
• All of the files (the layered Photoshop document, the text file (if importing data sets) and photos) must be in the same folder.
• When defining a variable, the column names in the data set and the variable names in Photoshop much match exactly (including upper and lower case. In addition, variable names must begin with a letter and cannot contain spaces or special characters (except for periods, hyphens, underscores, and colons).
• To export Data Driven Graphics, select File > Export > Data Sets as Files.
Bonus Topics
Auto-Generate Images from Layers and Groups — Photoshop has a little known feature called Adobe Generator. By enabling File > Generate > Image Assets, Photoshop can automatically create JPEG, PNG or GIF images by using specific naming conventions for Layers and Layer groups.
Saving Time Using Tool Presets — this blog post (Create and Save Your Own Tool Presets in Photoshop), demonstrates how to increase your productivity by creating Tool Presets in Photoshop to reuse frequently used tool settings (instead of having to constantly reselect them).
Color of Place — The set of actions included in this blog post (How Julieanne Kost Created “Colors of Place”), demonstrates how creating multiple actions to batch process some steps while manually controlling others can save time. It also demonstrates how the separation of commands into multiple actions can enable the placement as well as distribution of images.
Creating Smoke-flakes — This blog post (How to Create a “Smoke-flake” in Photoshop), demonstrates how to use actions to quickly create a “smoke-flake” by duplicating, rotating, and flipping multiple copies of a photograph of smoke.
