In the video below, you’ll learn how to quickly export large volumes of images using different file settings, presets, and batch export options in Lightroom Classic.
Following are several shortcuts and tips for exporting files from Lightroom Classic.
- Command + Shift + E (Mac) | Control + Shift + E (Win) displays the Export options dialog.
- Command + Option + Shift + E (Mac) | Control + Alt + Shift + E (Win) exports selected file(s) using the previous Export settings.
Export Location — Within the Export Dialog, use the “Export To” menu to select a folder and designate a subfolder if needed. Select “Choose Folder Later (useful for presets)” when creating presets to export files to various locations. Enable “Add to This Catalog” to auto import the exported file(s), and enable “Add to Stack” to auto stack the images. Note: Add to Stack is not available when exporting to various locations.
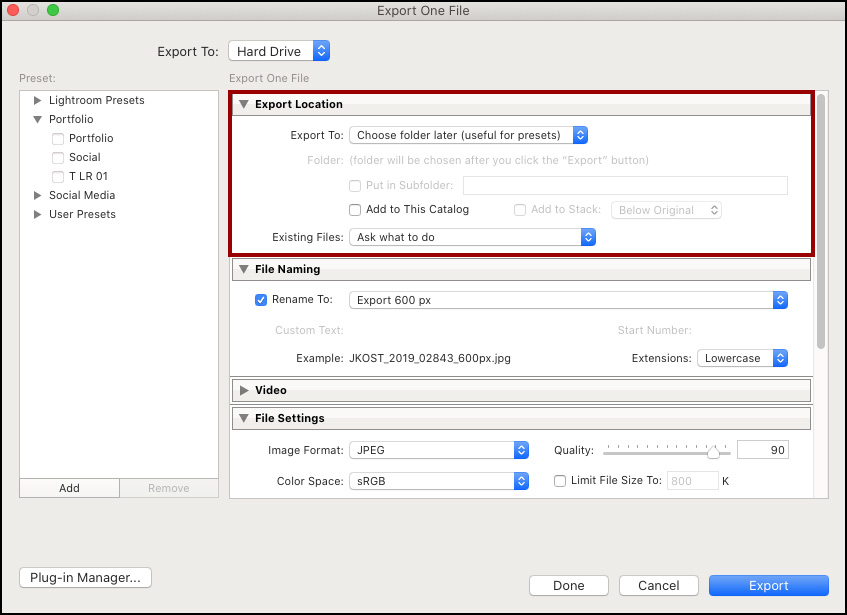
File Naming — Enable “Rename To” and select a preset or create you own in order to quickly append the exported file(s) names. I typically keep the same base name, and then append the exported file’s name based on export settings. For example, if I were to export my files at 600 pixels, I would append the file name with _600px.
File Settings — Select the desired file format (JPEG, PSD, TIFF, PNG, DNG, Original). Additional options are displayed based on the file format selected. For example, when exporting JPEG files, you can choose the quality of the image or, if you know the maximum size the file can be (for posting online for example), you can enable “Limit File Size To” and enter a value.
- Use “Original” when exporting a mix of files (DNG, PSD, JPEG etc.) which need to remain in their original formats.
- When exporting layered PSD files, selecting PSD as the image format will export a flattened PSD file (as well as discard any paths that are saved within the file). To export a layered PSD file and have Lightroom Classic retain the layers, choose Original for the Image Format.
- If the original file is a JPEG, and you’ve made changes to the file(s) in the Develop module (or in Quick Develop), you must export the modified JPEG as a new file in order for Lightroom Classic to apply the changes made in the Develop module to the file.
Image Sizing — When selecting Resize to Fit, use the “Width & Height” option to resize using both the image width and height. The width of the resized image will be limited to the unit specified in the “W” field, and the height of the resized image will be limited to the unit specified in the “H” field.
- Use the “Dimensions” option (which is similar to the “Width & Height” described above), but it disregards the image orientation. That is, the longer edge of the resized image will be limited to the larger of the two specified units. Similarly, the shorter edge of the resized image will be limited to the smaller of the two specified units.
- Choose “Short Edge” or “Long Edge” to resize images with mixed aspect ratios.
- Choose “Megapixels” to limit the file to a specific size (Lightroom Classic will resize the image as needed).
- Check “Don’t Enlarge” in order to prevent resizing an exported image larger that the original.
Sharpening — Selecting the sharpening options (Sharpen For, and Amount) enables Lightroom Classic to calculate the amount of sharpening to be added based on the size of the original and the size of the exported image. Because you can not preview the sharpening prior to exporting the file, I would suggest that you sharpen a small number of “typical” images to see what “Amount” your prefer.
Metadata — While you can choose to include all metadata in the exported file, selecting “Copyright & Contact Info Only” will remove extraneous metadata when exporting a file for a client (or when trying to keep the file size as small as possible when posting online) yet still keep important information with the file. Note: the metadata will still be embedded in the original file, just not the exported one.
Watermarking — This video (Watermarking Images in Lightroom Classic) demonstrates how to create a transparent watermark in Photoshop as well as add a text or graphic watermark when exporting files from Lightroom Classic.
Post Processing — After exporting files, Lightroom Classic can enable Droplets created in Photoshop to run a series of actions on the exported files. First, you’ll need to create the Action and Droplet in Photoshop. Then, use the After Export menu to choose Go to Export Actions Folder Now. Once the Droplet is placed into the Export Actions folder, it will become available from the After Export menu. This video (Using Photoshop Actions and Droplets With Lightroom Classic to Automate your Workflow) will show you how.
Creating and Saving Export Presets — If you often use the same settings when exporting files, click the Add button to save an export preset.

- To rename a preset, Control -click (Mac) | right -click on the preset name and choose “Rename”.
- To update the settings saved in a preset, Control -click (Mac) | right -click on the preset name and choose “Update with Current Settings”.
Saving Changes in Export — Click the “Done” button to dismiss the Export dialog while remembering changes in export settings.
Applying Export Presets to images in the Library Module — To export selected images using a preset while bypassing the Export dialog, in Grid view, Control -click (Mac) | right -click on an image and choose Export > (saved preset name).
Batch Exporting files using Multiple Presets — To batch export files using multiple presets, click the check box to the left of the preset name and choose “Batch Export”. Note: when a preset is selected, it becomes read-only. Deselect the preset to make changes to the preset.
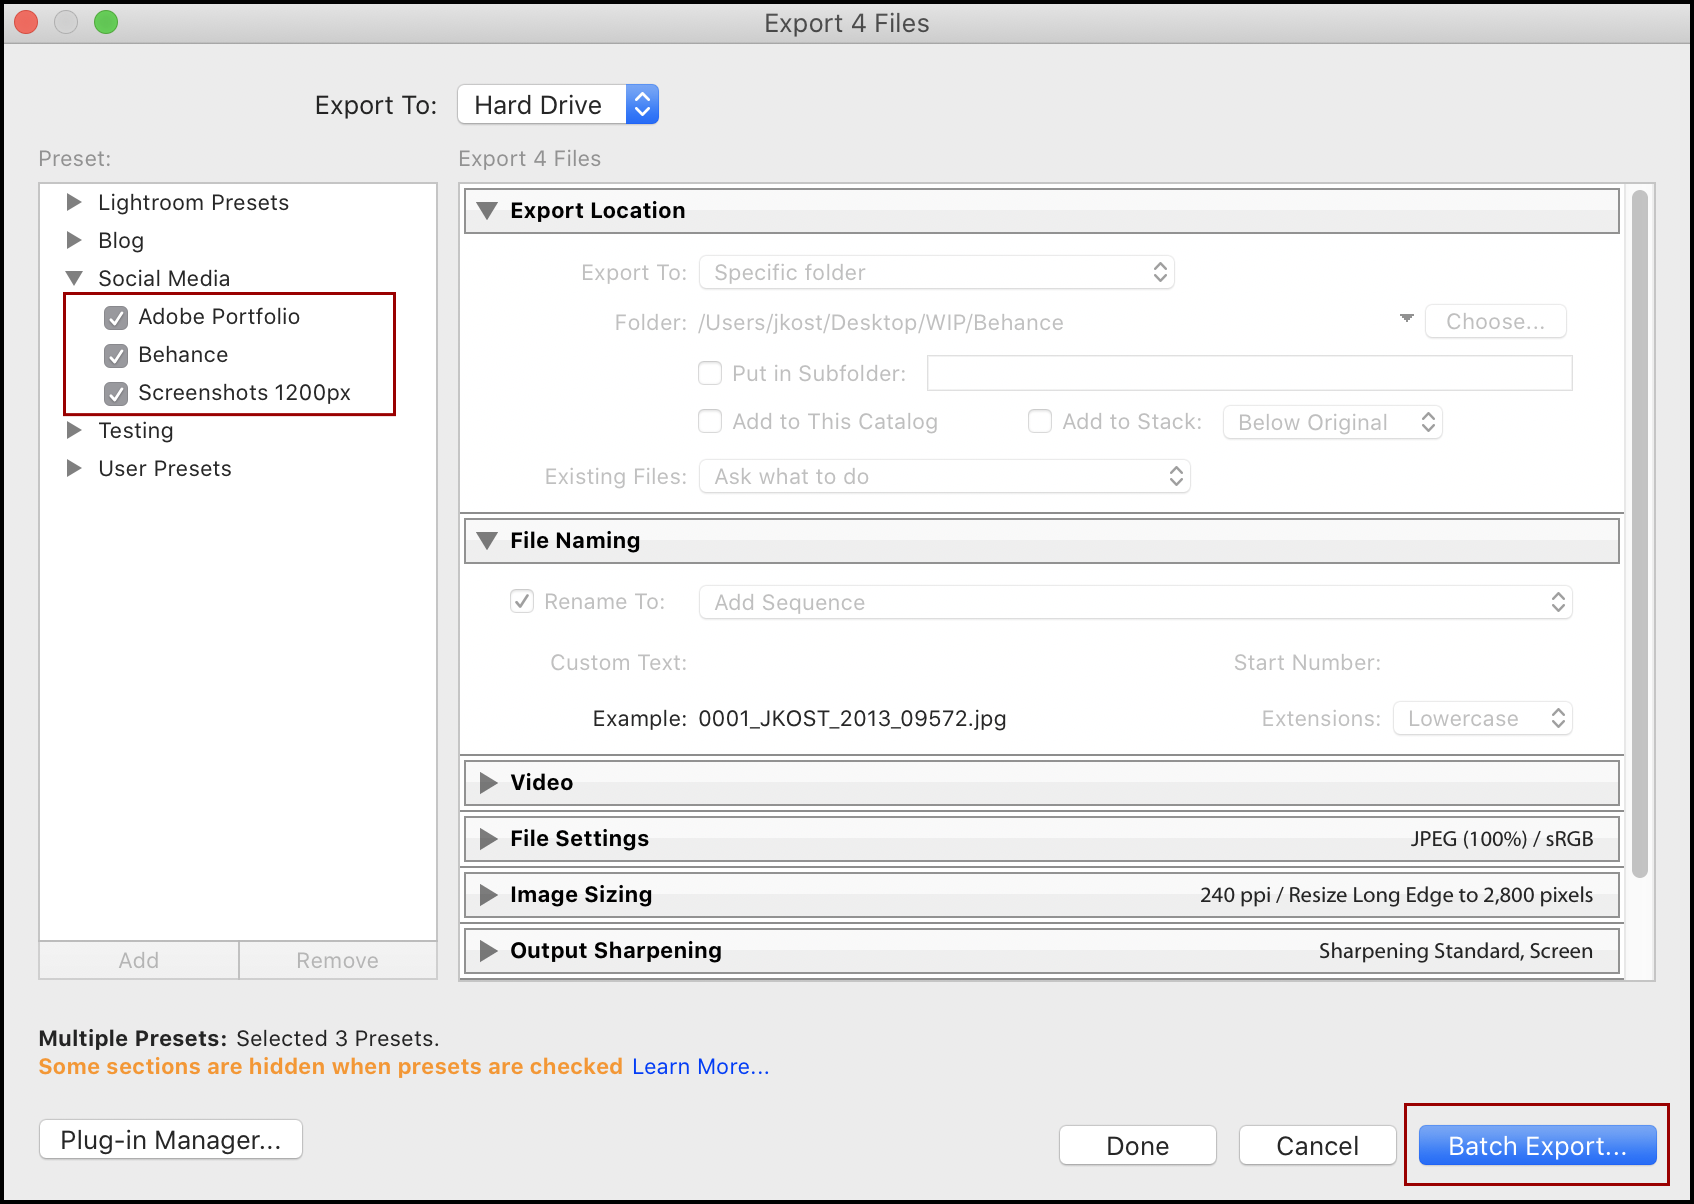
The Batch Export window appears enabling you to control the Destination and File Naming options on a per-preset basis. You can choose to leave the presets “as is” (exporting to the destination as defined by the preset), select a common destination for all presets, or change the destination for each preset individually.
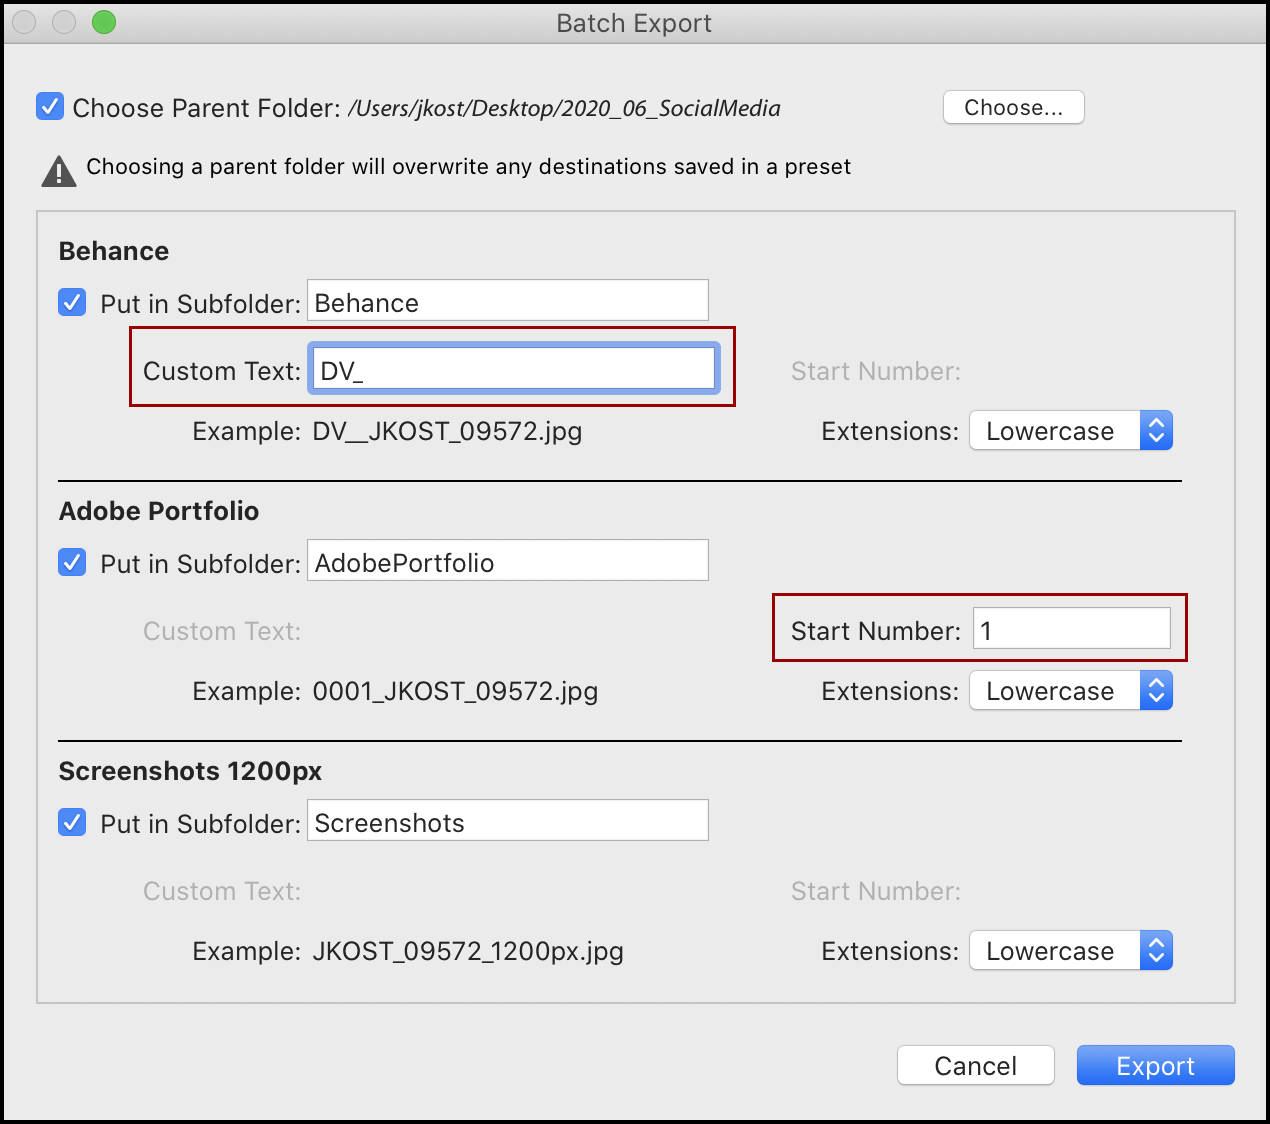
To change the destination for all of the presets in the current batch export to a single folder, enable “Choose Parent Folder” and click Choose… to select a folder. If needed, enable the “Put in Subfolder” option to create different subfolders for each export preset and enter a name for the folder. (This is helpful when you have presets that normally save files to different locations but, for the current export, files need to be saved into a single location.)

Note: choosing a new Parent Folder will override the destination saved in the Export presets for the active Batch Export – it will NOT change the destinations that were saved in the original Export preset.
To change the destination for an individual preset, click “Choose…” and select a destination folder.
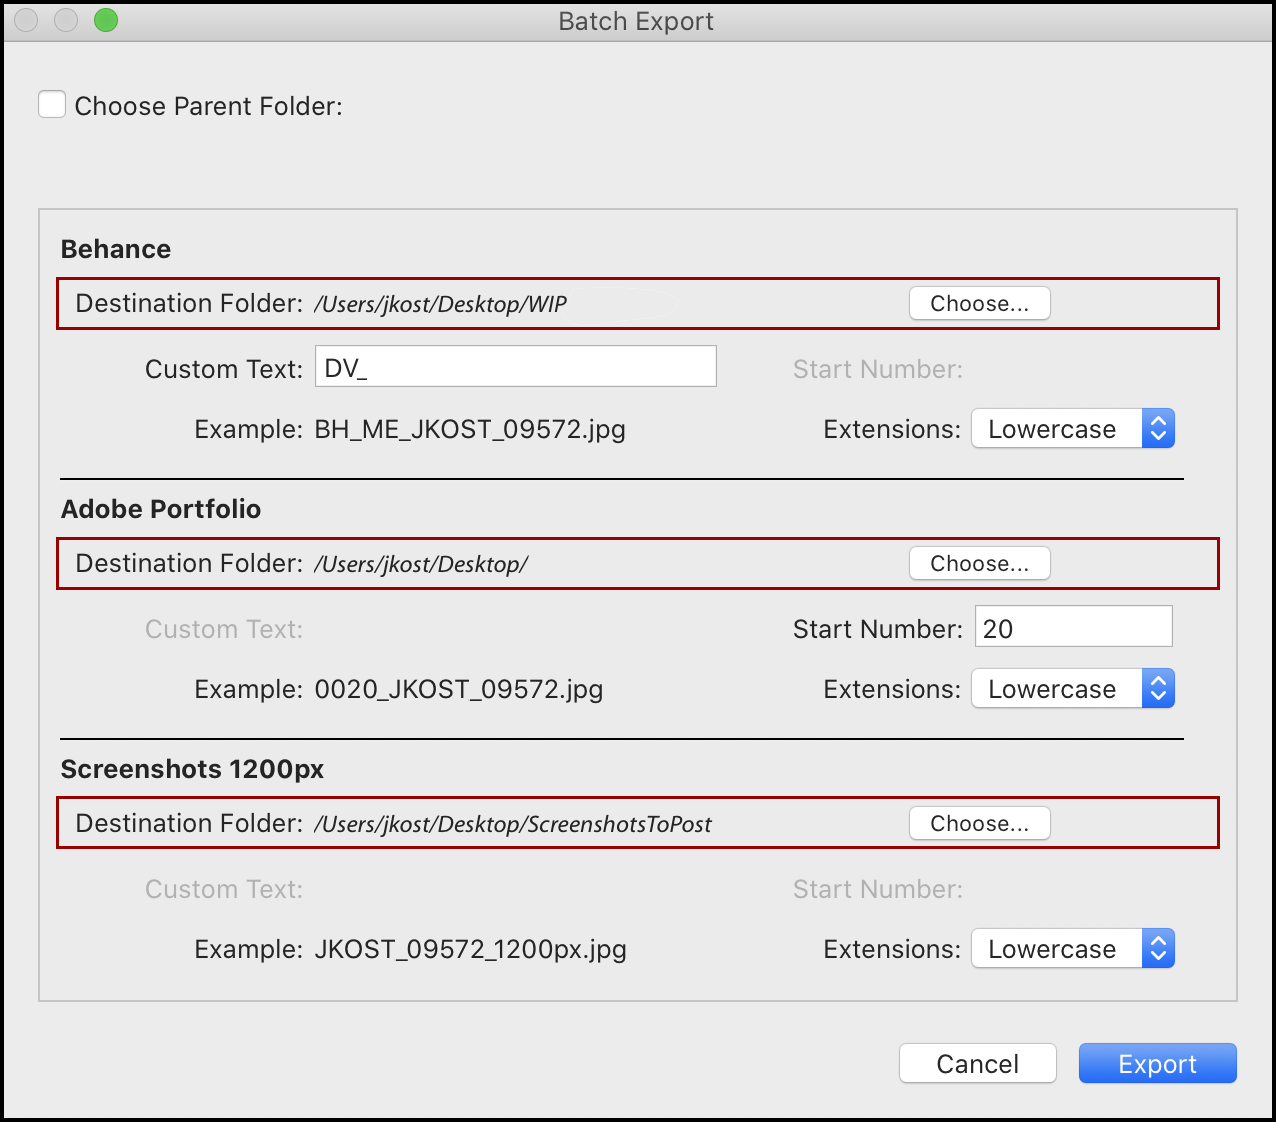
Note: choosing a new destination will override any destination saved in the Export preset for the active Batch Export – it will NOT change the destination that was saved in the original Export preset.
If an Export preset uses File Naming Options that include “Custom Text” or a “Sequence”, you have the opportunity to enter the Custom Text and/or the sequence Start Number.
While Lighroom Classic doesn’t have the ability to retain the folder structure of the original files when exporting, I ran across this “Folder Publisher“ plug-in by Jeffrey Friedl and it worked like a charm. http://regex.info/blog/lightroom-goodies/folder-publisher