Here are 25 of my favorite tips and shortcuts for creating selections in Photoshop!
Add To, Subtract From, and Intersect Selections — The Marquee, Lasso, Magic Wand, Quick Selection, and Object Selection tools all share the following shortcuts that can help when making complex selections:
- Shift – drag with the tool to add to an existing selection.
- Option -drag (Mac) | Alt -drag (Win) to subtract from the original selection.
- Shift + Option -drag (Mac) | Shift + Alt -drag (Win) to produce the intersection of selections (the exception being the Quick Selection tool).
Drawing a Rectangular/Elliptical Marquee from the Center — Option -drag (Mac) | Alt -drag (Win) with the Rectangular/Elliptical Marquee tools to create a selection from the center.
Selecting a Circle or a Square — Shift -drag constrains the Rectangular Marquee tool to a square and the Elliptical Marquee tool to a circle.
Repositioning the Selection while Drawing — After starting to draw a selection using a Marquee or Lasso tool, press and hold the spacebar (while still holding the mouse down), then drag to reposition the origin of the selection. Release the spacebar (while still holding the mouse down) to continue creating the selection.
This video (3, 2, 1, Ps! Seven Tips for Making Basic Selections in Photoshop) demonstrates several of the shortcuts above.
Toggling the Lasso Tools in Photoshop — Holding the Option key (Mac) | Alt key (Win) toggles the Lasso tool to the Polygonal Lasso tool and vice versa. Note: When starting with the Lasso tool, this shortcut might take a few tries to master as you have to be careful to release the Option/Alt key (to return from the Polygonal Lasso to the regular Lasso) while continuing to hold the mouse down.
- Holding the Optionkey (Mac) | Alt key (Win) while dragging the Magnetic Lasso tool will toggle to the regular Lasso if you drag with the cursor and the Polygonal Lasso if you click with the cursor.
Softening the Edge of a Selection — When using the Marquee and Lasso tools, tapping Return (Mac) | Enter (Win), will automatically highlight the Feather amount in the Options bar (adding a Feather softens the edge of the selection and is applied to the NEXT selection that you draw with the tool). If you prefer to leave the tool options at their default, you can add a feather after creating the selection by choosing Select > Modify > Feather (Shift + F6) and entering a value.
- This video (Five Ways to Soften the Edge of a Selection) demonstrates five different ways to feather a selection including feathering (or not) selections that touch the edge of the canvas (image area).
- When using Select >Modify > Feather, you can choose whether or not to apply the feathering along any of the edges of the image that the selection touches by enabling/disabling the “Apply Effect at Canvas Bounds” option. Note: this edge option is also available for Select > Modify > Smooth, Expand, and Contract.
Using the Marquee and Lasso tools — This video (Using the Marquee and Lasso Tools) walks though the essentials of making selections using the Marquee tools for selecting geometric shapes, and the Lasso tools for selecting free-form shapes.
The Magnetic Lasso Tool Options— When using the Magnetic Lasso tool, the following shortcuts can help to quickly change tool options:
- [ or ] decreases/increases the Width (add the Shift key to quickly go to the minimum/maximum lasso Width).
- ‘,’ (comma) or ‘.’ (period) decreases/increases the (edge) Contrast (add the Shift key to go to the minimum/maximum Contrast).
- ‘;’ (semicolon) or ‘’’ (apostrophe) decreases/increases the Frequency (add the Shift key to go to the minimum/maximum Frequency).
The Magic Wand Tool — The Magic Wand tool makes selections based on the color clicked on in the image area.
- Use the Sample Size in the Options bar to select the number of pixels sampled in the image to use as the basis for selection.
- Press Return key (Mac) | Enter (Win), to automatically highlight the Tolerance amount to enter a numeric value ranging from 0 to 255 (tolerance determines how similar the surrounding pixels need to be to be added to the selection. A low value selects the few colors very similar to the pixel you click. A higher value selects a broader range of colors.
- To select similar colors throughout the image (as opposed to being restricted to similar pixels that are touching the originally selected area) uncheck the “Contiguous” option in the Options bar.
- Enable “Sample All Layers” in the Options bar to sample more than one layer.
Quick Selection Tool — When using the Quick Selection tool, after clicking in the image, the tool automatically switches to the “Add To” mode making it easy to drag again with the tool to add to an existing selection. Holding Option (Mac) | Alt (Win) toggles between Add To and Subtract From.
- If the Subtract From icon is selected, hold down the Shift key to toggle between Subtract From and Add To.
- Enable “Sample All Layers” in the Options bar to sample more than one layer.
- Enable Auto-Enhance to reduce rough edges of the selection in transitional areas.
- Press the left/right bracket to decrease/increase the brush tip size.
Object Selection Tool — The Object Selection tool uses artificial intelligence to help make selections of objects within an image. Choose between Rectangular or Lasso “Mode” and drag a loose rectangle or lasso around an object in the image. Photoshop will help to identify and “shrink-wrap” the selection around the subject.
- Enable “Sample All Layers” in the Options bar to sample more than one layer.
- Enable Enhance Edge to reduce rough edges of the selection in transitional areas
- With Object Subtract enabled, Photoshop will use artificial intelligence when drawing a loose rectangle or lasso around the object to be removed from the selection. To draw a precise selection around an area to subtract from the selection (without the help of artificial intelligence), disable the Object Subtract option and drag( in either Rectangular or Lasso mode) to remove area from the selection.
- This video (Select Subject, Object Select Tool and Content Aware Fill) demonstrated how making selections and removing unwanted information in images is now easer than ever before.
Repositioning a Selection — To reposition a selection (the marching ants, not the underlying content of the layer), position the selection tool (marquee, lasso etc.) within the selection and click and drag.Or, use the arrow keys (up/down/left/right) to move a selection 1 pixel (add the Shift key to move in 10 pixel increments).
- After you start moving a selection with a selection tool, holding the Shift key will constrain the movement to multiples of 45° (0°, 45°, 90° etc.).
Transforming Selections — With an active selection in the image area, choose Select > Transform Selection and use the transformation handles to transform the selection (this will transform the the marching ants, not the content of the layer). Several shortcuts are the same when transforming a selection as when transforming the contents of a layer(s). For example:
- Position the cursor outside of the transformation handles (the cursor becomes a double headed arrow), and drag to rotate.
- Option -drag (Mac) | Alt -drag (Win) an anchor point to transform from the center.
- Command -drag (Mac) | Control -drag (Win) a corner anchor point to freely distort the image.
- Command + Shift -drag (Mac) | Control + Shift -drag (Win) a center anchor point to skew the image.
- Command + Option + Shift -drag (Mac) | Control + Alt + Shift -drag (Win) a corner anchor point to change the perspective of an image.
- Or, instead of memorizing each individual shortcut, Control -click (Mac) | right -click (Win) within the transformation bounding box and choose a transform option from the context sensitive menu.
- To apply the transformation, tap Return (Mac) | Enter (Win), click in the preview area outside the transformation handles, or select another tool. To cancel a transformation, tap the Escape key.
- When using Transform Selection, the “Reference Point” can be changed to determine the location around which transformations occur. By default, the reference point is hidden to prevent accidental repositioning.
- To display the reference point (while in Transform Selection and Free Transform), check the empty well to the left of the reference point icon in the options bar (or, choose Edit > Preferences > Tools > “Show reference point when using Transform”).
- To reposition the Reference Point, drag the center point freely within the image area, click on one of the nine reference point locations in the Options bar, or set the position numerically (also using the Options bar).
Invert a Selection — Command + Shift + I (Mac) Control + Shift + I (Win) will quickly invert a selection (selecting the unselected part of an image and deselecting what was originally selected).
Deselect and Reselecting — Command + D Mac) | Control + D at any time to deselect. If you accidentally deselect your selection, use Select > Reselect.
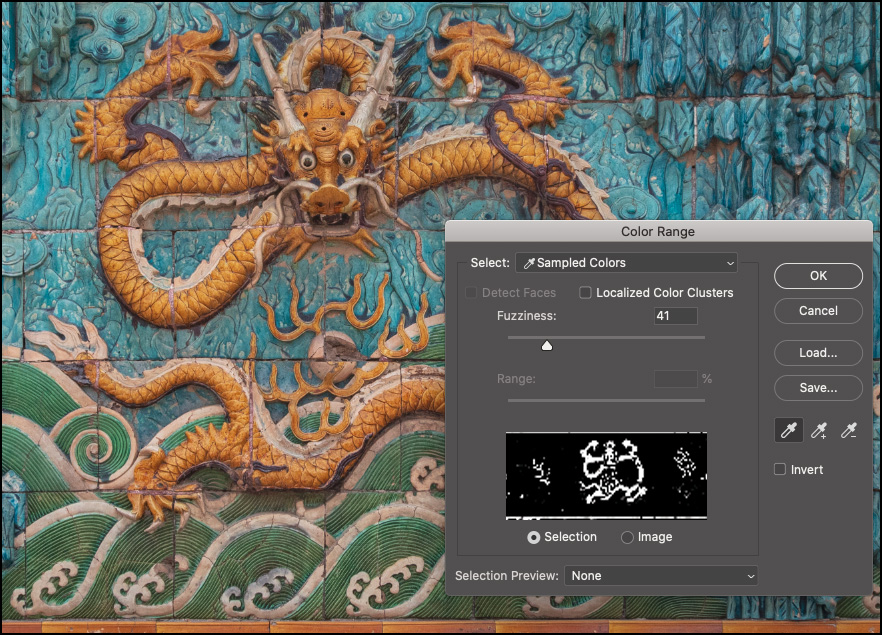
Making Selections Based on Color (and Tonal) Range — Color Range enables selecting areas of an image based on color (sampled colors as well as predefined color ranges) as well as on Highlights, Midtones, Shadows, Skin Tones, and Out of Gamut colors. When Select is set to Sampled Colors, shift -clicking in the image area adds additional colors to the selection and select Localized Color Clusters to build a more accurate selection. Use the Fuzziness slider to gradually fan out the selection for smoothness.
- When Select is set to Shadows, Midtones or Highlights in your image, use the Range slider to modify the threshold value.
- For a larger preview, use the Selection Preview menu to preview the results of the selection in the image.
Making Selections based on Focus — This video (How to Use Focus Mask to Make Selections based on Focus) demonstrates how to make selections based on depth of field to help isolate portions of your image for further editing.
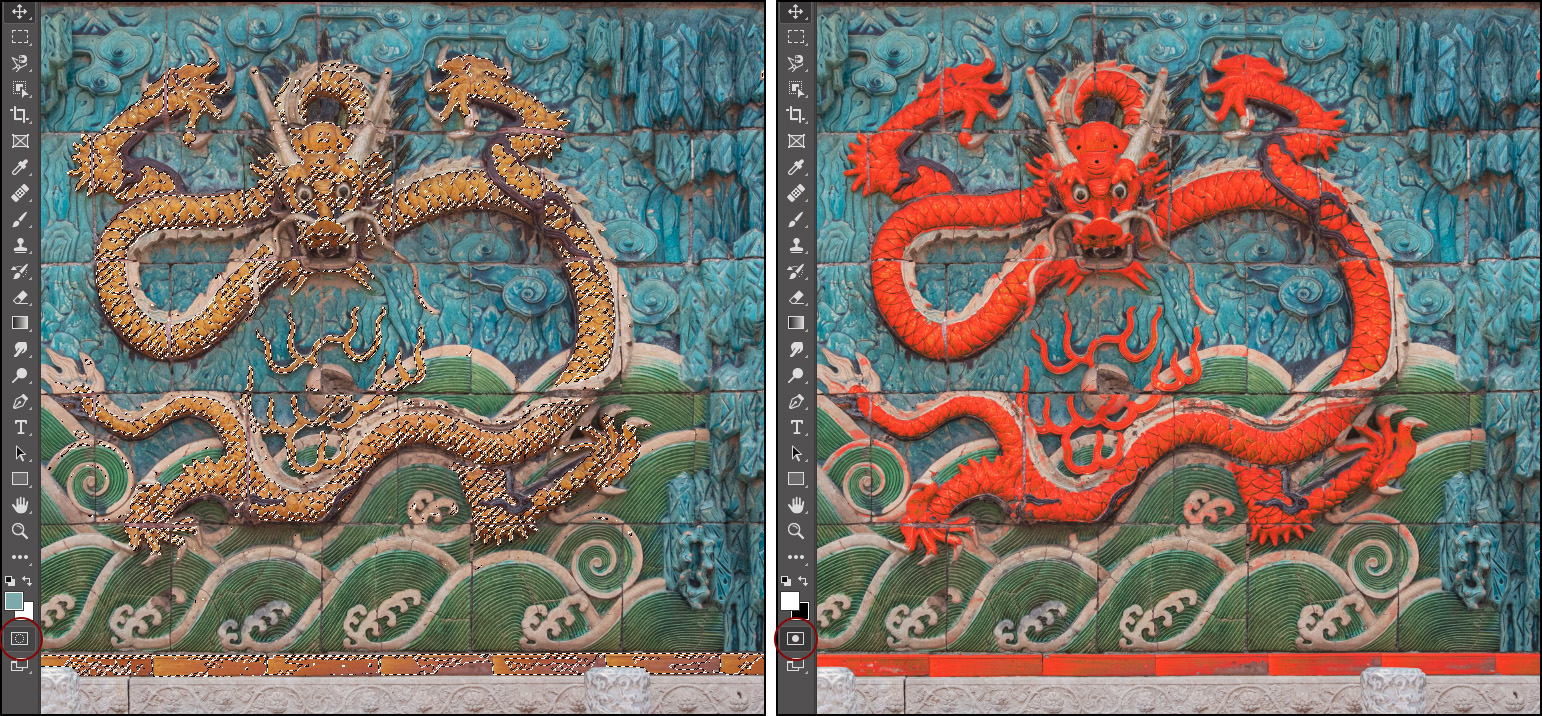
Previewing Selections using Quick Mask — To preview a selection as a mask (where red represents the masked area by default), tap the Q key to toggle Quick Mask mode. Tap it again to return to the selection (marching ants).
- Option -click (Mac) | Alt -click (Win) on the Quick Mask icon to invert the selection when entering Quick Mask mode.
- Double clicking the Quick Mask icon in the Tool panel enables changing the color of the Quick Mask overlay. This can be helpful when viewing the Quick mask over an image where the subject or background is similar to the default red overlay. Note: changing the Quick Mask color will also change the Overlay option in the Select and Mask workspace.
- While in Quick Mask mode, tap the Tilde key (~) to display Quick Mask as a grayscale mask. Tap it again to return to the red overlay view.
- Command + 2 (Mac) | Control + 2 (Win) to view the Quick Mask, yet edit the composite image. Note: You can view the Channels panel to see what’s happening under the hood – see how Command + 2 (Mac) | Control + 2 (Win) targets the RGB channels instead of the Quick Mask channel and that Command + 6 (Mac) | Control + 6 (Win) will target the Quick Mask.
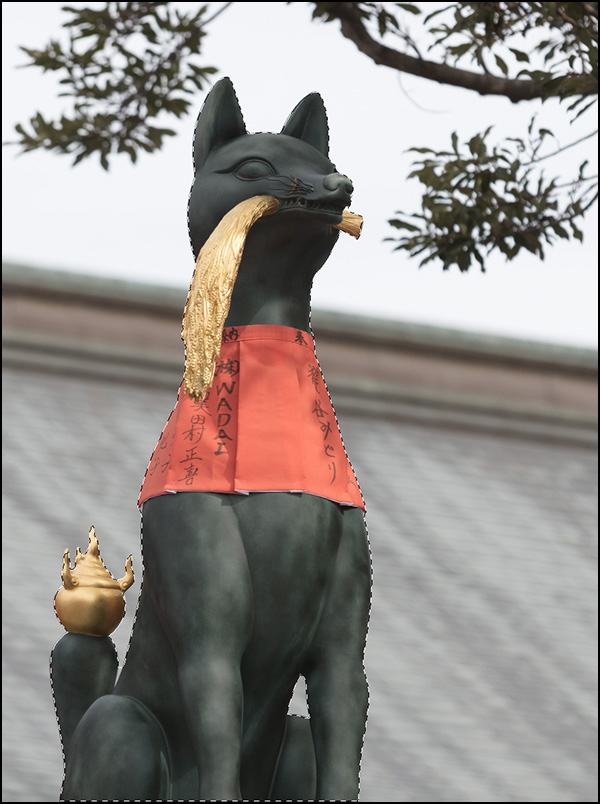
Select Subject — Select Subject uses artificial intelligence and machine learning to quickly select the primary subject in the image. In the example below, Select Subject selected almost all of the kitsune statue with a single click of the Select Subject button (even as the subject consisted of multiple tones and colors). Note: if you have multiple subjects in an image, try using the Object Selection tool instead.
It was easy to then refine the selection (to include the missing areas) using the Lasso tool.
Select Subject has also been trained on portraits so that if it identifies a person in the image, it will create an accurate selection around difficult-to-select attributes such as hair. On more difficult selections, try using Select Subject to help with the initial selection, then use additional tools or the Select & Mask workspace to refine it.
Select Sky (and Sky Replacement) — Photoshop’s Select > Sky and Edit > Sky Replacement features automatically separate the sky from the foreground elements in a photograph.

To select a sky, choose Select > Sky: this is an excellent way to quick select the sky area (or the foreground: Select > Inverse) to make adjustments.
To select the sky and replace it with the help of Adobe Sensei’s AI and machine learning, choose Edit > Sky Replacement. The Sky Replacement panel contains several customizable options including:
- Choose from one of the preset skies, or, click the gear icon to load a New Sky. Photoshop automatically fits the sky in the image area and displays a preview. Sky Replacement will recognize the horizon in the image and to adjust the foreground colors to match the sky.
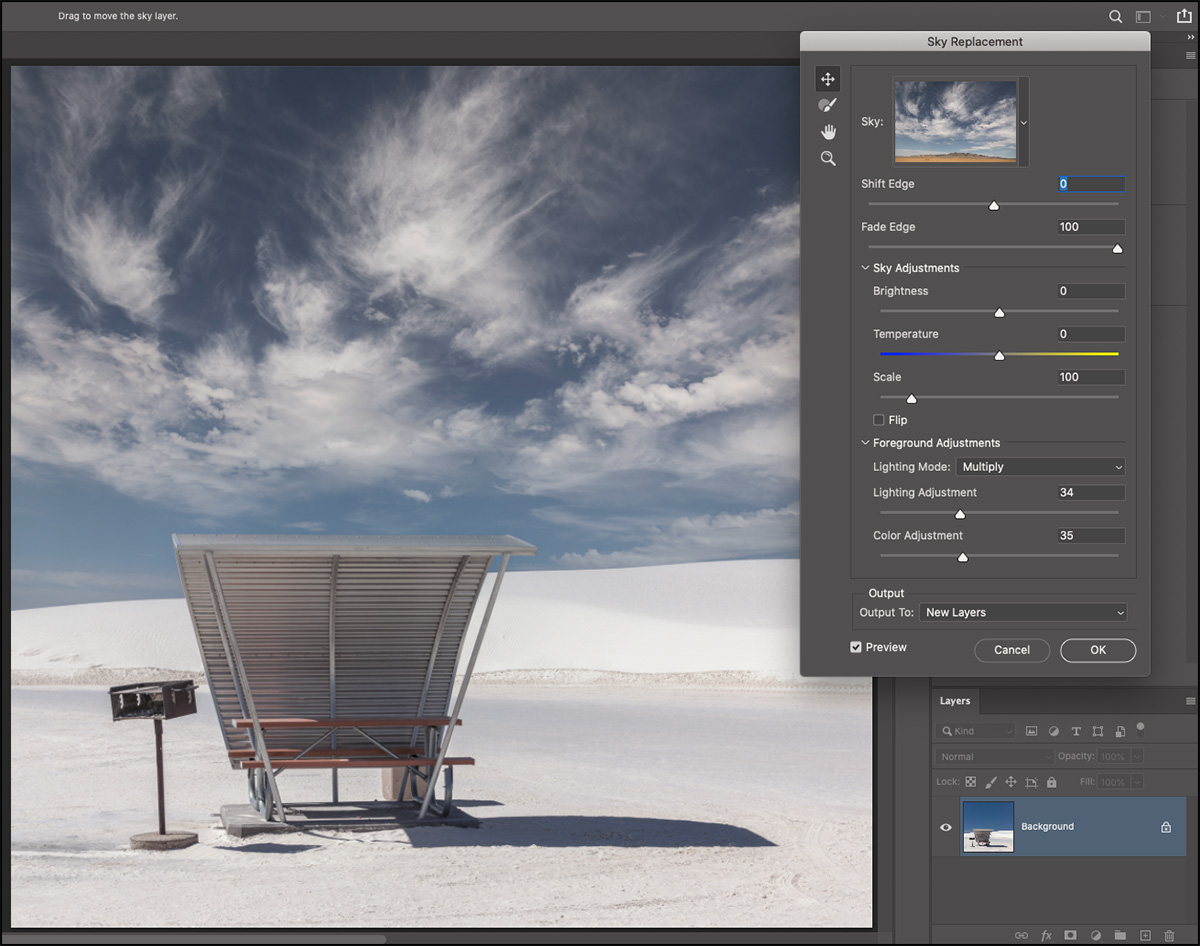
- Shift Edge—Shifts the edge and helps to reduce fringing of the edges by shifting the edge of the layer mask for the sky layer (which you can see in the Layers panel when the Output is set to New Layers).
- Fade Edge—Softens the edges of the sky by blurring the mask for the sky layer (which you can see in the Layers panel when the Output is set to New Layers). A lower values provide crisper blending and can reduce halo effects that may appear for some foreground/sky combinations.
- Sky Adjustments—Sky Replacement uses nondestructive adjustment layers (Brightness & Contrast and Color Balance ) to harmonize color and tone in order to make the final composite more realistic.
- Size—Use the Size slider to decrease/increase the size of the sky and the Sky Move Tool to reposition the sky. As the sky is repositioned, the foreground elements will be re-harmonized (based on the visible part of the sky).
- Flip—Use the Flip option to better match the direction of light.
- Foreground Adjustments—These options adjust the toning in the foreground to better match the new sky. The Multiply option can darken the area, while the Screen option lightens it.
- The Sky Brush—Use the Sky Brush to manually paint the new sky in or out to reduce halos or amplify the appearance of the sky in complex areas such as treetops. When the brush is selected, additional options appear in the Options bar including: size, blend mode and opacity.
- Option (Mac) | Alt (Win) toggles between adding and subtracting sky.
- Using the “add” brush mode on the new sky can reduce halo effect or give the sky more presence in treetops.
- The “subtract” mode on the foreground can remove new sky that is bleeding into the foreground.
- The Overlay or Soft Light blend modes are effective for gently toning in the sky and foreground boundary. Use the Normal blend mode and higher brush opacity for a stronger effect.
- Output—Choose to output the results to a New Layer Group (for maximum flexibility including access to Layer masks, color and tonal adjustment layers), or to a Duplicate layer (the results flattened upon a single layer).
- Sky Groups—When adding new skies, click the Folder Icon (or use the gear icon) to create a new Group. Then, drag and drop sky presets between groups to organize your skies.
Note: Added Sky’s are automatically available across devices (when signed in using the same Adobe ID).
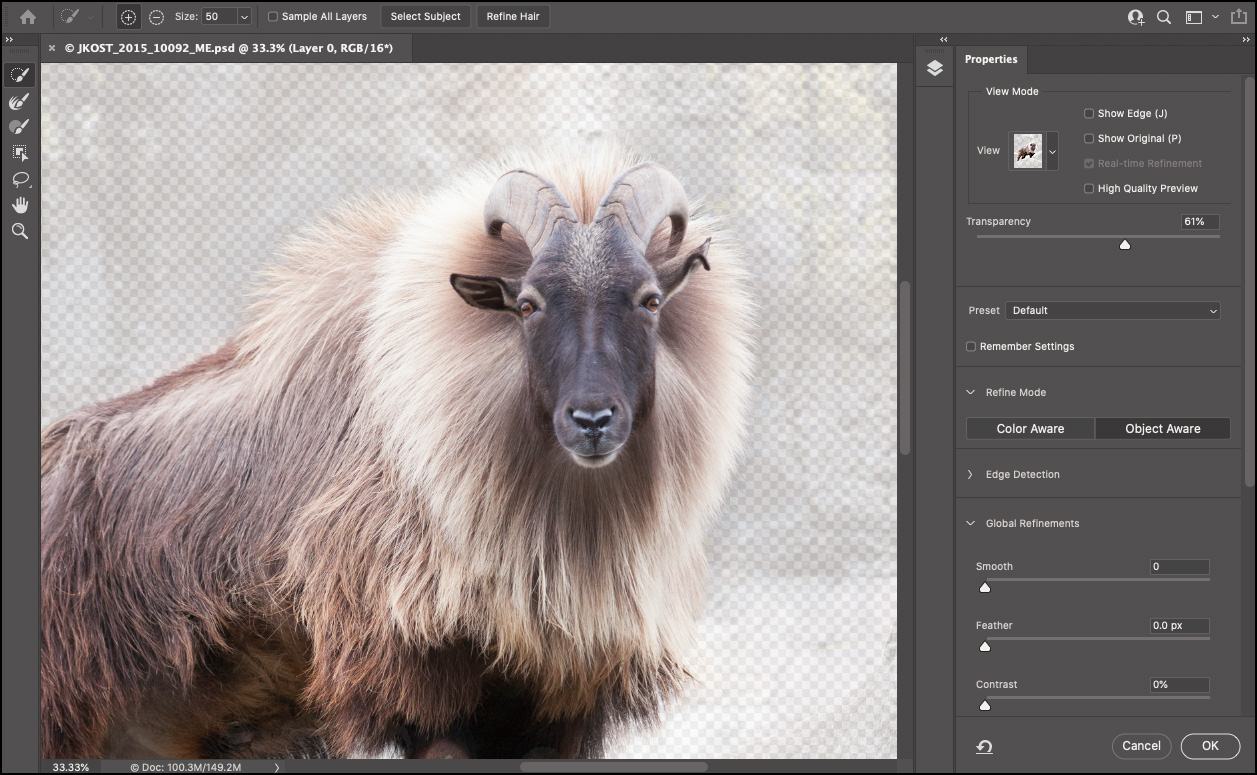
Select and Mask — For more control after making a selection, use Select and Mask to further fine tune your selection. To access Select and Mask choose one of the following:
- Select > Select and Mask.
- Click Select and Mask in the Options bar (when a selection tool such as the Lasso, Object Selection, Quick Selection etc. is selected).
- Using the shortcuts: Command + Option + R (Mac) | Control + Alt + R (Win) .
Note: You don’t have to start with a selection, you can choose Select and Mask and then begin the selection process there.
Select a tool using the following shortcuts:
- Quick Selection Tool (W) Note: this shortcut is shared between Quick Selection and Object selection – tap W to toggle between the two tools.
- Refine Edge Brush (R)
- Brush (B)
- Object Selection (W) Note: this shortcut is shared between Quick Selection and Object selection – tap W to toggle between the two tools.
- Lasso (L)
- Hand (H)
- Zoom (Z)
For the Quick Select, Brush and Lasso tools, Option (Mac) | Alt (Win) toggles “Add To Selection” to “Subtract From Selection”.
- For the Refine Edge Brush, Option (Mac) | Alt (Win) toggles “Expands Detection Area” to “Restore Original Selection”.
- With the Lasso Tool selected, Option + Shift (Mac) | Alt + Shift (Win) toggles both Add To and Subtract From options to Intersect with Selection.
Painting with the Brush tool adds to or subtracts from the mask (it will not paint on the image). To change the parameters of a brush:
- Tap the left/right bracket decrease/increase brush size.
- Hold the left/right bracket to continuously decrease/increase brush size.
- Control + Option -drag (Mac) | Alt + right click -drag (Win) left/right to decrease/increase brush diameter.
- Control + Option -drag (Mac) | Alt + right click -drag (Win) up/down to increase/decrease the hardness/softness of the brush.
- Shift-click to paint a straight line between the first and subsequent clicks.
Use the Select Subject or Refine hair buttons to quickly select the primary subject in the image or refine detailed areas such as hair. Note: Select Subject uses artificial intelligence and machine learning to quickly select the primary subject in the image. The technology has been trained and optimized for Portraits so that if it identifies a person in the image, it will create an accurate selection around difficult-to-select attributes such as hair.
Each View Mode has it’s own keyboard shortcut listed next to the name of the mode:
- Onion Skin = O
- Marching Ants = M
- Overlay = V
- On Black = A
- On White = T
- Black and White = K
- On Layers = Y)
- “J” toggles the Show Edge on and off
- “P” toggles the Preview on and off
- “F” cycles through the view modes (add Shift to cycles backwards)
- “X” temporarily turns off the view mode, displaying the original
To create a preset, select Save Preset from the Preset drop down.
Use the “Remember Settings” option to change the defaults to your preferred settings.
Refine Mode — There are two Refine Modes to choose from: Object Aware and Color Aware.
- When trying to select hair and other fine elements of an image (particularly when the foreground and background are similar in color or hard to differentiate) use Object Aware (with the help of AI and Machine learning, it often produces the best results in these situations).
- In photos that have a simple background and high color contrast with the subject, Color Aware may yield better results – especially when used in combination with the Refined Edge Brush. When using Color Aware mode, the Real-time Refinement check-box (located in the View Mode section) can help preview the results of the Refine Edge brush in real time.
Global Refinements — Use the Smooth, Feather, Contrast, and Shift Edge sliders to help to refine the edges of a mask. For example, if your photo has a slight halo around the selection, use the Feather slider to increase the softness of the edge, then use the Shift Edges slider to choke (move the edge inwards) or spread (move the edge away) from the subject.
If you first create a selection, then choose Select and Mask and modify the selection, clicking “Clear Selection” removes all masking while clicking the Reset Workspace icon (to the left of the cancel button) resets the selection to state when Select and Mask option was chosen.
Select and Mask supports Bird Eye View for faster navigation within an image. When zoomed into an image, press and hold “H” (the image zooms out to fit in the window). Drag the zoom rectangle over the desired location and release the mouse. Release the “H” key – the image zooms to the chosen area and the selected tool remains unchanged. Note: Birds Eye View requires GPU support.
The first time you double click on a Layer Mask in the Layers panel, Photoshop displays a dialog asking what you would like double clicking on a Layer Mask to do. You can choose between View Properties (in the Properties panel) or Enter Select and Mask. This behavior can be changed later in Preferences >Tools > Double Click Layer Mask Launches Mask and Select Workspace.
This video (Select and Mask in Photoshop CC) demonstrates how to use the Select and Mask workspace in Photoshop.
Additional Ways to Modify Selections — There are specific commands that enable quick modifications to selections. Choose Select > Modify…
- Border – to add a border to the selection.
- Smooth – to help clean up stray pixels in a color-based selection.
- Expand – expand the selection.
- Contract – shrink the selection.
- Choose Select > Grow to grow the selection to include all adjacent pixels falling within the tolerance range specified in the Magic Wand options.
- Choose Select > Similar to include pixels throughout the image, not just adjacent ones, falling within the tolerance range.
The Maximum and Minimum Filters — The Maximum and Minimum filters can expand or contract a selection by a decimal number (not a whole number as is the limit for the Select > Modify command), first, make your selection, then click the Quick Mask icon to view the red overlay before selecting the filter (otherwise the filter will effect the pixels in the photo that you have selected). Then, choose Filter > Other > Minimum to contract the selection or choose Filter > Other > Maximum to expand the selection. Note: both of the filters are looking at the values of gray within the specified radius that you define. The Preserve Roundness option will help keep round shapes round instead of being reduced using a more “rectangular” method which will cut corners when contracting. The Preserve Squareness will help keep rectangular shapes with more square edges from getting rounded. Both filters can be used for choke and spread operations on masks or images (removing dirt, enlarging bright points of light, etc.).
Saving Selections — After making complex selections, if you think you might want to use the selection again, choose Select > Save Selection to save the selection as an alpha channel. Alpha channels can be saved in several file formats including .psd and .tif. Note: alpha channels are not saved in the JPEG format. To load the channel as a selection, use Select > Load Selection or use the following shortcuts:
- Command -click (Mac) | Control -click (Win) on the icon for a channel to load the channel as a selection.
- Command + Shift -click (Mac) | Control + Shift -click (Win) to add additional channels to the selection.
- Command + Option -click (Mac) | Control + Alt -click (Win) to subtract another channel from the selection.
- Command + Option + Shift-click (Mac) | Control + Alt + Shift -click (Win) to create the intersection of two channels.
Pasting Into a Selection — If you have an active selection in your document (marching ants) and have content on the clipboard, selecting Edit > Paste pastes the content from the clipboard centered within the active selection.
- Choosing Edit > Paste Special > Paste Into, will paste the content from the clipboard into your selection and automatically convert the selection into a Layer mask.
- Edit > Paste Special > Past Outside also creates a layer mask from the current selection, but inverts the mask as it pastes the content.
- To preserve object coordinates when pasting from one document to another use Edit > Paste Special > Paste in Place.
Convert (Load) the Contents of a Layer into a Selection — To create a selection from the content of a layer, Command -click (Mac) | Control -click (Win) on the Layer thumbnail in the Layers panel.
- Command + Option + 2 (Mac) | Control+ Alt + 2 (Win) loads the luminosity of an image as a selection. This can then be used for a variety of manipulations such as adjusting color or building density.
- Use the following shortcuts to add to, subtract from, and intersect selections:
- Command + Shift -click (Mac) | Control + Shift -click (Win) to add another layer to the selection.
- Option + Command -click (Mac) | Alt + Control -click (Win) to subtract another layer from the selection.
- Option + Command + Shift -click (Mac) | Alt + Control + Shift -click (Win) to create the intersection of two layers.
- Note: the same shortcuts work when clicking on a Layer Mask thumbnail in the Layers panel.
Using Temporary Adjustments — Sometimes it’s easier to make a selection of an object if the contrast between the subject and the background is greater. In order to temporarily add more contrast, try adding an adjustment layer (such as Curves or Levels), and boost the contrast significantly. Then, then make the selection and, when finished, discard the adjustment layer.



I love the newly added Object selection tool for creating selections in Photoshop.