In the video below, you’ll learn how to remove distortions caused by the camera lens using the Lens Correction panel as well as correct perspective distortions using the auto and guided upright options in the Transform Panel.
Lens Corrections — Lightroom Classic includes numerous lens profiles, which can be used to correct common lens aberrations such as barrel and pincushion geometric distortion (“barrel” distortion causes straight lines to appear to bow outward, “pincushion” distortion causes straight lines to appear to bend inward). Most lens profiles also correct for vignetting (where the corners of an image appear darker than the rest of an image). In addition, Lightroom Classic’s ability to remove chromatic aberration corrects for misaligned pixels in an image (also caused by lens distortion).
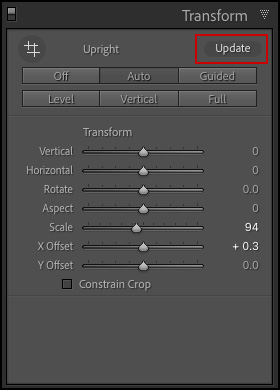
For best results, enable Lens Profile Corrections and Remove Chromatic Aberration before applying Upright corrections. If Lens Corrections are applied after making Upright corrections, click the “Update” button in the Transform panel to have Lightroom reanalyze the image, and compute a new correction.
Raw and Non-Raw Lens Profiles — There are separate lens profiles for raw and non-raw files. Lightroom Classic’s Lens Correction panel’s lens profile popup displays only the profiles available for the file type of the selected image (if you’re working with a raw file, you will see raw-based lens profiles, if you’re working with a jpeg, you will see non-raw-based lens profiles. Adobe creates many more raw-based lens profiles available than non-raw-based lens profiles. This is due to the fact that lens correction quality for non-raw files (JPEGs, TIFFs, etc.) can be very problematic since the quality results depends on where the JPEG/TIFF came from, and how it was previously processed. For example, a JPEG that comes straight out of the camera is very different from a JPEG that somebody created from a raw file in ACR. If you try to apply the same non-raw-based lens profile to these two cases, you can get quite-different results (even though they’re both JPEGs from the same camera and lens).
Vignetting — To achieve even vignetting when cropping images, use the Lens Profile to remove vignetting caused by the lens and the Post-Crop Vignetting in the Effects panel to apply additional vignetting.
Built in Lens Correction Support — Some cameras have lens profile support built-in (Micro 4/3 (MFT) lenses and cameras for example, as well as other cameras (Fuji X, Leica Q, plus many point-and-shoot models from Canon). If your lens has built-in support, the Lens Corrections tab will display the message “Built-in Lens Profile Applied”.
Creating Custom Lens Correction Profiles — If you have a unique camera/lens combination or want to make your own custom lens profiles, you can use the Adobe Lens Profile Creator. Click here for more information.
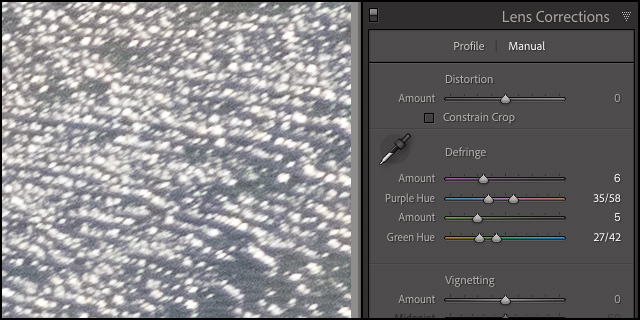
Removing Chromatic Aberration — Chromatic Aberration is caused by the failure of the lens to focus different colors to the same spot. In one type of chromatic aberration, the image from each color of light is in focus, but each image is a slightly different size – this type of Chromatic aberration can be removed by enabling the Remove Chromatic Aberration check-box in the Lens Correction panel. Another type of chromatic artifact affects the edges of specular highlights, such as those found when light reflects off water or polished metal. This situation usually results in a purple fringe around each specular highlight and can be corrected using the Defringe options in the Manual tab of the Lens Correction panel.
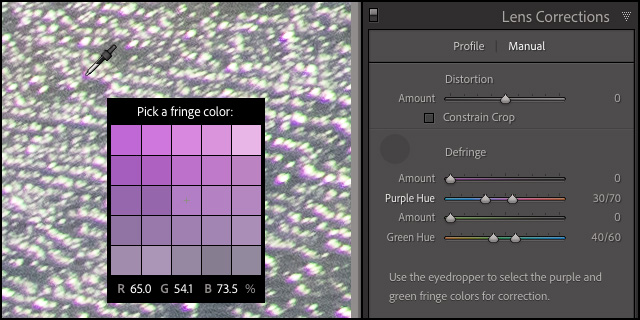


Previewing Chromatic Aberration — Option -drag (Mac) | Alt -drag (Win) the Defringe sliders to display a high contrast preview of the areas being effected.
This link provides additional information on how to include Lens Profile Corrections as part of your Raw Default Settings (in order to automatically apply Lens corrections when importing images).
Transform Upright Mode Shortcuts — Applying any of the five Upright modes (Auto / Guided / Level / Vertical / Full) will most likely produce better results when working on raw files because as they can take advantage of more reliable metadata within the file (such as focal length).
- Control + Tab (Mac and Win) cycles through the Upright Modes.
- Shift + T selects the Guided Upright tool. Drag in the image area to add up to 4 upright guides per image. Option -drag (Mac) | Alt -drag (Win) for finer precision (slower movement) while dragging a guide.
- “O” toggles the visibility of the Guided Upright Loupe.
- With the Guided Upright tool selected, set the Grid Overlay (located in the toolbar) to “Always” to display a reference grid in the image. If the Grid Overlay is set to either “Never” or “Auto”, tapping “H” will toggle between them.
- “A” toggles through the Tool Overlay options (Always, Auto, Never).
Aspect — Use the Aspect slider to help remove distortions within an image if an area becomes overly squished or stretched (I find this to be especially helpful when there are people/animals in the photo).
Revealing Cropped Areas — When using the Upright Modes, the resulting image is often cropped in order to avoid displaying blank areas around the edges. To help retain necessary information from the original image that would otherwise be cropped, use the Scale, X Offset, or Y Offset sliders to reposition the image within the canvas.
Rotated Crops and Manual Perspective Corrections — Rotated crops and manual perspective corrections in the Transform panel (Horizontal, Vertical, Rotate, Aspect, Scale, and X/Y Offset controls) applied to existing images will usually interfere with Upright corrections. For this reason, selecting one of the Upright modes will reset the crop and manual perspective adjustments order to display the maximum image area remaining after an Upright adjustment.
- Option -click (Mac) | Alt -click (Win) to preserve Crop settings when applying an Upright Mode.
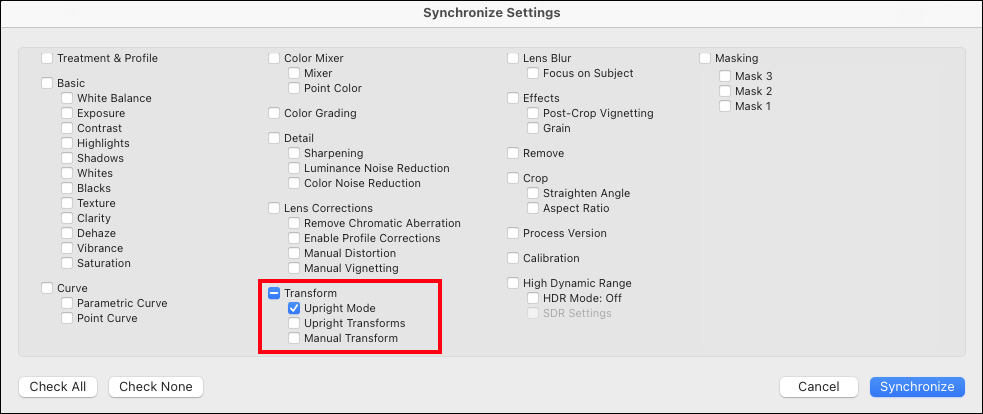
Sync Transform Settings — To sync transform setting across photos, choose “Upright Mode” to calculate Upright modes independently for each image. Choose “Upright Transforms” to synchronize using the exact numeric values.
- For example, select Upright Mode if you have a series of unrelated images where each photo needs to be analyzed and the perspective corrected individually. Note: if this is something you do all of the time, you can create a preset by selecting Develop > New Preset and enabling the “Upright Mode” option.
- If, on the other hand, you have a series of related images such as a sequence of bracketed exposures or a set of time lapse images were you need to apply the same exact numeric perspective corrections to each image, choose to sync “Upright Transforms” (In this scenario, you don’t want Lightroom Classic to analyze each individual image because Upright is very likely to return a slightly different result on each of the images in the selection.) Note: You could choose to create a preset by selecting Develop > New Preset and selecting the “Upright Transforms” option but I’m not sure that this preset would be useful when applied to future images because the numeric values are locked into it.
- Choose “Manual Transform”, to sync the current values of the Vertical, Horizontal, Rotate, Aspect, Scale, X Offset, and Y Offset adjustment sliders.