In this video, you’ll explore several ways to add a vignette effects and simulate traditional film grain in Lightroom Classic.
Below are three techniques for Vignetting photographs in Lightroom Classic:
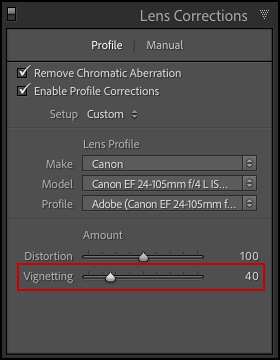
Lens Correction — Although initially designed to remove vignetting caused by lens distortion, the Vignetting slider in the Lens Correction panel can be used to increase/decrease the amount of vignetting in an image. Many photographers prefer this method because it does a great job of simulating an in-camera vignette effect along the edges. If however, you have cropped the image, the vignetting may appear uneven as the Lens Correction was designed to effect the entire image (regardless of crop).

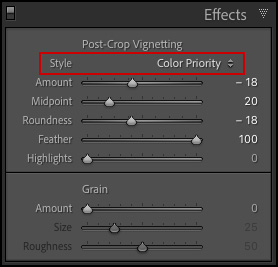
Post-Crop Vignetting — The Effects panel offers three different styles of post-crop vignettes which can add either a light or dark vignette and display a live preview when cropping. The primary benefit being that the vignette is applied to the image after cropping and is readjusted and updated as the crop is altered. Note: to create a the most uniform vignette on a cropped image, first remove any vignetting caused by lens distortion using the Vignetting slider in the Lens Correction panel, then apply the post-crop vignette.

- The Post-Crop Vignetting feature has three different styles to choose from:
- Highlight Priority – enables highlight recovery but can lead to color shifts in darkened areas of a photo. It is suitable for photos with bright image areas such as clipped specular highlights and behaves more like a traditional exposure burn in the darkroom.
- Color Priority – minimizes color shifts in darkened areas of a photo but cannot perform highlight recovery. This style also behaves more like a traditional exposure burn in the darkroom.
- Paint Overlay – similar to an overlay of black or white paint. While the paint overlay can create slightly muddy looking edges in some photographs (because it’s adding the same amount of density), it can be helpful when edges in an image need to be darkened/lightened by the same amount (for example in a high key image).
- Use the Amount slider to control the darkening/lightening of the vignette area.
- Use the Midpoint slider to reposition the vignette inwards towards the center or outwards towards the edge of the image).
- Use the Roundness slider to shape the vignette (from rectangular to elliptical).
- Use the Feather slider to soften the edge of the vignette.
- Use the Highlights slider in combination with either the Highlight Priority or Color Priority styles to reintroduce contrast in the highlights. This effect will be most noticeable if the vignetting is applied over bright areas such as highlights in a sky.

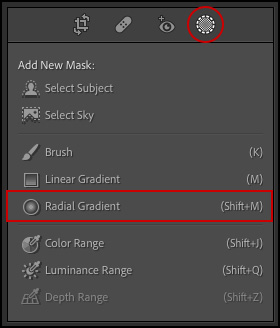
The Radial Gradient Tool — Use the Radial Gradient tool to make local adjustments with an elliptical mask. Select the Mask icon, then choose Radial Gradient.

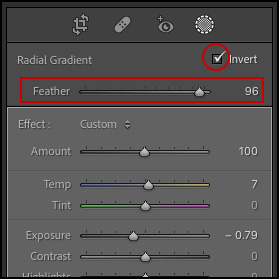
Drag the gradient in the image and adjust the size and position using the on-screen controls as needed. By default, the interior of the shape will be affected: in the adjustment panel, check the Invert button to affect the exterior of the shape. Use the Feather slider to increase/decrease the visual falloff of the applied adjustment.

There are several advantages to using the Radial Gradient including the creation of off-center vignette, applying multiple adjustments (exposure, sharpness, saturation etc.), and the application of multiple gradients within a single image.
The following shortcuts can help when using the Radial Gradient tool (Shift + M)
- Command -double-click (Mac) | Control -double-click (Win) in the image area to expand the Radial Filter to the visible image area.
- You can drag a Radial Gradient beyond the image area (you may need to first zoom out, then drag to resize/reposition).
- ‘ (apostrophe) toggles the Invert Mask option.
- Shift -drag constrains the Radial Gradient to a circle.
- By default, the Radial Filter is scaled from center. Option -drag (Mac) | Alt -drag (Win) to scale from the “corner”.
- Shift -dragging any of the four handles of an existing Radial Gradient will preserve the aspect ratio of the ellipse.