In this video you’ll learn how to use the Map module in Lightroom Classic to view the location of a photograph as well as quickly find and add GPS and Location information (including Sublocation, City, State, Country/Region, and ISO Country Code) to images that don’t have embedded GPS data.
The Map Module Shortcuts
- Plus/minus ( +, – ) zooms in/out.
- Option -drag (Mac) / Alt -drag (Win) to zoom in on the map.
- Delete (Mac) | Backspace (Win) deletes GPS coordinates.
- Command + Delete (Mac) | Control + Backspace (Win) deletes all Location metadata.
- Command + K (Mac) | Control + K (Win) locks markers.
- Command + F (Mac) | Control + F (Win) highlights the Search Map field.
- Command + left / right arrows (Mac) | Control + left / right arrows (Win) move from previous/next tracklog.
- “I” toggles the Map information overlay.
- “\” (backslash) toggles Location filter bar at the top of the map.
- “O” toggles Saved Location overlay.
Map Style shortcuts:
- Command + 1 (Mac) | Control + 1 (Win) displays Hybrid view
- Command + 2 (Mac) | Control + 2 (Win) displays Roadmap view
- Command + 3 (Mac) | Control + 3 (Win) displays Satellite view
- Command + 4 (Mac) | Control + 4 (Win) displays Terrain view
- Command + 5 (Mac) | Control + 5 (Win) displays Light view
- Command + 6 (Mac) | Control + 6 (Win) displays Dark view
Metadata
- Click the arrow next to the GPS coordinates in the Metadata panel (in the Library module) to view the image in the Map module.
- Option -click (Mac) | Alt -click (Win) the arrow next to GPS coordinates (in the Metadata panel either the Library or Map module) to view the image via Google Maps in the default web browser.
- Delete (Mac) | Backspace (Win) deletes GPS coordinates of the selected image (when in the Map Module).
Filtering the Selected Source — The Content Selector (in the tool bar) allowing filtering based on All Filmstrip Photos, Selected Photos or Flagged Photos.
Create a Collection from a Pin — | Right -click (Control -click Mac) on the pin and select New Collection from the context sensitive menus to create a collection based a group of photos at a specific Pin location.
Select and Reorder Images in the Map Module — While in the output modules, instead of returning to the Library module to select different files, you can:
- Choose a different collection using the Collections panel.
- Use the Go Back and Go Forward navigation icons to view recently viewed folders (located in the black bar above the filmstrip).
- Click the path for the currently selected image (located in the black bar above the filmstrip) and choose from Recent and Favorite Sources
Working with GPS data in the Map Module — When you drag images onto the Map in Lightroom’s Map module, and you have Reverse Geocoding enabled (Catalog Settings > Metadata > Address Lookup), Lightroom will automatically enter Location information associated with the GPS information (Sublocation, City, State/Province, Country, and ISO Country Code).
It’s important to note that Lightroom can treat the Location Information and the GPS data independently of one another. If you move the location of the images (by dragging and dropping them to another location on the map), by default both the GPS as well as the Location Information will be updated. In fact, this is always true of the GPS information – if you move the image on the map, the GPS data will be updated.
You have, however, the option to override the Location Information. As I mentioned, by default, Lightroom will update the Location Information if you move the file, but you can also change the Location Information manually (perhaps you have a nickname for the location), by typing in any of the Location Information fields.
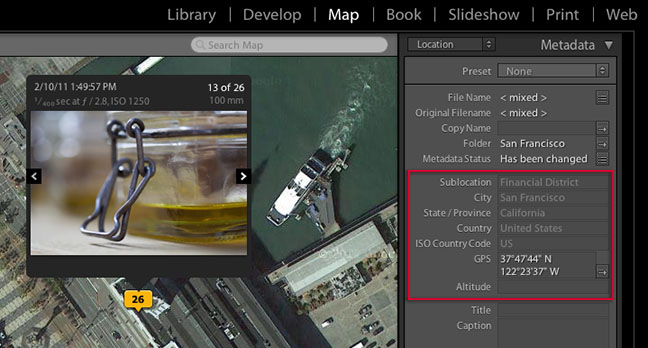
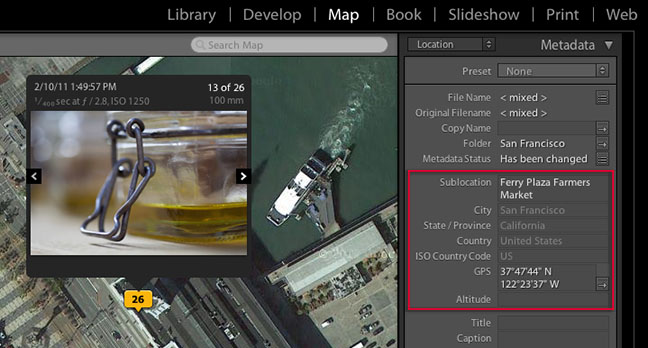
Lightroom displays the Location Information in grey if it is being automatically generated. If you customize the values (enter your own text), the custom information displays in white.
As you can see in the first example, the Location Information is gray indicating that Lightroom assigned the information based on reverse geoencoding the GPS data.
In the second example, I have entered “Ferry Plaza Farmers Market” in the Sublocation – overriding Lightroom’s reverse geoencoding information – locking it in so that moving the image on the Map will no longer automatically update it.
Applying Saved Locations — Once a Location has been created in the Saved Locations panel in Lightroom’s Map module, you can quickly apply that Location information by dragging images from the filmstrip and dropping them onto the saved Location. Likewise, you can drag a Saved Location to a photo in the filmstrip. In both cases, the photo will receive the same location as the already defined “Saved Location”.


I think I understand how the Map module works, but I have a basic question, maybe I’m missing something. If my RAW phot HAS GPS information in the EXIF, why do I need to drag it onto the map to locate it? Can’t LRCa automatically place it on the map at the Long/Lat in the GPS info? And if not, WHY not? That would seem to me to be straightforwards – if LR can figure out the Lat/Long from a “dropped” photo, it should be able to do the reverse.
?????