Photoshop on Macs running M1 chips — I’m happy to announce that today Adobe shipped the first version of Photoshop to run natively on Apple computers powered with the M1 chip. With this version, internal tests show about a 20% boost in performance across many parts of the application including AI-based selection tools, filters, and retouching features compared with Photoshop running Rosetta 2 (Rosetta 2 enables applications built for Apple’s Intel chips to run on the new Apple Silicon devices with the M1 chips). While a few of the more recent Photoshop features (Invite to Edit, Preset Syncing, most notably) are still being ported to the M1 chip, you can easily switch back to Photoshop running under Rosetta 2 until they make their way into the shipping version. A huge thanks to everyone who participated in the beta process and contributed feedback!
Super Resolution — Adobe Camera Raw’s (v13.2) new Super Resolution feature uses an advanced machine learning model (trained on millions of photos) to intelligently boost the resolution of an image while maintaining clean edges and preserving important details. Watch the video below to see it in action. Note: Super Resolution will be coming to Lightroom Classic and Lightroom soon.
Here are five quick tips/shortcuts from the video:
• To access Super Resolution, right-click in the image (or Control -click on Mac) and choose “Enhance” or, use the shortcut Command + Shift + D (Mac) | Control + Shift + D (Win) to display the Enhance window.
• To skip the Enhance Preview dialog box, press Option (Mac) |Alt (Win) before rt-clicking and selecting the Enhance menu command (when using this shortcut, Camera Raw will apply the previously used settings).
• Camera Raw has a file size limit of 65,000 pixels on the long side or 500 megapixels. So, you may not be able to apply it to a really large file such as a panorama, since doubling the pixel dimensions of the panorama may exceed the limits of Camera Raw.
• You can’t apply Super Resolution multiple times to the same original. Although you can apply Super Resolution and then enlarge the file further when using the Save options in Camera Raw or after opening the file in Photoshop (using the Image Size command).
• Applying Super Resolution to a Bayer or X-Trans raw file will also automatically apply Enhance Details, to create the highest quality image possible.
To learn more about how Super Resolution works, check out this post by Eric Chan.
Additional new features in Adobe Camera Raw include:
ProRaw Profile — With the addition of a new ProRaw profile, photos captured in the ProRaw format will now appear closer to their in-camera look.
Filter and Sort — The filmstrip can be filtered based on capture date, file name, star rating, color label, and status, as well as sorted by ascending or descending order.
Customizable Panel Order — The Edit panels can now be reordered. Right -click (or Command -click on Mac), on a panel header choose “Edit Panels to Show…”. Use the up and down arrow keys in the subsequent dialog to change the stacking order. Note: the Profile location can not be repositioned.
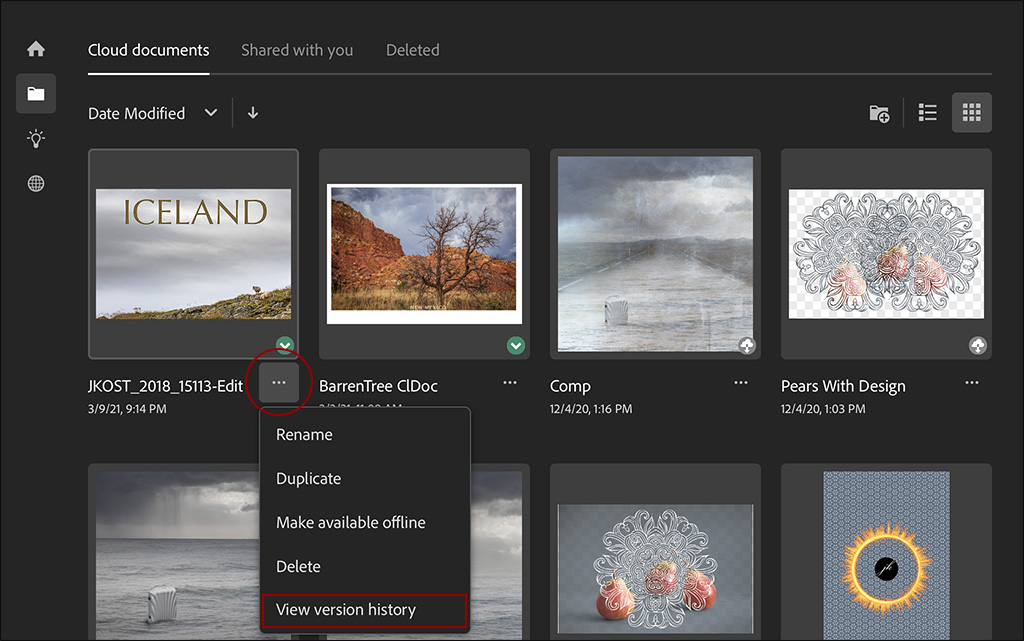
Version History and Offline Access on iPad — Cloud Documents on Photoshop on the iPad gained two new features: Version History and Offline Access.
Version History Panel — When cloud documents are saved (either automatically -after a certain time duration or, when you choose to save the document), Photoshop automatically creates and saves a version. To view the Version History for a document, tap the More icon (…) at the bottom right of your image on the home screen and select View Version History.
In the Version History window, tap to view different versions, and use the More icon (…) to Name or Revert to a version. To prevent an auto-version from being deleted (auto versions periodically expire based on the type of subscription), tap the More icon (…) and Choose Name this version.
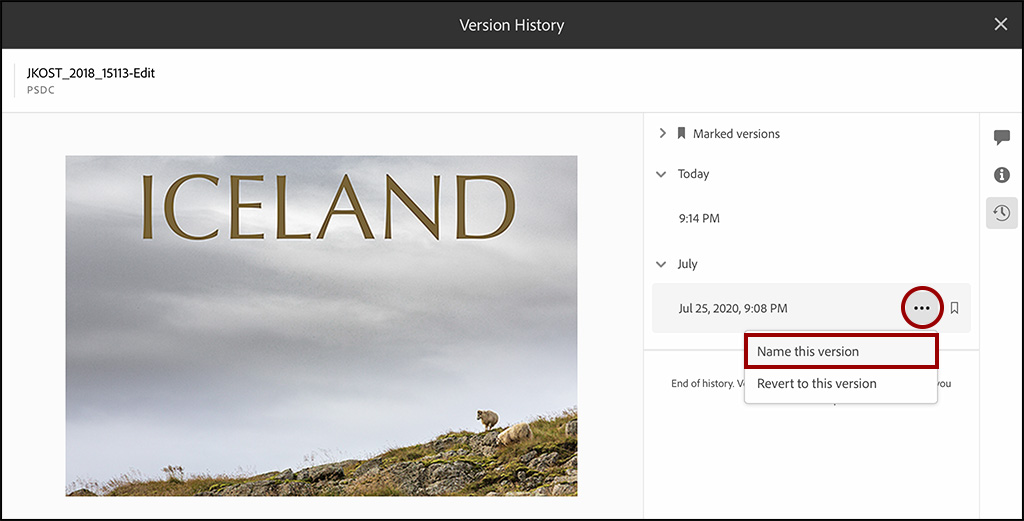
Note: another way to manage Versions is by using the Timeline view on assets.adobe.com. Choose Your Work > Files > Cloud Documents, select the desired file and click the Version/Timeline View icon (to on the right of the image preview).
Offline Availability of Cloud Documents — Now you can select the Cloud Documents you want to store locally and access while you are offline In the home screen, tap the Cloud icon at the bottom right the image preview to download the image locally (or tap the More icon (…) and choose Make Available Online). To designate an offline document back to cloud-only (to free up space on your iPad for example), tap the more icon and choose Make Online Only.
I’d love to be able to have an automated workflow where I can save all of my Lightroom edits using “Save Metadata to Files” in Lightroom, then have Photoshop run a batch action that opens those original DNG files, converts them to Super Resolution (without having to go through the process of saving and reopening the Enhanced DNG), and then exports the file as a JPEG (after adding some custom sharpening). Basically I want the option of Super Resolution without having to save a new DNG file, as if it were just another step in the editing process. Hopefully this is coming when Super Resolution hits Lightroom.