Here are my favorite tips, tricks and shortcuts for working with Adobe Bridge!
Navigating the Content Panel —To navigate through images in the Content panel, use the up and down, left and right arrow keys. In addition:
• Command + \ (backslash) (Mac) | Control + \ (backslash) (Win) will cycle the Content panel through Thumbnails, Details and List views.
• Tap the Tab key to display only the Content panel. Tap again to display all panels.
• Command + “[“ or “]” (Mac) | Control + “[“ or “]” (Win) rotates selected images in the Content panel.
• Command + “+” or “-” (Mac) | Control + “+” or “-” (Win) increases/decreases thumbnail size in the Content panel
Previewing Images —Tap the spacebar to enter Full Screen Preview or use Command + B (Mac) / Control + B (Win) to enter Review Mode and preview images without having to open them in Photoshop. While reviewing images in either of these view:
• The left/right arrow takes you to the previous/next image.
• 0-9 rates and labels images.
• Command + R (Mac) | Control + R (Win) launches Camera Raw allowing you to make edits – all without ever leaving the Full Screen Preview or Review Mode.
• Command + “[” or “]” (Mac) / Control + “[” or “]” (Win) rotates the image
• The Escape key exits both modes.
Note: There are 2 additional advantages of using Review Mode: 1) it allows you to use the down arrow key to remove images from your selection and 2) it provides the ability to create Collections from your edited selection (icon appears in lower right). However in the “carrousel” view, the images are smaller.
View Images as a Slideshow —Command + L (Mac) | Control + L (Win) displays the selected images in Slideshow Mode and automatically transitions between images every five seconds using a dissolve. Chose View > Slideshow Options to access additional Display, Slide, and Transition options.
Drag and Drop Folders to View (Mac only) —If you use the operating system to navigate to a folder, and then want to see that folder in Bridge, dragging the folder icon (in the operating system) to the Preview Panel in Bridge will display the contents of the folder in Bridge.
“String Substitution” Batch Renaming —When renaming files, you can replace any part of a filename with custom text. Select the files to be renamed and choose Tools > Batch Rename or use the shortcut Command + Shift + R (Mac) | Control + Shit + R (Win). Under “New Filenames” use the drop down menu to select “String Substitution” from the list. Enter in the Text to “Find” and “Replace” and you’re done! This is an easy way, for example, to remove a prefix like “_MG_” from a file name and insert your own custom text instead.
Rating Images —By default, star rating and color labeling items in Bridge requires the Command (Mac) | Control (Win) keyboard modifier. However, selecting Preferences > Labels allows you to remove the keyboard modifier when applying the ratings/labels. After removing the modifier, 0-5 rates applies star ratings, and 6-9 applies color labels. Command + comma/period (Mac) or Control + “+ comma/period (Win) will increase/decrease the rating. Use Preferences > Labels to change the name of the color ratings to meet the needs of your workflow. Note: if using both Lightroom and Bridge, you will probably want to make these labels match.
Set the Reject Label —Option + Delete (Mac) | Alt + Backspace (Win) sets the Reject Label.
Deleting Files —Command + Delete (Mac) | Control + Delete (Win) deletes selected file(s) from Bridge, placing the file(s) in the Trash (Mac) | Recycle Bin (Win).
Toggle Metadata Details in Bridge —Select Preferences > Thumbnails to assign and display (up to) four additional lines of Metadata under the image thumbnails in the Content panel. Command + T (Mac) | Control + T (Win) toggles the visibility of the displayed metadata.
Toggle Photoshop and Bridge —Command + Option + O (Mac) | Control + Alt + O (Win) toggles between Bridge and Photoshop (and vice versa).
Editing Capture Time —Select Edit > Edit Capture time to adjust the capture time to a specific date and time or shift the date by a number of hours, minutes and seconds. This can be helpful when changing timezones of when the camera’s date and time are set incorrectly.
Place a Smart Object from Bridge to Photoshop —When working in Bridge, select a file and choose File > Place > In Photoshop. If you have no other documents open, the document will be placed into a new document as a Smart Object in Photoshop. If you already have a file open in Photoshop, Photoshop will place your document into the currently active document (as a Smart Object) and resize it to fit within the canvas (image area) and displaying transformation handles so that you can resize if necessary. Tap the Return or Enter key to apply any transformation. Note: you can manage Photoshop’s “Place” options using Photoshop’s Preferences > General (Skip Transform when Placing, Resize Image During Place, and Always Create Smart Objects when Placing). When playing images, if the original image is a raw file, the Camera Raw dialog will be displayed before placing the file in Photoshop so that you can make any necessary modifications.
Bypass the Camera Raw Dialog —Shift-double clicking on a raw image in the Bridge will bypass the Camera Raw dialog, applying either settings that have been saved with the file, or if there are no setting applied, opening the file with the camera defaults.
Applying Camera Raw Presets in Bridge — To make presets available in Bridge, first mark them as Favorites in Camera Raw, then select them from the Edit > Develop Settings menu.
Open Several Photographs into a Single Photoshop Document —In Bridge, select multiple photographs and choose Tools > Photoshop > Load Files into Photoshop Layers to open them all into a single document.
Image Processor —Use Image Processor to quickly save multiple images to a different format (PSD, TIF and/or JPEG). First, select the desired images. Then, choose Tools > Photoshop > Image Processor. Use the options to choose a destination folder, a File Type(s)and any additional options such as Resize to Fit and Compression etc.. You can even choose to run an action after Image Processor batch converts the files.
Note: While you can run Image Processor from Photoshop (File > Scripts > Image Processor), Photoshop requires that you either select “open” files or a folder of images and I typically want to convert only a selection of images. If you do want to use Bridge to process all of the images in a folder, you can either select ALL of the images or select NONE of the images – if no files are selected, Bridge will assume that you want to process all of them.
Using the Image Processor Script to Process Raw Files in Bridge or Photoshop —When using the Image Processor Script to batch process raw files in Bridge or Photoshop, it’s important to know that the workflow settings in Adobe Camera Raw might have an effect on the resulting files. In this example, I selected the raw files in Bridge and choose Tools > Photoshop > Image Processor. I want the resulting images to be a maximum of 2000 pixels in the long side so I enter that value in the width and height options.
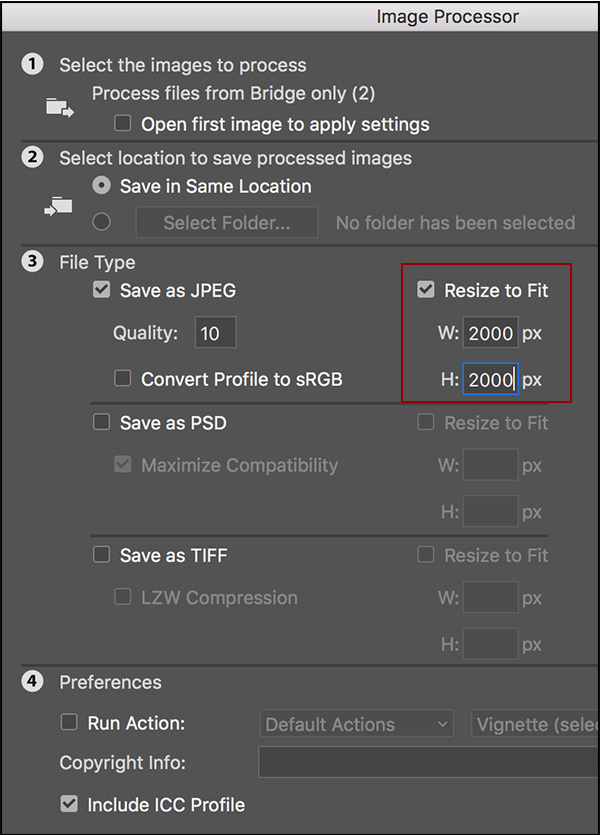
If, in Camera Raw, the Image Sizing options are disabled (or if they are set larger than 2000 pixels), then I’ll have nothing to worry about. If however, the Resize to Fit option is enabled in the Workflow Options in Camera Raw, and the Long Side dimension set lower than 2000 pixels (as is illustrated in the example below), Camera Raw will resample the image down to 1000 pixels (throwing away information) and then the Image Processor Script will up-sample it (making up information) based on the Image Processor settings.
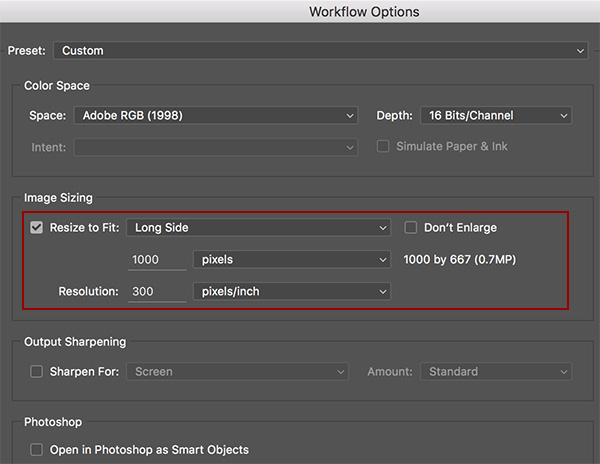
Having the Resize to Fit option enabled might produce unexpected results.
Because resampling down and then up will lower the quality of the final image, I would be better off unchecking the Resize to Fit option in Camera Raw (or setting it to the same dimensions that I have set in the Image Processor Script).
Clear Camera Raw Settings in Bridge —To quickly clear Camera Raw Setting from images in Bridge, right -click (or Control -click (Mac)on the image thumbnail and choose Develop Settings > Clear Settings. Note: You can also choose to Reset and/or Copy and Paste Develop settings from the context sensitive menus.
Opening Camera Raw in Bridge or Photoshop – For most people, the fact that Camera Raw is a plug in that works in both Bridge and Photoshop is completely transparent. The most common workflow is to find the desired image in Bridge, double click to open it in the Camera Raw dialog box and start editing edits. When you’re finished making edits the default option is “Open Image” (to open in Photoshop) and if you click Done, you will remain in Photoshop.
But there is a subtle difference when you use one of the following three methods to open a raw file (i.e not double-clicking on an image):
Choose File > Open in Camera Raw.
Click the Open in Camera Raw icon.
Use the shortcut Command + R (Mac) | Control + R (Win).
Using any of these three methods, will launch the Camera Raw plug in within Bridge. And, when you are finished making edits, the default option is “Done” (and by clicking it, you will be returned to Bridge. The advantage to this workflow is that you can make edits without having Photoshop open.
Resetting Bridge’s Preferences —When launching Bridge, Command + Option + Shift (Mac) | Control + Alt + Shift (Win) to choose “Reset Preferences”, Purge All Local Cache Files”, and/or Reset Standard Workspaces”.
Creating PDF files in Bridge —The Output module enables quick and easy creation of PDF files within Bridge CC.
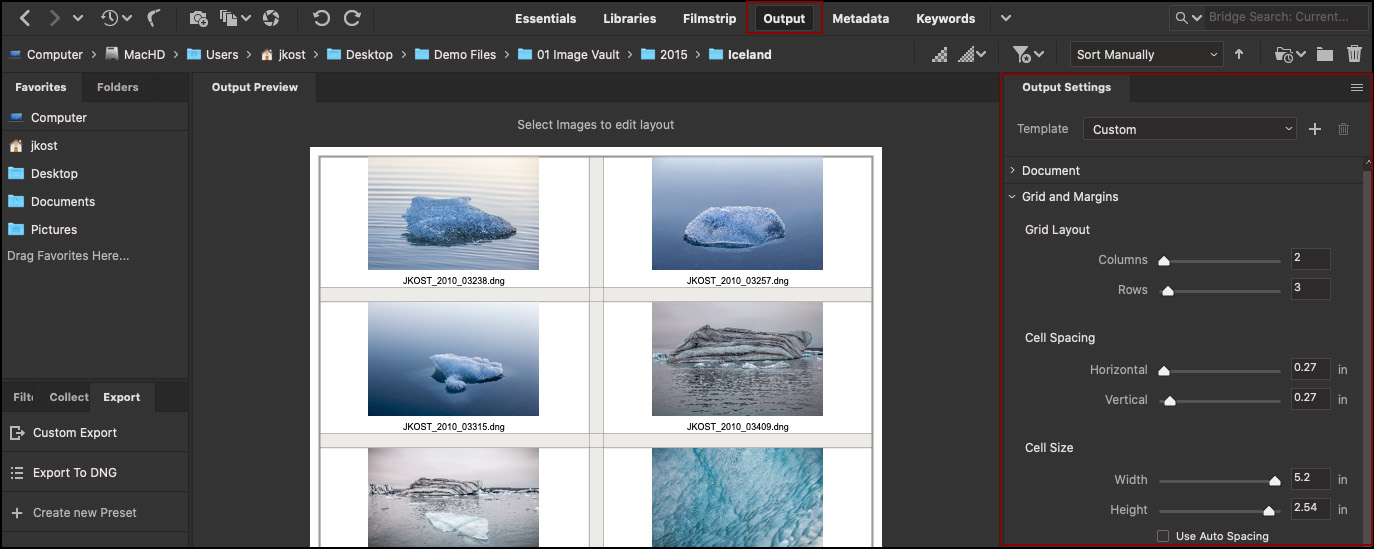
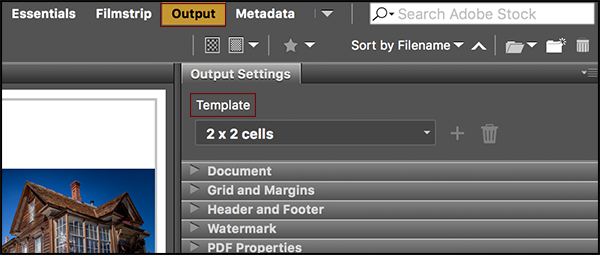
Select the Output workspace and chose a template as a starting point. Then, drag and drop images from the filmstrip into the Output Preview area, and drag to reorder images as needed. Use the panels to customize the following:
- Document —define page size, resolution and quality, image rotation and background fill, thumbnail placement, and filename.
- Grid and Margins —customize the grid layout, margins, cell size, and spacing.
- Header and Footer —add page numbers and custom text blocks at the top and bottom of the page.
- Watermark —add a text or image watermark and place on each image or at the top of bottom of the page. Customize the watermark’s size, placement, and opacity.
- PDF Properties —add password protection and choose playback options for multi-page documents (including full screen and automatic advancement with transitions).
When finished, chose Export to PDF and, if desired, save your custom settings as a new template. Note: There are additional preferences (Bridge > Preferences > Output) which include options for viewing the PDF after export, preserving embeded profiles, using Solo mode, and cell size vs cell spacing priorities for layout.
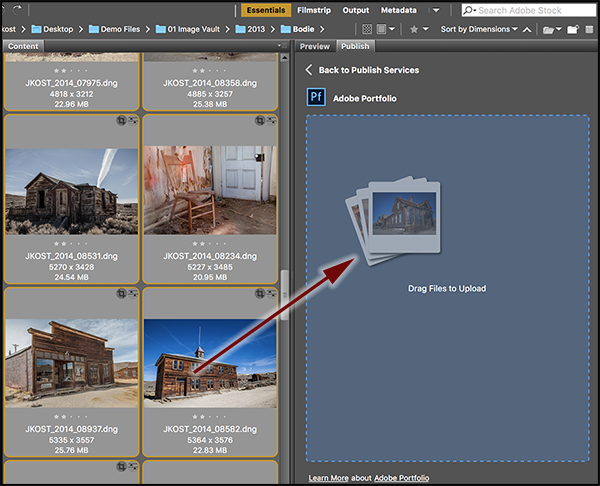
Adding projects to Adobe Portfolio —Publishing your work to Adobe Portfolio has never been easier. In the Publish panel, click the Adobe Portfolio icon and drag and drop files from the content panel into the empty well.
- In the Create Portfolio Project dialog, give the project a name, set your cover photo, and choose whether or not to include the project on Behance. Note: If you select raw files, they will be converted to JPEG files before uploading to Adobe Portfolio.
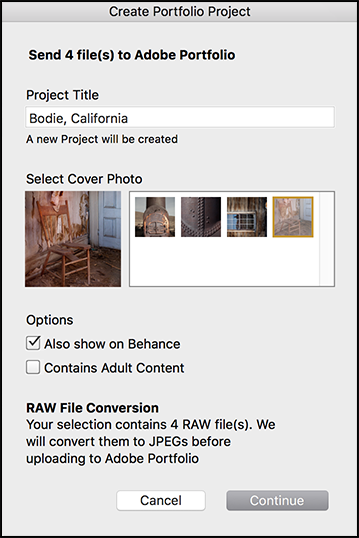
- Once the files are uploaded and the project has been created, a dialog appears. Click Go To Adobe Portfolio to push your project live using the Portfolio editor.
Stock Contributor Workflow —To quickly contribute image to Adobe Stock, click the Adobe Stock Contributor icon in the Publish panel. Connect your Contributor account, drag and drop files from the content panel into the empty well, and you’re ready to upload!
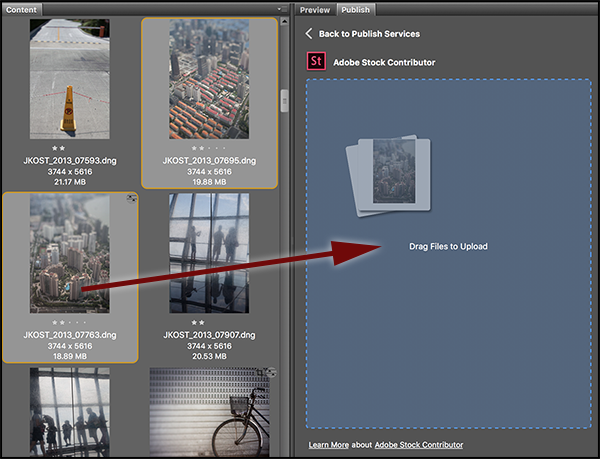
Once the files are uploaded click Go to Adobe Stock to add additional information about the image and submit.
Lightroom or Bridge? —This video (Should I use Lightroom or Bridge) discusses the advantages of using Adobe Bridge and Lightroom Classic so that you can make the correct choice for your workflow.
Why Does a Photograph’s Preview Change in Bridge? —This video (Why Does the Photograph’s Preview Change in Lightroom and Bridge?)explains why the look of a photo changes as the preview is updated in Bridge by explaining how digital camera files are captured and displayed by different applications. https://youtu.be/Om0_0FUpGrI
CEP Extensions Support —Bridge supports Common Extensibility Platform (CEP) so that developers can create and run HTML5\CSS based Extensions. Visit https://github.com/Adobe-CEP to find Bridge CEP related resources. For detailed instructions, refer to the document CEP Extensions Cookbook for Bridge.
How much for this program and does it run with basic pphotoshop Thank you
Hi Julieanne
We are loving the new Adobe Bridge CC 2018 update with all the new features. But it seems that the 2018 version is not working with custom XML metadata. Everything was fine in 2017 still. Hopefully, Adobe will fix the problem in a future release. Thanks.
Could you please post the issue here so that the product team can see it? https://feedback.photoshop.com/
There are far more people looking there than on my blog… Thank you!