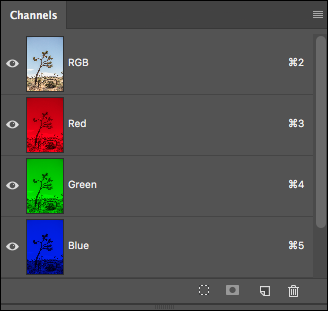
1) Viewing Channels in Photoshop
When working in RGB:
- Command + 2 (Mac) | Control + 2 (Win) displays the Composite (RGB) Channel.
- Command + 3 (Mac) | Control + 3 (Win) displays the Red Channel.
- Command + 4 (Mac) | Control + 4 (Win) displays the Green Channel.
- Command + 5 (Mac) | Control + 5 (Win) displays the Blue Channel.

When working in CMYK:
- Command + 2 (Mac) | Control + 2 (Win) displays the Composite (CMYK) Channel.
- Command + 3 (Mac) | Control + 3 (Win) displays the Cyan Channel.
- Command + 4 (Mac) | Control + 4 (Win) displays the Magenta Channel.
- Command + 5 (Mac) | Control + 5 (Win) displays the Yellow Channel.
- Command + 6 (Mac) | Control + 6 (Win) displays the Black Channel.
To revert back to the old behavior (PSCS3) select Window > Workspaces > Keyboard Shortcuts & Menus and enable “Use Legacy Channel Shortcuts”. This remaps the shortcuts for showing channels two keys to the left. For example:
- Command + ~ (Mac) | Control + ~ (Win) displays the Composite Channel
- Command + 1 (Mac) | Control + 3 (Win) displays the first channel of the document
2) Viewing Channels in Panel Based Adjustments
- Option + 2, 3, 4, etc. (Mac) | Alt + 2, 3, 4, etc. (Win) displays the Composite, Red, Green, and Blue channels when using the panel-based adjustments such as a Curves Adjustment layer.
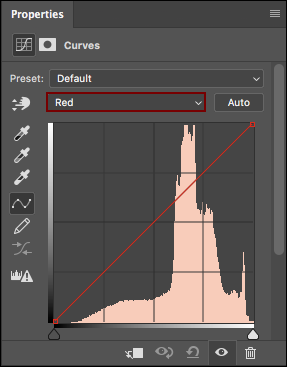
- The Hue/Saturation and Selective Color commands are slightly different as they don’t map to just RGB/CMYK, however the same general rules apply: Option + 2 (Mac) | Alt + 2(Win) selects the Master channel, and Opt+3, 4, etc. selects subsequent items in the list.
3) Saving Selections as Alpha Channels
After making complex selections, choose Select > Save Selection to save the selection as an alpha channel. Alpha channels can be saved in several file formats including Photoshop and TIFF. (Note: alpha channels are not saved in the JPEG format.)
4) Loading Channels as Selections
After saving selections as channels, those channels can be loaded back into a selection with the following shortcuts:
- Command -click (Mac) | Control -click (Win) on the icon for a channel to load the channel as a selection.
- Command + Shift -click (Mac) | Control + Shift -click (Win) to add additional channels to the selection.
- Command + Option -click (Mac) | Control + Alt -click (Win) to subtract another channel from the selection.
- Command + Option + Shift-click (Mac) | Control + Alt + Shift -click (Win) to create the intersection of two channels.
5) Spot Color Channels in Photoshop
Command -click (Mac) | Control -click (Win) the new channel icon on the Channels panel to create a new Spot Color channel. (Spot Color channels are used primarily for printing using additional “spot colors” on the printing press.)
6) Viewing Individual Channels
During a Free Transform, using the Place command, and /or when Cropping, the opacity of layers as well as the visibility of individual channels can be changed on their respective panels (although not with the use of keyboard shortcuts). Note: this can be especially useful when using alpha channels and/or with alignment of layers.
7) Display Channels in Color
To display the Channels in the Channels panel in color, choose Preferences > Interface > and enable Show Channels in Color.
8) Loading the Luminosity of an Image as a Selection
Option + Command + 2 (Mac) | Alt + Control +2 (Win) loads the luminosity of an image as a selection. This can then be used for a variety of manipulations such as adjusting color or building density.