I’m excited to announce several updates to Lightroom CC starting with the new and enhanced Raw and Creative Profiles. While the concept of Profiles isn’t new to Lightroom CC, in this release, their power has been greatly enhanced. This video demonstrates how:
If you’re not familiar with raw profiles, here is a overview of the key concepts covered in the video above:
Profiles
A profile is a set of instructions that is used to render a photograph, converting it from raw camera information into the colors and tones that we see.
- Every raw image must have a profile applied (and can only have one profile at a time).
- Profiles are nondestructive and can be changed at any time without any loss of quality.
- There are no “right” or wrong” profiles: they’re like filling in a pie – some people will choose cherry and others prefer peach.
Adobe Raw Profiles
There are six new Adobe Raw profiles which can be applied to raw files. The new default profile for raw files in Camera Raw is Adobe Color for color images and Adobe Monochrome for Black & White images.
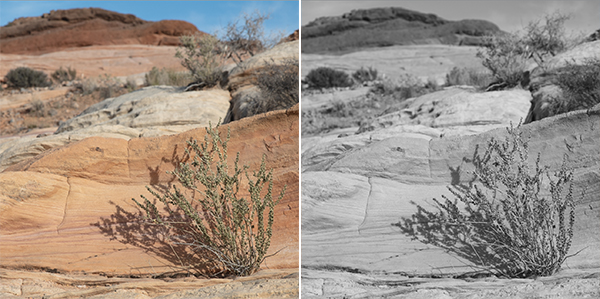
Adobe Color — was designed to be a great starting point for any image. The goal of this profile is to render a relatively neutral, baseline image that closely matches the original colors and tones in the original scene. It assumes that you want the ultimate control over refining and adjusting images in order to achieve the exact look that you want. In comparison to the previous default profile, Adobe Color is a bit warmer in the reds, yellow and oranges, has a very small increase in contrast, and, it does a better job of moving highlights between color spaces.
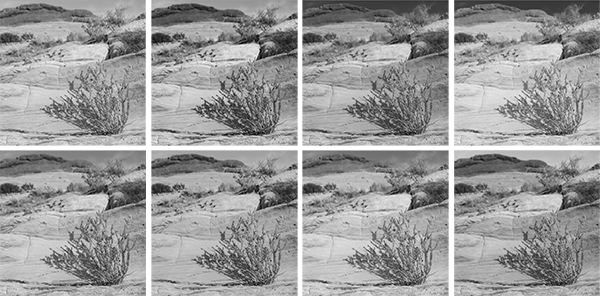
Adobe Monochrome — was carefully tuned to be the best starting point for any black and white image. This profile slightly shifts colors as they are converted to grayscale – brightening the warmer colors and darkening the cooler colors. It also adds a small amount of contrast but allows lots of headroom for editing.
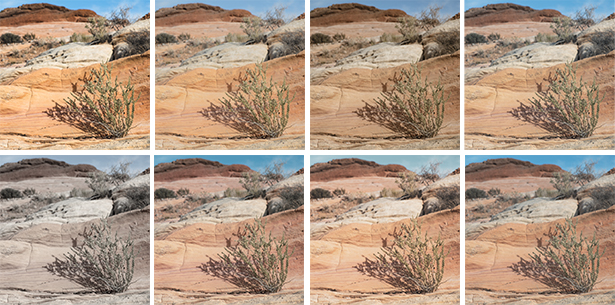
The additional four Adobe Raw profiles that were created as starting points for specific types of images:
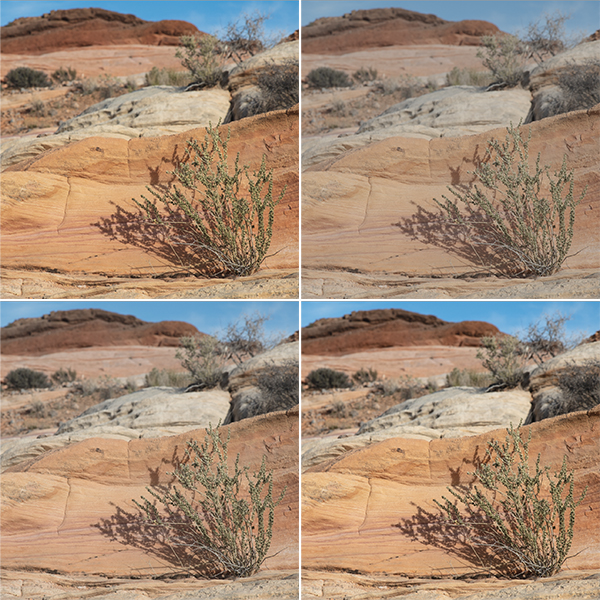
Top row left to right: Landscape, Neutral. Bottom Row left to right: Portrait, Vivid.
Adobe Landscape — adds a bit more saturation to all of the colors in an image and renders more vibrant blues and greens. While this profile adds a slight amount of contrast to the overall image, it also helps to maintain details by slightly compressing the highlight and shadow values in scenes with significant contrast.
Adobe Neutral — reduces color saturation as well as contrast , rendering a flatter, low contrast version of the image. It‘s designed to give you the most headroom for post processing. This a great profile to start with if you have an image with delicate colors and gradients.
Adobe Portrait — is tailored especially for portrait images. It has a slightly more gentle tone curve and is optimized for skin tones.
Adobe Vivid — adds vibrance and contrast while still rendering natural skin tones and is a great place to start for images of people in a landscape.
Note: Standard V2 was the default profile in previous versions of Lightroom CC.
If the image that you’re working with isn’t set to Adobe Color by default, most likely one of three things is happening:
You’re working on a non-raw photograph (like a JPEG or TIFF) – in which case the profile will just say Color because all of the rendering was done already (either in another raw processor or within the camera itself) and you can’t apply a raw profile to a non-raw file.
You’re working on an image captured as DNG via Lightroom on a mobile device and the default profile is Camera Default because images are be optimized differently for images captured on mobile devices.
You’re working with a legacy file – in which case you will see the previously embedded profile which you can choose to change at any time (Lightroom CC won’t automatically update legacy files using the new profiles as doing so would change the look of the image.)
Adobe Camera Matching Raw Profiles
In addition, Adobe created and ships Adobe Camera Matching profiles. These profiles are designed to match the preset “styles” that can be set using the menus on a camera. Because the style options differ among camera manufacturers, this list of profiles will change depending on your camera.
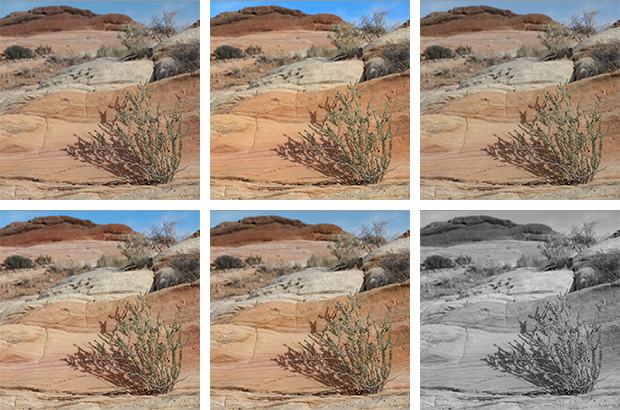
Adobe Camera Matching Profiles for the Canon 5Ds. Top row left to right: Faithful, Landscape, Neutral. Bottom Row left to right: Portrait, Standard, Monochrome.
The Camera Matching monochrome profiles behave differently from other Black and White profiles (Adobe Monochrome, Legacy, and the Creative Profiles), by discarding the color information in the file. Therefore, the Black and White Mix sliders, are not available. You can however add color tints to these images using the Tone Curve, Split Tone, and color swatch with Local Adjustment tools.
Legacy Raw Profiles
Legacy Raw profiles are also included in order to maintain backwards compatibility when working with legacy files.
Creative Profiles
In addition to Raw profiles, are several groups of Creative profiles. These profiles are designed to apply more creative, stylistic effects to an image and can be applied to non-raw photographs (like JPEG’s and TIFFs). Creative Profiles can (but aren’t required to) use color lookup tables (LUTs) to remap color and tones enabling new and unique ways of processing images. Camera Raw ships with several different Creative profiles including:
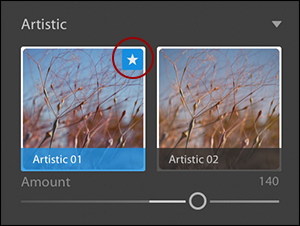
Artistic Profiles — these profiles were designed to be more edgy, and typically have stronger color shifts.
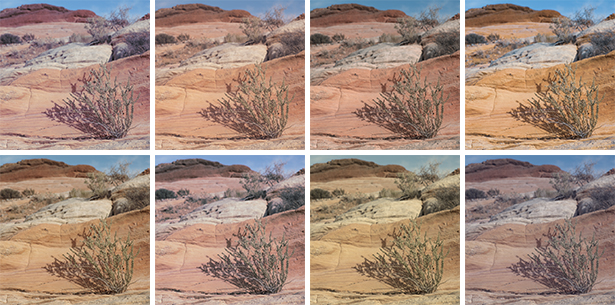
Lightroom’s eight different Artistic profiles.
B & W Profiles — these profiles were designed to create a more dramatic interpretation of the original image, some of these profiles increase/decrease contrast, others limit the dynamic range, and several emulate the effects of using color filters with film.
An assortment of different Black and White profiles (01, 03, 06, 07, 08, 11, Red, Blue).
Modern Profiles — these profiles were designed to create unique effects that fit in with current photography styles.
An assortment of different Modern profiles (1, 2, 3, 4, 5, 6, 8, 10).
Vintage Profiles — these profiles were designed to replicate the effects of analogue imagery.

An assortment of different Vintage profiles (1, 2, 4, 6, 7, 8, 9, 10).
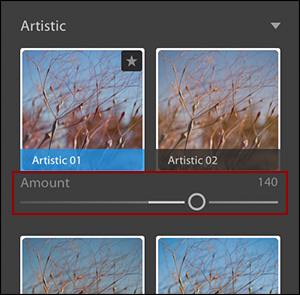
Creative profiles have an Amount slider which can be used to decrease/increase the intensity of the profile. Note: it is up to the creator of the profile to define exactly how far the “intensity” can be changed. In other words, you might see subtle or more aggressive changes on a per-profile basis.
Previewing and Applying Profiles
You can hover the cursor above a profile to preview the effect in the preview area, however you need to click the profile to apply it. After applying a preset, you can compare two profiles. When long pressing the Option key (Mac) Alt key (Win), the selected profile & hovered-over profile can be previewed/compared.
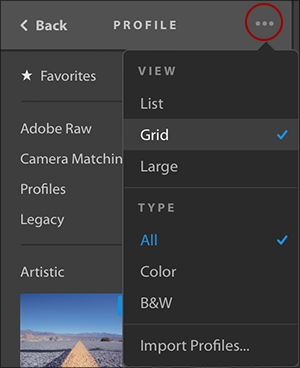
To change how presets icons are viewed in the Preset Browser, click the three dots and choose to view as a List, Grid, or Large.
Double click a profile to simultaneously apply it as well as close the Profile Browser.
Once a profile has been applied, use any of the other slider controls in any of the other panels to make additional modifications to your images – profiles don’t change slider values.
Quickly Accessing Favorite Profiles
Click the star icon to add a profile to the Favorites group. Click it again to remove.
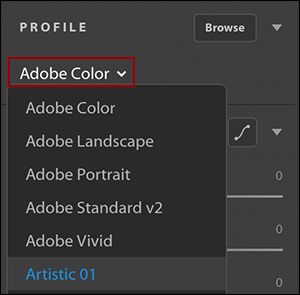
Quickly access Favorites from the drop down menu (without having to use the Profile Browser).
Profiles and Presets
When saving a preset, the Profile is saved as a part of the preset (just as any other attribute or slider in Lightroom would be).
Presets are now saved as XMP files, making them compatible and accessible across Camera Raw, Camera Raw as a filter in Photoshop, and all of the Lightroom desktop products.
To import presets, click the three dots menu in the presets panel and choose Import Presets. Navigate to a preset, select it, and Lightroom CC will automatically install it.

Lightroom CC for Macintosh and Windows has also added support for network attached storage (NAS) devices as well as a new filter by sync status option, big fixes, and added support for new cameras and lenses.
The SDK info for creating custom profiles can be downloaded from this link: http://www.adobe.com/go/profile-sdk
Hello Julieanne — looks like a fantastic update! I’m not a Lightroom user at the moment, since past profiles haven’t been to my liking, but I’m eager to try out these new profiles.
I have a question re: LUTs, since they’re mentioned in passing — it sounds like users will be able to create their own Creative Profiles, and use external LUTs in them. Am I reading what you’re saying correctly?
Proper LUT support would be a great addition to Lightroom; it’s been part of Photoshop for ages, and I hope this new update adds support to Lightroom as well. Thanks!
Yes, you can create your own profiles that include LUT’s However there is more to a profile than just a LUT. The SDK contains all of the instructions as to how to create a custom profile and can be downloaded from this link: http://www.adobe.com/go/profile-sdk
Where can I find more details NAS support? I didn’t see anything in the release notes.
Looks like they just added some details about NAS support here: https://helpx.adobe.com/lightroom-cc/using/preferences.html
Julieanne , in this excellent summary you wrote “The Camera Matching monochrome profiles behave differently from other Black and White profiles (Adobe Monochrome, Legacy, and the Creative Profiles), by discarding the color information in the file. Therefore, the Vibrance, Saturation, and HSL sliders, are not available (as they would have no effect).”
When I apply Adobe Monochrome to my RAW files, Vibrance, Saturation and HSL are not available; that panel just says “B&W”. This is how it’s always behaved in monochrome conversions. What you wrote implies that I should see those sliders after applying Adobe Monochrome.
You’re right, I wasn’t clear. What I meant was that with the Camera Matching profiles, you don’t have access to the Black and White Mix sliders like you do with the other B/W profiles. I’ve corrected it above, but please let me know if it still doesn’t read right to you.
It does now, thanks. But this is actually quite confusing. For example, because I’m working with Fuji RAFs I now have the following: Adobe RAW, Camera Matching (which work as you described) and Legacy, which include black and white versions of the old Fuji Camera profiles, e.g., “Provia/Std B&W). These legacy ones do allow you to use the colour channels.
The other thing that’s missing on the Camera Matching RAW profiles is the ability to adjust with a slider.
Just downloaded Lightroom Classic Update. I cannot find Abobe Raw Profile. I am interested in the Neutral Profile. Where is It?
When you say Lightroom CC, are you referring to the Cloud version or the Classic version. Yes, it is still confusing as I have both but didn’t think the Cloud version was that versatile.
Where are all my presets? After installing the update and restarting my computer the presets do not show up in the develop module
Hi Julieanne-
Thanks for sharing—with this update, does Lightroom play better with Fuji files than before?
Hello Julieanne — Thank you as usual for your excellent insight.
My Legacy profiles are now coming up all in B&W, including profiles I had generated with ColorChecker Passport and the old Adobe profiles.
I am happy to send you a screenshot if you wish to see.
Thank you,
Moshe.
Why did Adobe remove the B&W and Color Mix from the Copy Settings panel? This is a step backwards! Perhaps they want me to create and apply a profile but that only slows me down. Disappointed!
Question about the LUTs in the SDK. In regards to Space and Clip/Extend. What specifically is this referring to? The RGB data being input, output?
For instance if I have a LUT that converts Rec709 Gamut/sRGB Gamma -> Rec709/Cineon > Kodak 2383/Rec709 Emulation would I select space: srgb/clip?
Basically do I need to make my LUT loop back into whatever colorspace I define in ACR? For instance ProphotoRGB/Gamma 1.8 -> Rec709/Cineon -> Kodak2383/Rec709 Emulation -> ProphotoRGB/Gamma 1.8.
How does ACR/LR interpret the RGB data after it’s run through the LUT?
I assume it has to process the data from LR Internal working space > some RGB > LUT > Interpret RGB DATA > Convert for display icc.
I feel like it’d be useful to add a couple parameters that define how to encode the RGB data going into the LUT and another for how to interpret the output data from the LUT. A few standard ones can be:
LUT Input Space:
Rec709/Cineon Log
Rec709/sRGB
Rec709/Gamma 2.4
Rec709/Rec709 Gamma
P3D65/Gamma 2.6
P3D60/Gamma 2.6
P3D65/sRGB (DisplayP3)
ACESCG/Gamma 1.0
ProphotoRGB/Gamma 1.0
ProphotoRGB/Gamma 1.8
ProphotoRGB/sRGB
LUT Output Space:
AdobeRGB/Gamma 2.2
Rec709/sRGB
Rec709/Gamma 2.4
Rec709/Gamma 2.2
Rec2020/Gamma 2.4
P3D65/Gamma 2.6
P3DCI/Gamma 2.6
P3D60/Gamma 2.6
P3D65/sRGB (DisplayP3)
ProphotoRGB/Gamma 1.8
ProphotoRGB/sRGB
Thanks so much!
Under profile browser my VSCO profiles are now saying “profile missing” after the latest Lightroom CC update. PLEASE HELP!
The best place for help is feedback.photoshop.com.
Thanks Julieanne. It appears that the profiles are also available in Lightroom Mobile. However, your post above indicates “Presets are now …. accessible across Camera Raw, Camera Raw as a filter in Photoshop, and all of the Lightroom products.” I got excited about this, but didn’t find Presets as an option in Lightroom Mobile. Please clarify. Thanks.
George, you are correct. Although the presets can now be shared across the LR desktop products, there isn’t a way to sync a preset made in Lightroom on the desktop with Lightroom on a mobile device. However, bringing all presets into the same format is first step in bringing constancy across the products…
Your request to sync presets is a solid one.