Here are several tips to use when creating high dynamic range (HDR) images, Panoramas, and HDR Panoramas using Lightroom Classic’s PhotoMerge commands.
Photo Merge — HDR If you’ve never created an HDR image in Lightroom Classic, this video (High Dynamic Range Imaging within Lightroom) will get you started.
• For best results, in the Lens Correction panel, enable Remove Chromatic Aberration and Enable Profile Corrections to all individual images before running Photo > PhotoMerge > HDR or, make sure that the corrected image is the “most selected”image before selecting the Photo Merge command (see illustration below).
• I prefer to merge the images first, then make tonal and color adjustments to the resulting merged HDR file as not all adjustments made to individual images are applied when merging to HDR. The settings that are not applied include the primary tone settings in the Basic panel (Exposure, Contrast, Highlights, Shadows, Whites, and Blacks – as the HDR Photo Merge uses it’s own calculations to expand the tonal range), Tone Curve, Local Adjustments, Red Eye, Upright, and Crop.
• To apply adjustments such as Profiles, Spot Healing, Color Grading etc. (which can be applied during the HDR Photo Merge), make sure that the adjustments are made to all images or, that the image with the adjustments is the “most selected” image before choosing PhotoMerge > HDR.
• Control + H (Mac and Win) displays the HDR Merge Preview window. For performance reasons, the maximum preview size is 2048px.
• Option + Shift + H (Mac) | Alt + Shift + H (Win) bypasses the HDR Merge Preview window and creates a HDR image based on the last used HDR merge settings.
• Enable Auto Align if there was camera movement between the sequence of exposures (if the images were taken without a tripod for example). Lightroom will automatically align the images and crop any uneven edges.
• Enable Auto Settings to automatically enhance the combined exposures (even if the Auto Settings feature is applied in the HDR Merge dialog, settings can be modified/removed from the resulting file using the Develop module’s Basic panel after merging – without any loss of quality.
• Enable Deghost if there was movement within the photo between the sequence of images (blowing leaves, moving cars, people walking etc. ). “O” toggles the Deghost Amount mask, Shift + O cycles through the mask overlay colors.

• Check Create Stack to automatically stack the source and resulting HDR image. The merged HDR image will appear at the top of the stack.
• The merged HDR is a 16-bit floating point image due to the significant (and painful) file size that would result if the HDR merge was 32-bit.
• Lightroom Classic adds -HDR to end of the file name of the merged HDR making them easy to find using the Text filter in Grid view.
• The resulting (merged) DNG files will always default to Process Version (PV) 2012 or later, despite any differing PV settings applied to the source images (PV2012 or later is required for the extended Exposure range (+/- 10 stops), previous PV’s are restricted to (+/- 4 stops).
• This Adobe Helpx article discusses the optimum number of exposures/images for an HDR photo merge.
Photo Merge — Panorama If you’ve never created a Panorama in Lightroom Classic, this video (Panorama Merge within Lightroom) will get you started.
• I prefer to first merge the images and then make tonal and color adjustments to the resulting panorama as not all adjustments made to individual images are applied when merging to Panorama (Local Adjustments, Upright Transformations, and Crop for example).
• To apply adjustments such as Profiles, Spot Healing, or Color Grading (which can be applied during the merge), make sure that the adjustments are made to all images or, that the image with the adjustments is the “most selected” image before choosing PhotoMerge > Panorama.
• Control + M (Mac and Win) displays the Panorama Merge Preview window.
• Option + Shift + M (Mac) | Alt + Shift + M (Win) bypasses the Panorama Merge Preview window and creates a Panorama image based on the last used Panorama merge settings.
• Lens Correction Profiles are applied if Lightroom Classic can auto-detect which profiles to use. If Lightroom Classic can’t auto-detect the correct profile, an alert appears asking you to apply a lens profile correction for best results. Lightroom Classic always removes Chromatic Aberration as part of a Panorama merge.
• There are three different layout projections to choose from:
- Spherical aligns and transforms the images as if they were mapped to the inside of a sphere. If you’re creating a 360 degree panorama or a multi-row panorama, especially if you’re capturing the images with a short focal length lens, such as a 24 millimeter lens, then the spherical option is going to produce a more natural looking panorama.
- Cylindrical projects the panorama as if it were mapped to the inside of a cylinder. This projection mode works really well for wide panoramas, but it also keeps vertical lines straight.
- Perspective selects a middle image and then it distorts the other ones in order to match that, often resulting in a bow-tie effect.Really wide panoramas may not work well with this mode due to excessive distortion near the edges of the resulting panorama.
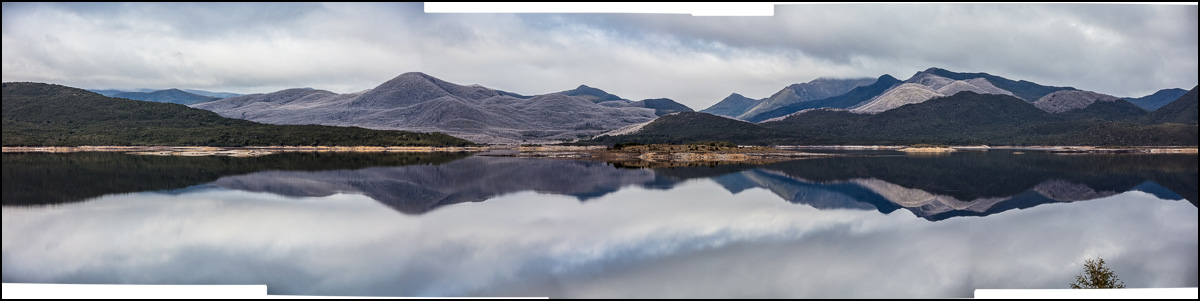
• Boundary Warp can adaptively stretch or reshape the edges of a stitched panorama to fill the rectangle boundary (this can be very helpful to fix irregular edges when shooting without a tripod).
Boundary Warp may not work as well on images with architectural features (straight lines) as the process of warping the image to fill the surrounding canvas may bend the lines. In the example below, it’s not possible to stretch the image to fit the canvas and preserve the lines at the same time. In other words, something has to give (the light pole on the left and the windows in the upper right become a bit distorted). Note: the boundary warp can not be changed after the Panorama is created.

• Enable Fill Edges to fill to automatically fill in any uneven edges of a panorama using the Content-Aware Fill technology. Fill Edges is applied to the Raw image so that you can still make all of the non-destructive raw edits after merging the image. Fill Edges works great in combination with Boundary Warp. Use Boundary Warp to reshape the majority of the rectangular area, then use Fill Edges to fill the smaller areas.
• Use the nondestructive Auto Crop to remove the transparent edges (the crop can be modified/removed from the resulting merged panorama using the Crop tool in the Develop module).
• Enable nondestructive Auto Settings to automatically enhance the colors and tones in the resulting panorama (Auto Settings can be modified/removed from the resulting file using the Develop module’s Basic panel after merging without any loss of quality).
• Enable Create Stack to automatically stack the source files with the resulting panorama (the merged panorama appears at the top of the stack).
• Lightroom Classic adds -Pano to end of the file name of the merged panorama making them easy to find using the Text filter.
• Post-merge, lens profile corrections don’t make any sense to apply to panoramas, so the feature is disabled in the Develop module.
• There is a size limit of 65,000 pixels on the long side of a file or, 512 MP – whichever comes first.
Photo Merge — HDR Panorama If you’ve never created a HDR Panorama in Lightroom Classic before, this video (HDR Panoramas in Lightroom Classic) will get you started. Note: many of the same settings are available as when merging to Panorama (see previous descriptions for Projection Method, Boundary Warp, Fill Edges, Auto Crop, Auto Settings, and Create Stack).
• Lens Correction Profiles are applied if Lightroom Classic can auto-detect which profiles to use. If Lightroom Classic can’t auto-detect the correct profile, an alert appears asking you to apply a lens profile correction for best results. Lightroom Classic always removes Chromatic Aberration as part of the merge.
• I prefer to first merge the images and then make tonal and color adjustments to the resulting panorama as not all adjustments made to individual images are applied when merging to HDR Panorama. The settings that are not applied include: the primary tone settings in the Basic panel (Exposure, Contrast, Highlights, Shadows, Whites, and Blacks as PhotoMerge uses it’s own calculations to expand the tonal range), Tone Curve, Local Corrections, Red Eye, Upright transformations, and Crop.
• To apply adjustments such as Profiles, Spot Healing, and Color Grading etc. (which can be applied during the merge), make sure that the adjustments are made to all images or, that the image with the adjustments is the “most selected” image before choosing Photo Merge > HDR Panorama.
• The HDR Panorama does not have the ability to Deghost images. To use the Deghost feature, bracketed exposures must be merged independently using Photo Merge > HDR and then stitched using Photo Merge > Panorama.
• Lightroom Classic saves the final HDR Panorama with the suffix HDR-Pano (making them easy to find using the Text filter), and discards the intermediate HDR images.
• There is a size limit of 65,000 pixels on the long side of a file or, 512 MP – whichever comes first.
Offline Files — if your original files are not available, Lightroom Classic will use Smart Previews to Merge an HDR Panorama.
Batch Process Photo Merge Commands
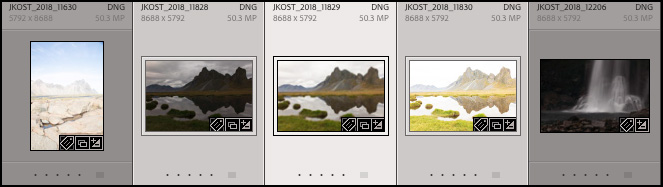
• To help automate the creation of HDR, Panorama, and HDR-Panorama images, the Photo Merge command can merge multiple selected “stacks” of images at once. First, select the images to be stacked (three bracketed exposures that need to be merged to HDR for example), and stack them using the shortcut Command + G (Mac) | Control + G (Win).
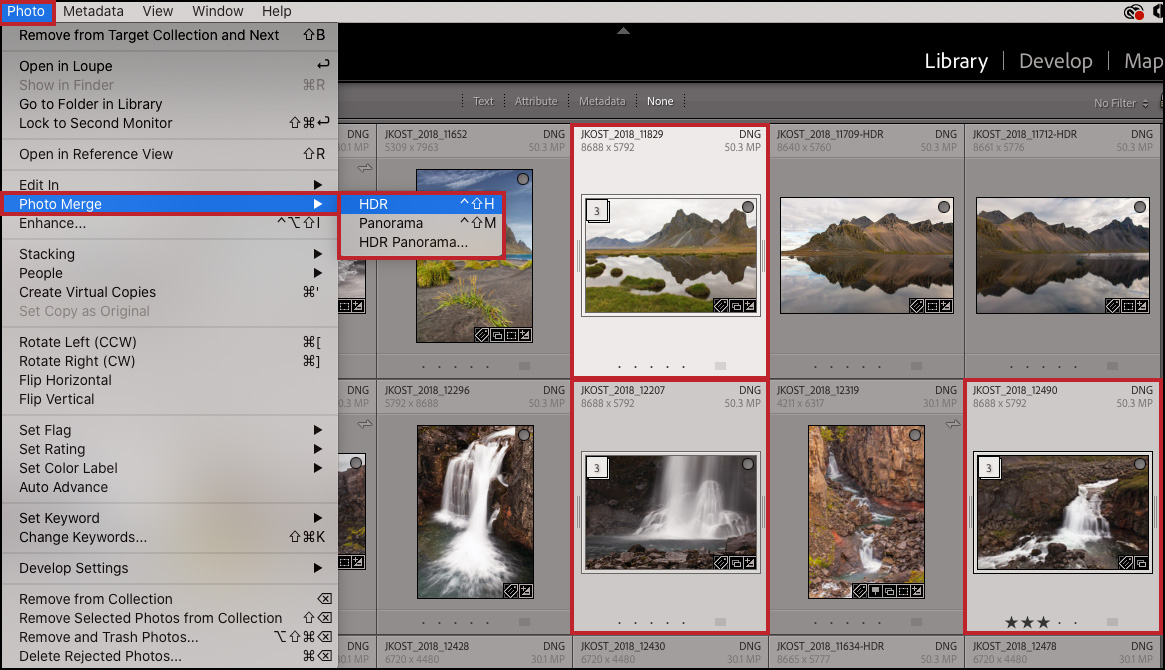
• When finished stacking groups of images, select the stacks which require the same merge operation and choose Photo > Photo Merge > HDR/Panorama/HDR Panorama.
• Each stack of images will be merged using the selected merge operation. Note: the same merge operation will be performed on all the stacks – so only choose stacks of images that need to be merged to Panoramas or to HDR or to HDR Panoramas, not a mix of different types of merges.
• When more than one stack is selected, Lightroom Classic will use the “previously used” merge settings.
• If a mix of stacked and unstacked images are selected when choosing Photo Merge, non-stacked images will be ignored (this can make it easier to select, for example, 20 “stacks” of HDR images in a folder of 5000 images as you could simply select all images and choose Photo Merge > HDR knowing that only the stacked images would be merged).
Merging Different Files — Photo Merge can merge images with differing dimensions, focal lengths, and orientations.
Finding HDR Images — The easiest way to find all DHR images in a Catalog/Folder/Collection is to use the Text filter (at the top of Grid view) to filter for “HDR”.
If however, the file name has been changed and no longer contains the HDR suffix, in the Collections panel, create a Smart Collection and match the following rules:
- Bits Per Channel > Is greater than > 14.
- File Type > Is > DNG (this prevents other file formats like 16-bit PSD file to match the criteria).
Note: Panoramas created in Lightroom using Photo Merge will also appear in the quick collection as they are 16 bit DNG files.