Here are ten of my favorite shortcuts for the Clone Stamp and Healing Brush tools in Photoshop.
Setting the Sample Point — Option -click (Mac) | Alt -click (Win) in the document to set the sample point. By default, the Clone Stamp and Healing Brush tools return to the original sample point every time the cursor is released. If however you want to maintain the relationship between the original sample point and the retouched area, enable the Align option (in the Options bar). I often enable the Align option because I prefer that the source information is sampled from different locations in the image (decreasing the probability of repeating patterns in the retouched areas) unless, there is only a small area of “good” source information to sample from.
![]()
Heal and Clone to Multiple Layers — For added flexibility (and to preserve the original information in a layer), choose “All Layers” from the Sample pop‑up menu and clone/heal to a new, blank layer.

• When working with more complex documents, you may prefer to select the “Current & Below” option from the Sample pop‑up menu to limit the layers that are included in the sample data.
• To sample from all visible layers except adjustment layers, choose “All Layers” or “Current & Below” and click to toggle the “Ignore Adjustment Layers” icon to the right of the Sample pop‑up menu.
![]()
Clone to a Second Document — Cloning (and Healing) isn’t limited to within a single document. With multiple documents open, Option -click (Mac) | Alt -click (Win) in the source document to set the sample point then, select another open document and start cloning! Note: there are certain rules that do apply – for example, the files need to be in the same bit depth and color space.
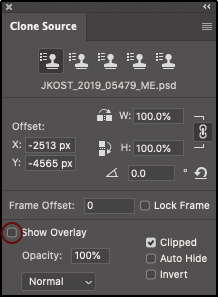
Previewing the Sample Area Overlay — By default, the Clone Stamp and Healing Brush tools display an overlay of the sampled area within the brush preview making it easier to preview and align areas when cloning and healing. If you find the preview distracting, in the Clone Source panel, uncheck the “Show Overlay” option. While the Overlay is hidden, use Option + Shift (Mac) | Alt + Shift (Win) to temporarily display the overlay. Note: you can also change the opacity and blend mode of the overlay using the options in the Clone Source panel.
Additional preview options include:
• To show an overlay of the sampled area within the brush preview but hide it when painting, check the Auto Hide option in the Clone Source panel.
• To display the overlay of the sampled area inverted within the brush preview, check the Invert option in the Clone Source panel.
• While Show Overlay is enabled, unchecking the “Clipped” option in the Clone Stamp panel displays all of the contents of the information set as the source – (which might be very helpful when working with video and “onion skinning” from one frame to another).
Transforming While Cloning — To change the width/height, angle and/or flip the source information when using either the Clone Stamp or Healing brush, use the corresponding options in the Clone Source panel or the following shortcuts:
• Option + Shift + < or > (Mac) | Alt + Shift + < or > (Win) decreases/increases the rotation value.
• Option + Shift + [ or ] (Mac) | Alt + Shift + [ or ] (Win) decreases/increases the scale (width/height). Note: To adjust the dimensions independently or restore the constrain option, click the Maintain Aspect Ratio button.
![]()
Note: the Vanishing Point filter also has a Clone tool which can be used to clone in perspective.
Hiding the Sampling Point — By default, the sampling point icon (crosshair) is displayed while cloning and healing. While this is often helpful, when quickly retouching small areas, I prefer to hide the sampling point icon using Command + H (Mac) | Control + H (Win) (to toggle the View > Extras feature).
Retouching Screen-By-Screen — When retouching images, I like to systematically move through the document starting at the upper left and then moving down screen by screen. When I reach the bottom of the document, I move over one screen to the right and start moving up again. The following shortcuts are a huge help:
• The Home key moves to the upper left corner of the document, the End key moves to the lower right.
• The Page Up / Page Down keys move one full screen up or down.
• Command + Page Up and Page Down (Mac) | Control + Page Up and Page Down (Win) moves left or right one full screen.
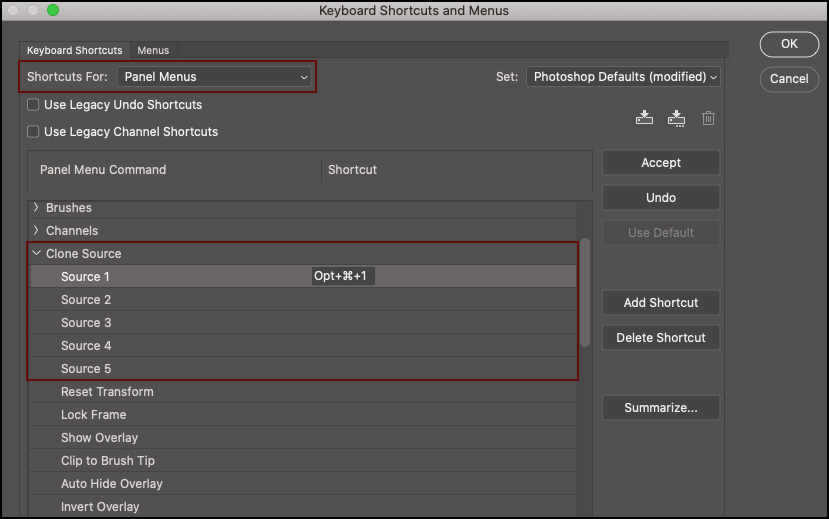
Setting Multiple Source Points — Use the Clone Stamp icons (across the top of the Clone Source panel), to set up to five different source points within the same document. This can be very useful when trying to sample from multiple areas, especially when working across multiple documents and with video frames. Note: you can set multiple source points for both the Clone Stamp tool and Healing Brush.
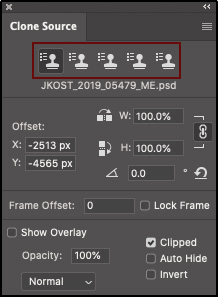
To quickly move from one source point to another, set up your own custom keyboard shortcuts using the Keyboard Shortcut Editor (Edit > Keyboard Shortcuts, Shortcuts For: Panel Menus, Source 1-5). Note: Additional Clone Source panel options can have custom shortcuts applied in this dialog (Reset Transform, Lock Frame, etc.).
Working with Video — The Frame Offset and Lock Frame options can help when specifying the frame relationship between the sample source video/animation frame and the target video/animation frame.
• When cloning between similar documents (such as frames in an image sequence), to help align identical areas in the source overlay and underlying image, set Opacity to 50%, select Invert, and deselect Clipped. Matching image areas will appear solid gray when aligned.
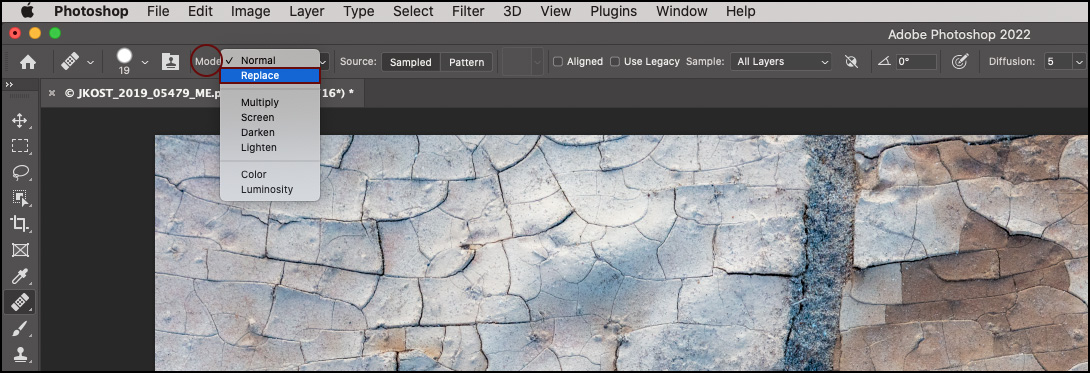
Healing Brush and Replace Mode — Using the Healing Brush with the blend mode set to Replace makes it behave like the Clone Stamp tool (in that it doesn’t automatically try to blend color or tonality of the source and destination), with one advantage: if you’re trying to clone high frequency image information, the edges of the cloned area will not appear soft as they do with the Clone Stamp tool.
But Wait, There’s More!
“Healing” in Real Time — By default, the Healing Brush algorithm starts making adjustments as you paint with the brush. If you prefer to finish your brush stroke before Photoshop begins adjusting the area, enable “Use Legacy” in the Options bar. Note: the “Use Legacy” option may produce slightly different results.
Healing Brush Diffusion Option — To reduce artifacts in images with high frequency information such as grain and fine details, try setting the Diffusion option (in the Options bar) to a lower value. When retouching images with smooth areas, try setting the Diffusion option to a higher value for better results.