Converting Images to DNG — While you can choose to convert to DNG when you import your images into Lightroom Classic, (Copy as DNG) I choose to convert my raw files to DNG as my final step in editing for two reasons:
- I often delete a significant percentage of my images from a shoot so it would be a waste time converting files on import that I will later trash. However, if you rarely delete photos, it might make more sense for you to choose “Copy as DNG” on import.
- Because converting to DNG is the final step of my editing workflow, I immediately know simply by looking at the file type, that an image has made it through my entire workflow
In the video below (The Advantages of the DNG File Format), you’ll discover the advantages of working with (and archiving to) the DNG raw file format. You’ll also learn more about how and when it makes the most sense to convert your files as you move through your workflow.
The video below (DNG Enhancements in Lightroom 4), you’ll discover the new enhancements to the Digital Negative File format and how to use them to improve the way you work with and archive your photographs.
Embed Fast Load Data — When converting raw files to DNG (Library > Convert Photo to DNG ), under DNG Creation, be sure to keep “Embed Fast Load Data” checked in order to view DNG files up to 8x faster in the Develop module.
DNG Verification — to verify the integrity of any Adobe created DNG file(s), select Library > Validate DNG Files. If Lightroom finds any invalid DNG files, they will automatically be placed in a special collection.
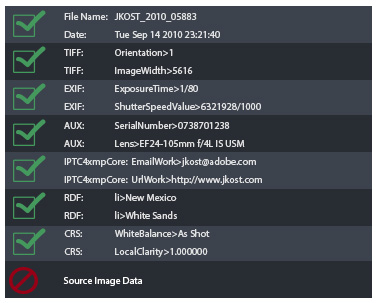
It’s important to note that the data that Lightroom Classic is verifying is the “original source image” – which, in a DNG file is never supposed to change. Lightroom Classic is checking this information independently of the other information (that may have changed) in the file.
Here is a little more detail (and please understand that this is a bit of an oversimplification): the DNG file contains many different “kinds” of information. It’s helpful to imagine that the DNG file is really more like a file cabinet and each different “kind” of information is stored in a different folder in that cabinet. This enables certain segments of the file (one folder) to be altered independently of another segment (or folder).
For example, if you add IPTC data to a DNG file (by adding keywords, copyright etc.), the data in the IPTC folder changes, but the source image data (which is stored in another folder), remains unchanged.
Even when you make edits to a DNG file in Lightroom Classic’s Develop module (or Photoshop’s Camera Raw plug-in), all of the changes are made to the DNG file (as a set of instructions) and are stored in a separate folder so as not to change the original source image data. It’s then up to the software (Photoshop or Lightroom Classic) to take the original source data and then apply the set of instructions (from the other folder) and display the results on screen so that it “appears” as if the changes have been made when, in fact, the original source information has not been touched. Of course the benefit of not touching the original is that the entire workflow is then non-destructive: the changes can be modified or removed at any time without changing the original source data.
So, it’s the best of both worlds, you can now validate an Adobe DNG file to confirm that the source image data has not changed, yet still make changes to other information in the file in order to add metadata and enhance the image. Note: Only DNG files created by Adobe software can be validated (camera-‐created DNGs cannot be validated because they do not contain the necessary checksum).
For more information, be sure to check out Peter Krogh’s in-depth explanation.
This is a good suggestion. I think I may try it in my workflow. Currently I store all my new images on a SSD until they are sorted and edited. When I think I am done working on them I move them to a 3TB hard drive. During the move would be a good time to convert. I currently have 4 drives I use for storage. The SSD for what I am working on, a 3TB external for all my PC backup files, a 3TB external that I store offsite and bring home every 2 weeks to copy files from my other backup drive. Finally a 3TB internal where I keep working copies of all my files.
Thank you for your web tutorials. I have really enjoyed them as I learn to use the tools available to me. I will now explore dng files on my computer since I cannot open Amy more screens on my phone. 🙂
I never thought of it this way, I’ve always converted on import. Is there another technical reason to wait? Is there any information lost on the DNG convert?
There isn’t any technical reason to wait – there is not any information lost on the conversion.
Another great idea, Thanks Julieanne is one of if not the best Adobe teacher!
Thank you Richard!