This release of Lightroom features several new features and product enhancements including the additional of Photo Merge, the Targeted Adjustment Tool, Clipping Indicators, and Enhanced Details!
Photo Merge brings the ability to merge multiple images together to create High Dynamic Range (HDR) images, Panoramas, and even HDR Panoramas. By combining multiple raw exposures, Lightroom CC creates the highest quality results – otherwise impossible to achieve with a single exposure.
To merge an HDR image, select the individual exposures and choose Photo > Photo Merge > HDR Merge.
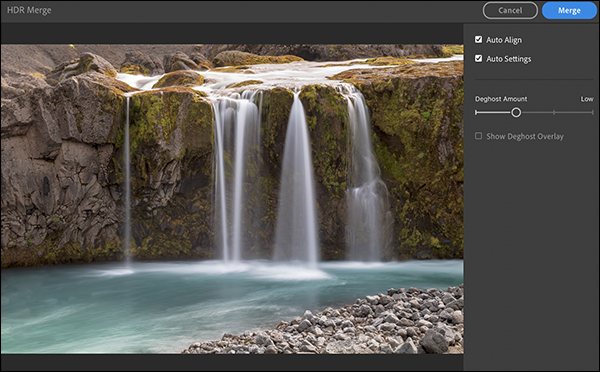
• Use Auto Align to have Lightroom automatically align the exposures (perfect for those times when you don’t use a tripod).
• Check Auto Setting to have Lightroom automatically apply automatic tonal enhancements to the image. All changes are nondestructive and can be modified or reset at any point after merging the exposures together.
• The Deghost option identifies anything that has moved between exposures (running water for example), and fills areas that have changed with information from a single exposure, removing any “ghosting” or semi-transparent objects in the resulting file.
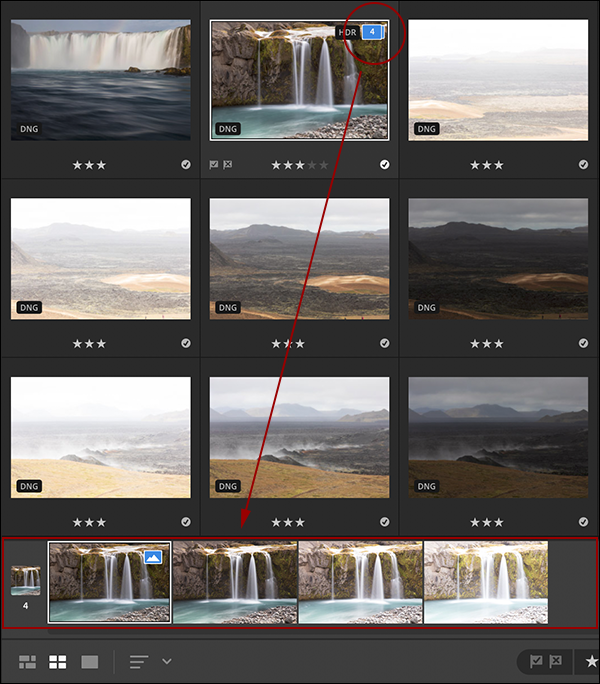
• After rendering the HDR image, Lightroom conveniently stacks the images, placing the HDR image at the top of the stack. Clicking on the stack icon displays it’s contents at the bottom of the preview area. If you ever want to unstack the images, select Edit > Stacks > Ungroup Stacks.
Additional information about merging to HDR:
• The resulting raw, HDR image will have an extended exposure range (+/- 10 stops) where individual raw files are restricted to (+/- 4 stops) and contains all of the desired shadow, midtone, and highlight information with all of the editing flexibility that comes with raw!
• Not all adjustments that you make to individual images will carry over when selecting HDR Merge. For example, if you have made adjustments in the Light panel, cropped the image, or made local adjustments on individual exposures, those adjustments will not be applied to the merged file. Because of this, I would suggest that you don’t spend a great deal of time making adjustments to each of the individual exposures but, instead, merge the images and then make adjustments to the resulting HDR image.
• Merging HDR images requires exposure metadata. If aperture and ISO information is available, then it is used as well.
• The merged HDR images is 16-bit due to the significant (and painful) file size that would result if the HDR merge was 32 bit.
• By default Lightroom CC appends the file name with”-HDR”. Although you cannot change the default file naming convention, you can always rename files after they are created.
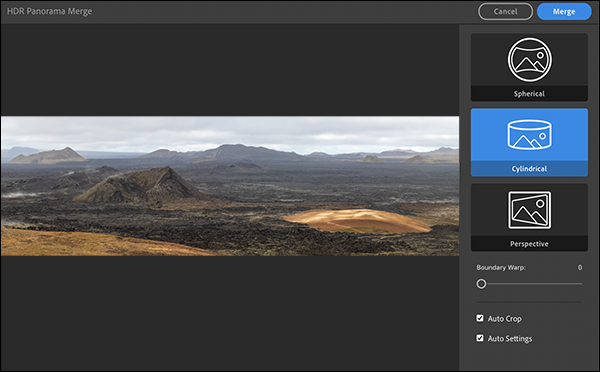
To merge a Panorama, select the individual photos and choose Photo > Photo Merge > Panorama Merge.

• Choose the projection method to stitch the photos together:
Spherical aligns and transforms the images as if they were mapped to the inside of a sphere. If you’re creating a 360 degree panorama or a multi-row panorama, especially if you’re capturing the images with a short focal length lens, such as a 24 millimeter lens, then the spherical option is going to produce a more natural looking panorama.
Cylindrical is best for creating really wide panoramas. Lightroom CC maps the images as if they were on an unwrapped cylinder.
Perspective selects a middle image and then it distorts the other ones in order to match that, often resulting in a bow-tie effect.
• Drag the Boundary Warp slider to adaptively stretch or reshape the edges of a stitched panorama to fill the rectangle boundary (the warp can not be changed after the Panorama is created).
• Use the nondestructive Auto Crop to remove the transparent edges (you can change or remove the crop at any time after the panorama is created)
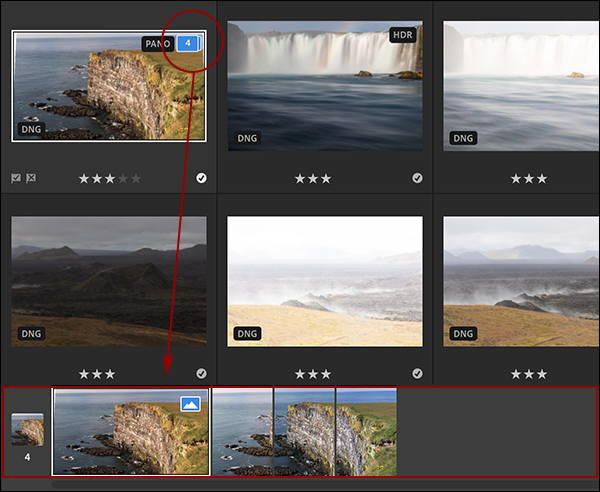
• After rendering the Panorama, Lightroom conveniently stacks the images with the Panorama at the top of the stack. Clicking on the stack icon displays it’s contents at the bottom of the preview area. If you ever want to unstack the images, select Edit > Stacks > Ungroup Stacks.
Additional information about Merge to Panorama:
• Not all adjustments that you make to individual images will carry over when selecting Photo Merge > Panorama. For example, if you have made adjustments in the Light panel, cropped the image, or made local adjustments on individual exposures, those adjustments will not be applied to the merged file. Because of this, I would suggest that you don’t spend a great deal of time making adjustments to each of the individual exposures but, instead, merge the images and then make adjustments to the resulting Panorama, image.
• By default Lightroom appends resulting image’s file name with “-Pano”.
• Post-merge, lens profiles don’t make any sense to apply to panoramas, so the feature is disabled.
• While Lightroom can merge images that are hand-held, using a tripod can result in higher quality images (because each image needs less manipulation to fit the panorama).
To merge an HDR Panorama, instead of having to first merge each of the bracketed exposures together and then stitching the resulting HDR files together, you can do both at once by selecting the individual photos and choosing Photo > Photo Merge > HDR Panorama Merge. The same settings are available as when merging to Panorama (see previous descriptions for projection method, Auto Crop and Boundary Warp).
Additional information about Merge to HDR Panorama:
• Lightroom automatically applies Lens Correction Profiles (if it can auto-detect which profiles to use) and removes chromatic aberration as part of the merge.
• The Deghost feature isn’t available within Merge to HDR Panorama, to use it, bracketed exposures must be merged independently (Merge to HDR… ) and then stitched (Merge to Panorama…).
• Lightroom saves the final Panorama (with the suffix -HDR-Pano ), and discards the intermediate HDR images.
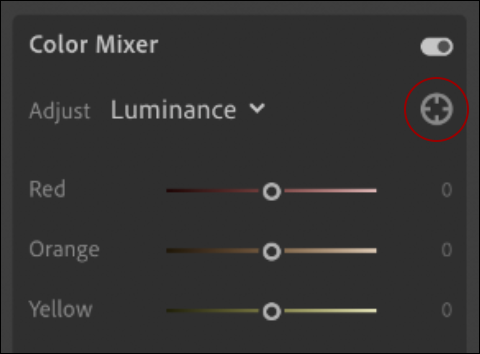
The Targeted Adjustment tool lets you interact directly with your photo when making adjustments. To use the Targeted Adjustment Tool with the Color Mixer, display the Color panel and click the square Color Mixer icon. Then, click the target icon, choose to adjust Hue, Saturation, or Luminance and drag in the image to make adjustments.
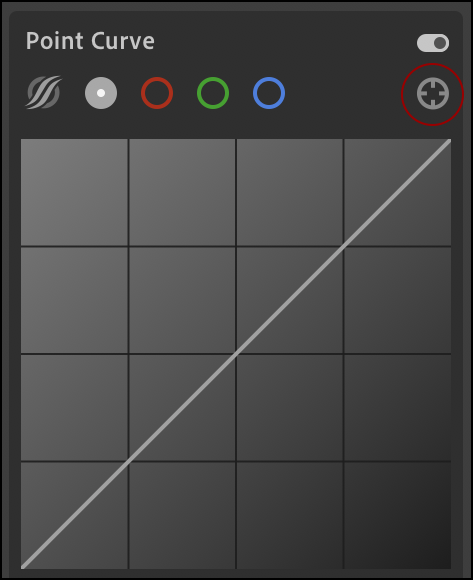
 To use the Targeted Adjustment Tool with the Tone Curve, display the Light panel and click the square Tone Curve icon. Then, click the target icon, select what you want to affect – the Composite, Red, Green, or Blue channel, and drag in the image area to make adjustments.
Use the following shortcuts to select the Targeted Adjustment tool:
Command + Option + Shift + T (Mac) | Control + Alt + Shift + T (Win) selects the Targeted Adjustment tool for the Tone Curve
Command + Option + Shift + H (Mac) | Control + Alt + Shift + H (Win) selects the Targeted Adjustment tool for Hue
Command + Option + Shift + S (Mac) | Control + Alt + Shift + S (Win) selects the Targeted Adjustment tool for Saturation
Command + Option + Shift + L (Mac) | Control + Alt + Shift + L (Win) selects the Targeted Adjustment tool for Luminance
Clipping Indicators display blue and red overlays in the image where values are clipped to pure black or pure white. To access them, first display the Histogram (View > Edit Panels > Histogram) at the top of the edit panel. The Histogram is a visual representation of all of the pixel values in an image plotted from 0 (black) on the left to 255 (white) on the right; the height of each column shows how many pixels in the image have that value. If you see large spikes at either edge of the Histogram, then the shadows are blocked (clipped to pure black) and/or the highlights are blown out (clipped to pure white) in at least one of the channels if not all. In either case, clipping indicators will help reveal areas in the image that don’t contain detail.
To toggle the visibility of the clipping indicators, click the triangles in the upper left and/or right of the Histogram panel. Tap the “J” key to toggle on/off both of the shadow/highlight clipping previews at once.
 Clipped shadows will be displayed with a blue overlay, highlights will be displayed in red.
 Use the sliders in the Light panel to make any necessary adjustments (revealing detail in the clipped areas).
Note: While amazing adjustments can be made to images in Lightroom, if the information wasn’t captured in the original image, Lightroom can’t create what isn’t there – so be sure to make a proper exposure of the scene whenever possible. And, while pushing shadow areas to black without detail can create effective negative and positive space in an image, clipping highlights to pure white can be problematic when printing as the areas without details (clouds in the sky for example), may just look awkward.
Enhanced Details is a new approach to one of the most important aspects of raw conversion; demosaicing. The demosaicing process is what converts the information captured by a camera sensor into the photograph that we all see. Enhanced Details works on images captured using both Bayer and X-Trans sensors in order to improve the rendering of small-scale details and to prevent artifacts such as false colors, moirés, and zippering. On images captured using Bayer sensors (like those on Canon, Nikon and Sony), you will most likely find diagonal lines to be rendered cleaner (less jaggy). On images captured with X-Trans sensors (such as the Fuji X-series) you will most likely find better small-scale and color detail (fewer artifacts).
When applying Enhanced Details to an image, it is necessary for Lightroom CC to create a new DNG file in order to contain both the mosaic data and the enhanced RGB data (as a result the new DNG file will be larger than a traditional DNG file). Because Enhanced Details takes time to run (it performs best with a fast GPU), I would suggest applying it on an image-by-image basis starting with images that have visible artifacts and which require the highest level of quality (images that will be printed large format, for example).
To apply Enhanced Details, select a photo and choose Photo > Enhanced Details or, right -click on the image(s) and choose Enhanced Details from the context sensitive menu. When a single image is selected, a Preview dialog box is displayed (click and hold to preview with and without Enhance Details applied). When multiple images are selected, Lightroom CC will directly start the DNG creation process. Note: All metadata and develop setting will be included in the new file, and it’s name will be automatically appended with “-Enhanced”.
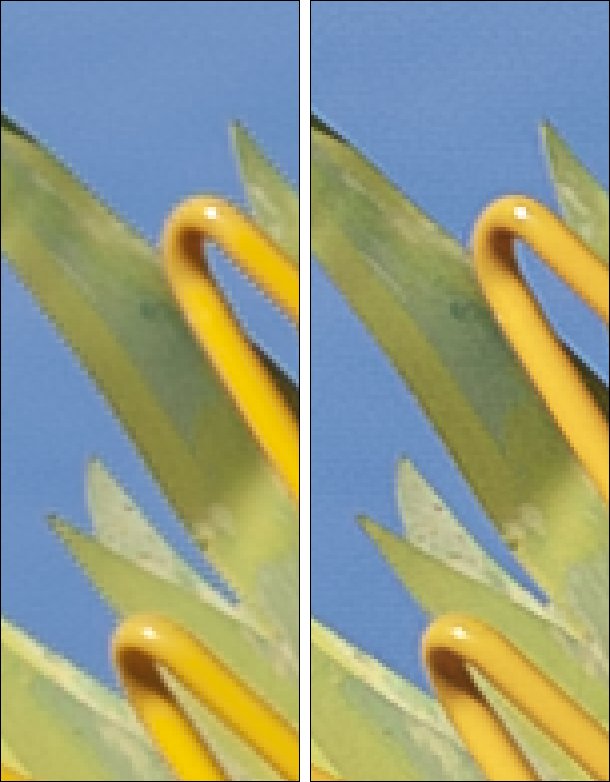
Jagged artifacts are apparent in the diagonal lines in the original image (on left). Diagonal lines don’t appear nearly as pixelated with Enhanced Details applied (on right).
It has been my experience that Lightroom CC is already doing an excellent job demosaicing the majority of my images created using the Canon 5Ds and Mark IV, but there have been instances (like in the illustration above) when I’ve noticed an improvement when applying Enhance Details. I don’t have a camera with an X-Trans sensor, but from the images that I’ve seen in the forums, I have a feeling that those customers will be very happy with the improvements that Enhance Details offers them.
Three important notes:
- Enhance Details requires macOS 10.13 (or later) or, Windows 10 (Oct 2018 Release).
- Enhanced Details can not be applied to JPEGs, TIFFs, or HEIC files.
- Enhanced Details can not be applied to DNG files saved with Lossy Compression, DNG files’s saved with 1.1 compatibility, or Linear DNG files such as DNG files created using Photo > Photo Merge (HDR, Panorama, or HDR Panorama). Enhance Details can be used on the individual exposures and then merged together.
Click here for more information on Enhanced Details.
Will enhanced detail be available in lightroom classic as well?
Yes, it is: http://blogs.adobe.com/jkost/2019/02/enhanced-detail-and-tether-capture-in-lightroom-classic-8-2-february-2019.html