I’m excited to share my top ten favorite updates, new features, and hidden gems in Photoshop 2020 (v21).
Consistent Free Transform — When in free transform, clicking the link icon (in the Options bar) will toggle the “constrain aspect ratio” option on/off . The state of the icon is sticky – once it’s set, it will stay that way until it’s clicked again. This means that, regardless of the contents of the layer (pixels, type, shape, etc.), transform will behave consistently. Holding the Shift key while transforming will temporarily toggle the opposite behavior.
![]()
Note: if, in a past version of Photoshop, the general preference “Use Legacy Transform” was enabled, and you carried your preferences forward form the previous version, be sure to disable it to take advantage of the new behavior.
Transform Warp — For more granular control and precision when warping layers, you can add additional control points when using Free Transform > Warp. This video demonstrates how.
New and Improved Preset Panels — Photoshop has added three new panels for organizing and applying Gradients, Patterns, and Shapes as well as updated the Swatches and Styles panels making it easier than ever to create, organize, and apply presets. Presets can be applied by clicking on the preset in the panel or, by dragging and dropping the preset from the panel onto either the desired layer in the Layer’s panel or the layer content in the canvas area. The contents of the layer (bitmap, vector, type etc.) will determine how the preset is applied: as a property of the layer, an adjustment layer, or layer style/effect. This video demonstrates how:
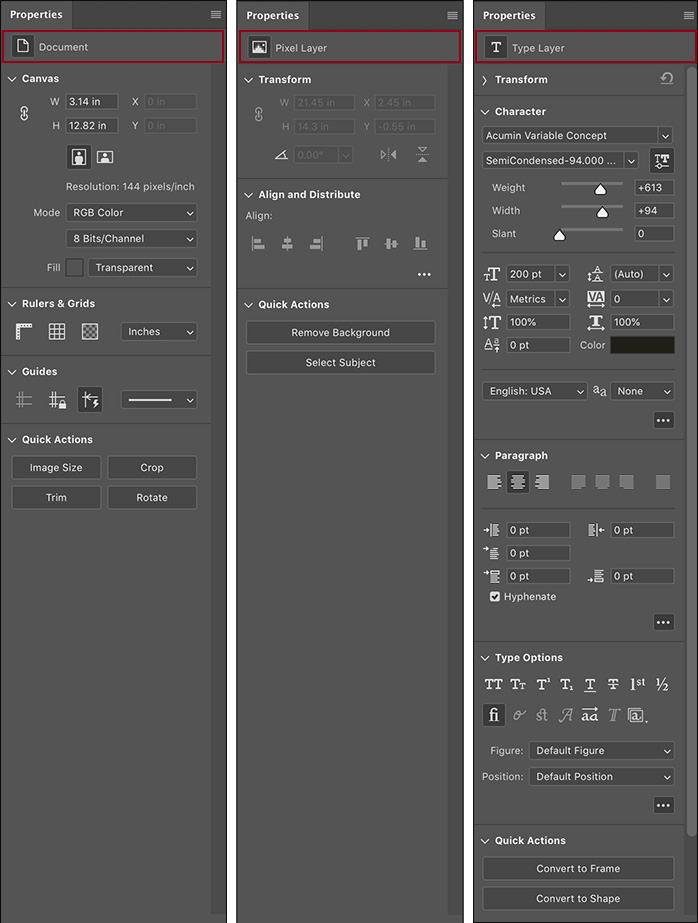
The Properties Panel — In order to save screen real estate and help boost productivity, several items have been added to the Properties panel and are displayed when the appropriate layer content is selected.
When no layers are selected, the Properties panel will display:
• Canvas Properties including dimensions, orientation, resolution, color mode, bit depth, and fill color.
• Access to Ruler & Grids and Guides options.
• “Quick Actions” enabling one-click access to Image Size, Crop, Trim, and Rotate commands.
With a Pixel layer selected, the Properties panel will display:
• Transform, Align, and Distribute options.
• “Quick Actions” including Remove Background (which runs Select > Subject; Select > Inverse; and Add Layer Mask) and Select Subject.
With a Type layer selected, the Properties panel will display:
• Transform options including width, height, x/y coordinates, rotation, and horizontal and vertical flip options
• The most popular Character options (with the exception of Vertical and Horizontal scale, Baseline shift, Faux Bold/Italic, Fractional Widths/System Layout, and No Break options).
• The most popular Paragraph options (with the exception of Justification and Hyphenation, Composition, and Language options).
• Open Type options.
• “Quick Actions” to Convert to Frame and Convert to Shape.
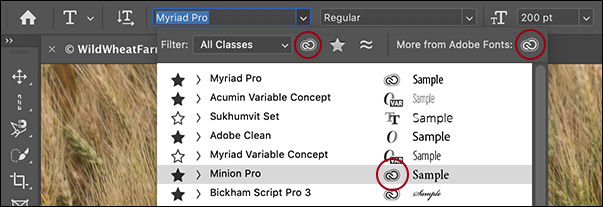
Typography — All 17, 000 Adobe Fonts (previously Typekit) are now included with a Creative Cloud plan (including the Creative Cloud Photography plan!) and are easily identified in the font menu by the new Creative Cloud icon to the right of the font name. Click the Adobe Fonts icon on the Filter bar to sort by Adobe Fonts, or click the icon to the right of “More from Adobe Fonts” to explore and activate additional fonts. You can use Adobe Fonts for any project (all fonts are cleared for personal and commercial use), and there are no longer any limits on how many you can activate and use at one time.
When working with OpenType fonts, you can now apply Stylistic Sets making it easier to apply a font’s alternate characters (such as substituting an alternate glyph for a fancy “g” with a simple “g”. Select the Type layer (or a subset of the text), click the Stylistic Set icon from the Properties panel, and choose from the font’s options.
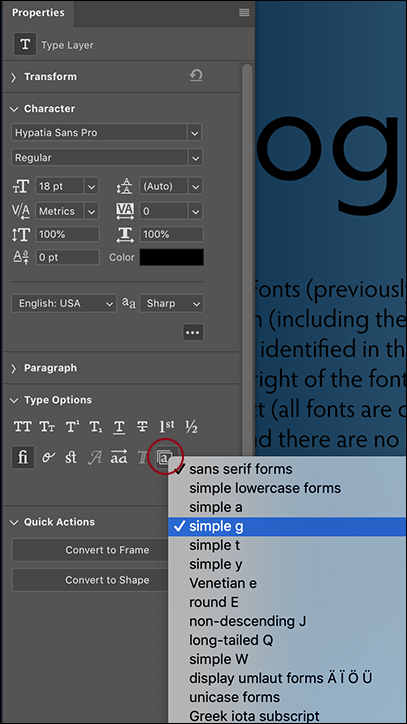
Note: Stylistic sets are a character-level attribute. As such, selected sets (Sets 1–20) are maintained if you switch fonts. In other words, if you have “set one” applied for a specific font that displays a simplified lowercase “g” and choose another font that has “set one” defined as Swash Caps, the Swash Caps will be applied and the simplified “g” removed. This behavior is simply a consequence of how Stylistic Sets are implemented in OpenType fonts.
Select Subject, Object Select Tool and Content Aware Fill — Making selections and removing unwanted information in images is now easer than ever before. Check out the video below to see how.
Below is additional information about Select Subject, Object Select, and Content Aware Fill.
•Select Subject has been updated using Adobe Sensei AI machine learning, is faster at analyzing imagery, and has improved edge detection.
• The new Object Selection tool was also trained using Adobe Sensei AI machine learning but focuses on helping to make accurate selections of objects within an image. Simply drag a loose rectangle or lasso around the object and Photoshop will help to identify and “shrink-wrap” the selection around the subject. Note: the Object Selection Tool is also available within Select and Mask workspace.
• The Content Aware Fill workspace as has three different sampling area options:
Auto — finds the best pixels to use for the sampling area by analyzing the content (based on texture and color match) radiating out from the selection. Auto sampling area works best when Rotation Adaptation, Mirror, and Scale are not in use.
Custom — clears the sampling area so that you can complete precision and control over the sampling area (use the Sampling Brush tool to paint over the exact areas to be sampled from).
Rectangular — samples from a rectangular area around the initial selection (and was the default in previous versions)
Fill Edges for Panorama Merge — You can now use the Content-Aware Fill technology to automatically fill in any uneven edges of a panorama when merging Panoramas in Adobe Camera Raw (and Lightroom!). The fill is applied to the raw image so that you can still make non-destructive edits after merging the image.
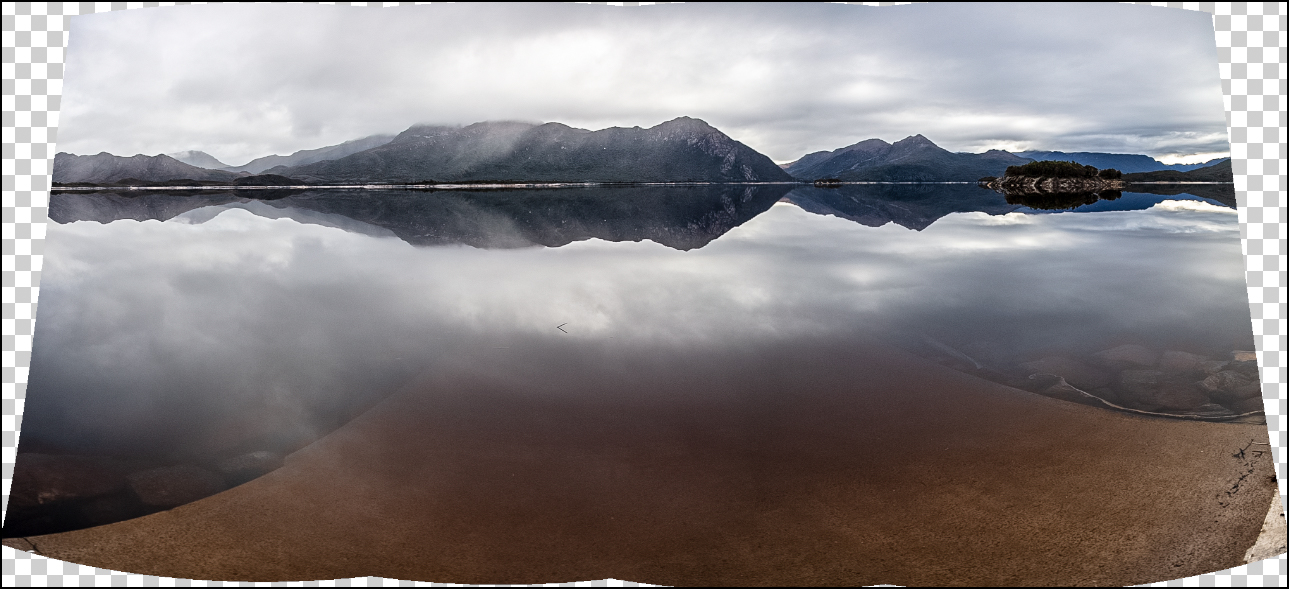
The original Panorama Merge.
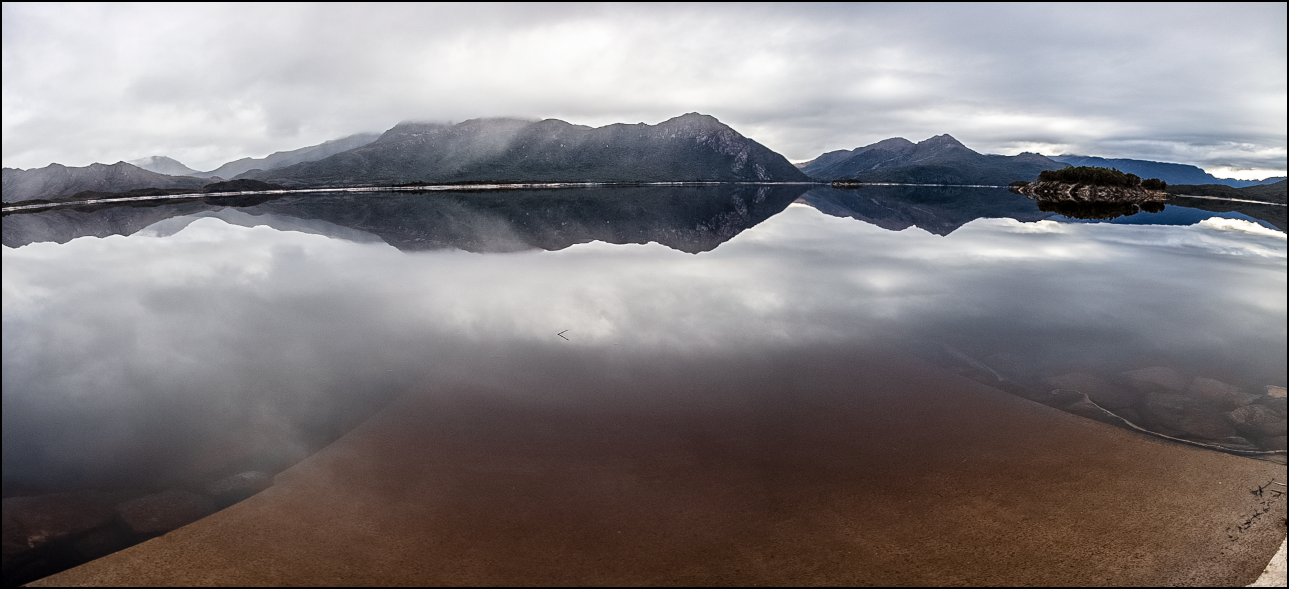
When merging images that have strong horizontal or vertical lines, Boundary Warp distorts the horizon.
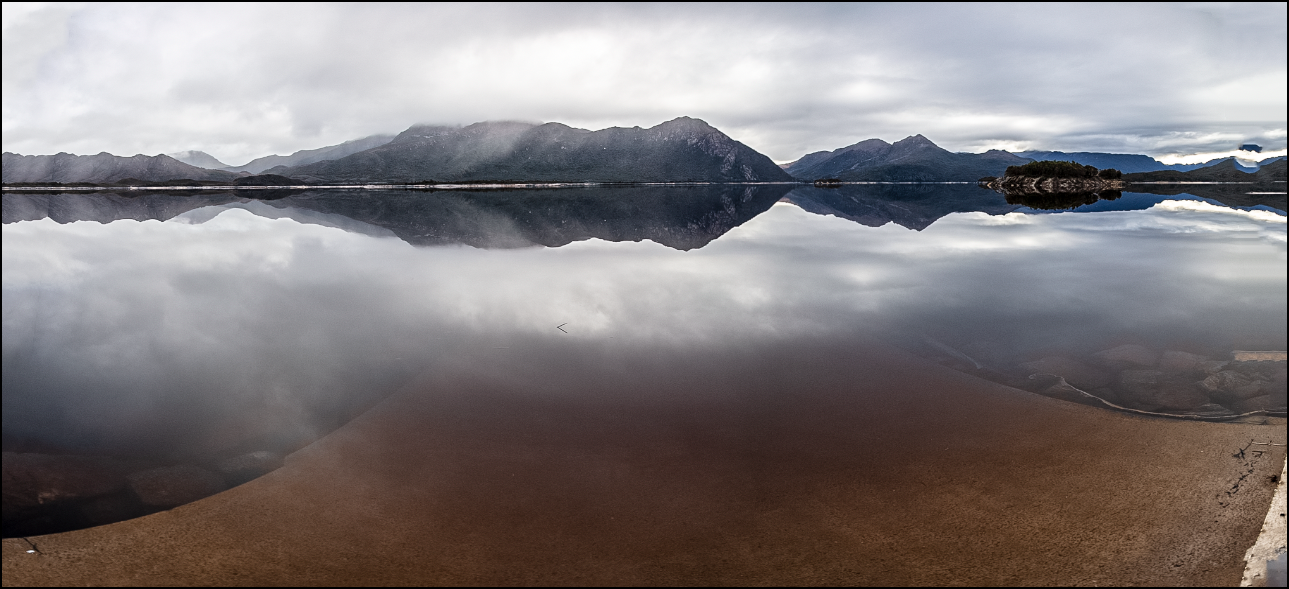
When using Fill Edges, Photo Merge automatically fills in the missing areas.
Layer Comps — In the past, if you had a Smart Object that contained Layer Comps, you could access the Layer Comps using the Properties panel. Taking that one step further; now, if you have multiple Smart Object that all have contain Layer Comps, you can create new Layer Comps in the parent document to capture different combinations of Layer Comps within the Smart Objects.
In the examples below, I have three Smart Objects in the Layers panel. Each Smart Object contains multiple Layer Comps. For example, the” Images” Smart Object has three different image/illustration options and the “Text” Smart Object has three different text/font options. I can use the Properties panel, to select the desired Layer Comp saved within each Smart Object to create a unique combination for each layout. Then, I can save those Layer comp combinations by adding a new Layer Comp in the parent document by clicking Create New Layer Comp icon, and selecting enable “Layer Comp Selection for Smart Objects”.
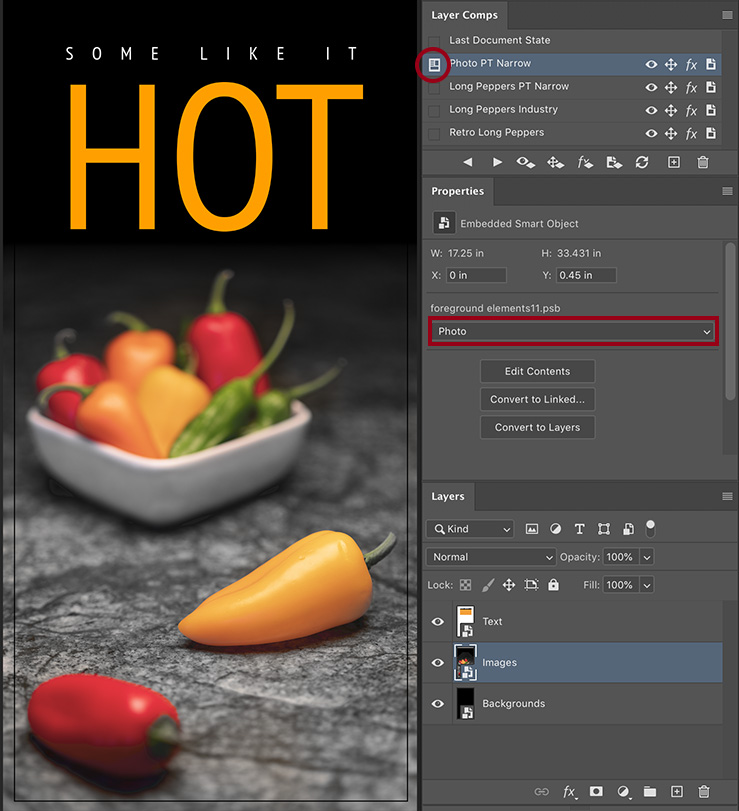
In this first example, the Layer Comp displays the PT Narrow layer from the “Text” Smart Object and the photo layer from the “Images” Smart Object.
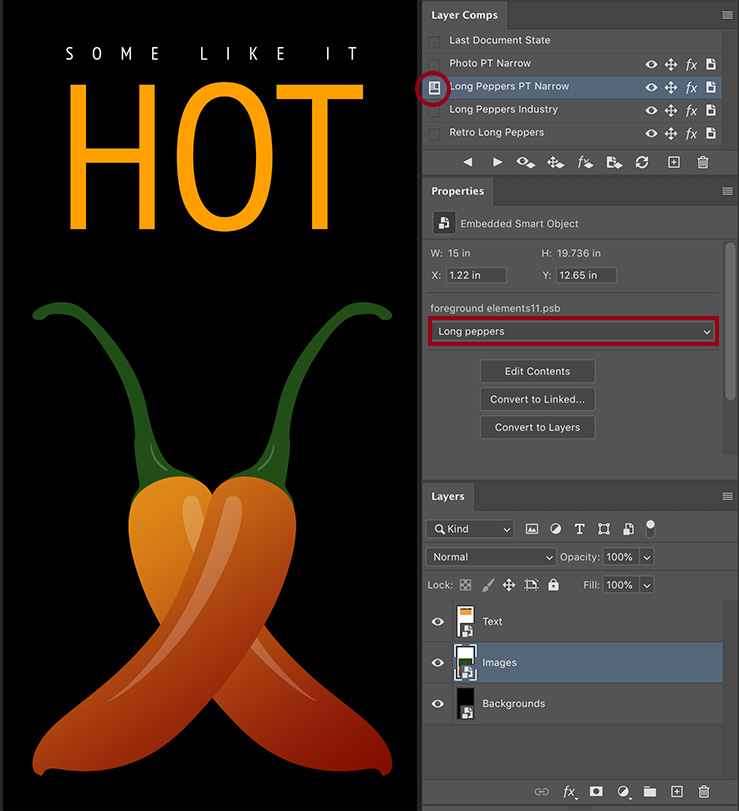
In this second example, the Layer Comp displays the PT Narrow layer from the “Text” Smart Object and the Long Peppers layer from the “Images” Smart Object.

In this third example, the Layer Comp displays the Industry layer from the “Text” Smart Object and the Long Peppers layer from the “Images” Smart Object.
Zoom to Layer Content — To maximize the use of the canvas and make editing easier, Option -click (Mac) | Alt -click (Win) on a layer will zoom to the contents of the layer to the screen. Option -click (Mac) | Alt -click (Win) on a Layer Group to zoom to fit the Layer Group’s content on the screen. Note: if multiple layers are selected, Option -click (Mac) | Alt -click (Win) on a layer first deselects other layers. Option -click (Mac) | Alt -click (Win) a second time to zoom to that layer’s contents.
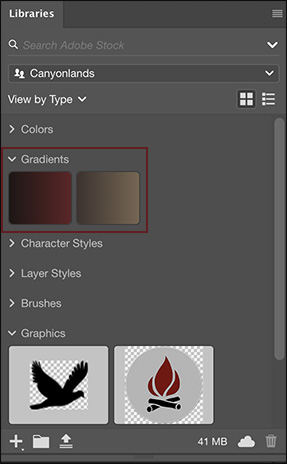
Library Support for Gradients — You can now add Gradients to the Libraries panel and access them accessed across multiple computers, and supported apps (including Illustrator and InDesign).
But Wait, There’s More! Of course the team didn’t stop at 10 – here are a number of additional hidden gems!
Smart Objects — You can now “unpackage” the contents of Smart Objects into their regular layers by choosing Layer > Smart Objects > Convert to Layers, Control -click (Mac) | right -click (Win) on the Smart Object in the Layers panel, or selecting Convert to Layers on the Properties panel. If the Smart Object contained multiple layers, Photoshop creates a Layer Group and places the layers into the group.
• When converting Smart Objects that have Transforms (including Warps) applied:
If the Smart Object contains only a single layer and has a Transform applied, selecting Convert to Layers displays a dialog with the option to retain or discard Transforms. If you choose to retain the transforms, the Smart Object will be rasterized. If you choose “No”, the transformation will be discarded but any Layer Masks, Layer Effects and Vector Masks that were applied to the layer will be retained.
If a Smart Object contains multiple layers and has a Transform applied, selecting Convert to Layers will separate the layers and discard the transformations.
• Likewise, if a Smart Filter(s) is applied to single or multi-layer Smart Object, you have the choice to retain (apply) or discard it. Note: this also applies to Image>Adjustments (including Image>Auto Adjustments, Auto Tone, Auto Contrast) that are applied to Smart Objects as Smart Filters.
• If there are nested Smart Objects (Smart Objects within a Smart Object), then only the parent Smart Object is converted to Layers (the nested Smart Objects remain as Smart Objects).
• Converting a Smart Object to Layers that contains a raw file will rasterize the raw data (convert to pixels).
Brush Tip Rotation — When you have the Brush tool selected, you can use the arrow keys to rotate the tip of the brush. Add the Shift key to move in larger increments.
Toggle between Painting and Erasing — Hold the Tilda key to toggle between painting and erasing with the current brush. Note: it’s actually painting in clear mode.
32 Bit Support — Some of the most common adjustment types – Curves and Brightness and Contrast, are now supported in 32-bit documents.
Saving GIF Files — When selecting Save As, you can now choose GIF as a file format (no longer CompuServe GIF) and it will now save an animation. Note: when saving animated GIF files, you can also choose File > Save for Web to access additional animation, color palette, compression and resizing options.
Export As — Export As now has a 2-up view for comparing two different export settings.
Creating New Documents — File > New (Command + N (Mac) | Control + N (Win) and loading of the Home screen is much faster. Plus, the Home screen has been updated to enable access to cloud documents.
Lens Blur — Photoshop can now open a HEIC image containing a depth map and create an alpha channel which can be used to set a focal point (to determine what to blur and keep in focus). In addition, there has been GPU improvements to increase performance.
Performance — The compositing of Smart Filters should be faster as this version is using the new compositing engine for all images.
Save as PDF — Selecting Save As > PDF will save a copy and leave the active document as it.
3D Improvements — This version of Photoshop includes support for additional file formats as well as improved compatibility with Dimension.
Enjoy!
Do you know of any way to get the Export function to automatically hyphenate the filenames like the old Save for Web function does?
How do you turn off #9 Zoom to Layer Content?! This is not a desired feature when trying to collapse all expanded groups. Reverted back to PS 2019. Please help!
Is something wrong with my upgrade? I don’t see the “object selection” tool?
If you do not see Object Selection Tool go to Edit > Toolbar and click on Restore Defaults then confirm and close dialogue.
I wish that the layer effects stroke option worked on a new blank layer. To make a simple edge stroke of perhaps 16 px, I have to merge all layers up and then choose the layer effects > stroke which allows me to easily determine the thickness, colour, etc of the stroke. But, now I’m stuck for modifying the underlying layers. If I could have a new blank layer above the others and use the layer fx>stroke, I would be much happier. Try using the layer fx>stroke on a blank new layer and you’ll se what I mean.
I know it’s not exactly what you’re after but if you fill the layer with white and multiply it, your fx>stroke effect should work and give you the desired result. The multiply blend does not apply to the stroke.
Hi Dawson, I don’t quite get your point. Layers FX (fx icon on the layer panel) only apply effects to pixels present on the layer, so none of them can work on an empty layer, that’s how it behaves. If you want a 16px stroke, use the shape tool (U) and create a line with a 16px wide stroke.
If you are talking about the Layers FILTERS, then convert your layers to a smart object (select them all together and right click on them in the layers panel to convert them to smart object). Then when you apply a filter to the smart object, you can modify its settings whenever you want; AND you can edit your layers individually by double-clicking on the smart object icon.
Hope this helps!
Hi Dawson, If you place all of your layers in a group and then add the stroke, it will stroke all of the layers “as-if” they are merged and then add the stroke (without your having to actually merge them).
Or, could you use the shape tools to draw a rectangle and set the fill to none and the stroke to the 16 px?
“Toggle between Painting and Erasing Hold the Tilda key to toggle between painting and erasing with the current brush .Note: it’s actually painting in clear mode.”
It won’t work in portuguese brazilian keyboard, I tried all other keys in the keyboard, and none worked with this new feature. Do you know how can I find out the correct key for this command?
I don’t believe that this features is available on a keyboard that does’t have a Tilda – I have forwarded the request to the product team asking if this could be added to the Keyboard Shortcut Manager in the future. Could you also post the request on the Photoshop forum so that others could amplify vote for it? Thanks, -j
Hi, how to disable Zoom to Layer Content?
Did I miss something or do something wrong? My PS 20 icon is rounded, while the other icons are square.
Apps get rounded corners when they become multi-device and cloud-aware. : )
Is there a way to turn off ‘Zoom to Layer Content’ feature? It’s in conflict with Alt +LMB and Ctrl+Alt+LMB on triangle next to group in Layers panel to collapse/expand groups which I’m using all the time.
I wish there was a way to create/save as animated pngs, since they’re so much cleaner than gifs… and chrome & firefox support apngs already.
You write:
When no layers are selected, the Properties panel will display:
• Canvas Properties including dimensions, orientation, resolution, color mode, bit depth, and fill color.
• Access to Ruler & Grids and Guides options.
• “Quick Actions” enabling one-click access to Image Size, Crop, Trim, and Rotate commands.
How do you make it so no layers are selected?
Choose Select > Deselect Layers or click in the grey area of the Layers panel (depending on how many layers you have, you might need to extend the panel).
Thanks Julieanne for this post! good stuff 🙂
Adobe: New auto selection tool
Me: Hmm, wonder if they’ve finally nailed it… *updates and opens CC 2020*
Me: Nope.
Despite the numerous selection and refinement tools in photoshop, color range is still the best way to create complex selections.
What’s the key for the quick erase for non-English keyboards which don’t have the tilde as a primary key?
I recently upgraded my MacOS to Catalina 10.15.1 and my Ps to 21.01. Suddenly printing has become a nightmare with my Epson 3880. Colors are way off. I recalibrated my BenQSW320 four times but someone told me it is probably the combination of upgrades that is causing the problem. Anyone else having problems? Thanks!
Hi Daniel, Sorry, but I would suggest that you post your question to our user to user forums which are frequented by members of the product development team as well as other passionate users willing to share their expertise and experience:
http://forums.adobe.com/community/photoshop
-j
I can’t get stylistic o work in the properties panel It is greyed out.
It could be that the font that you have selected doesn’t have any Stylistic Alts. I know that the following Open Type fonts all include them: Trajan Color, Bickham Script, Hypatia, and Source code.