I’m pleased to announce that Adobe Camera Raw (ACR) v12.3 has a new, modernized interface, ISO Adaptive Presets, Local Hue editing and more.
Modernized Interface — Camera Raw’s new look and feel provides a more flexible user interface. Click the Expand icon (the two arrows) in the upper right to toggle full screen.
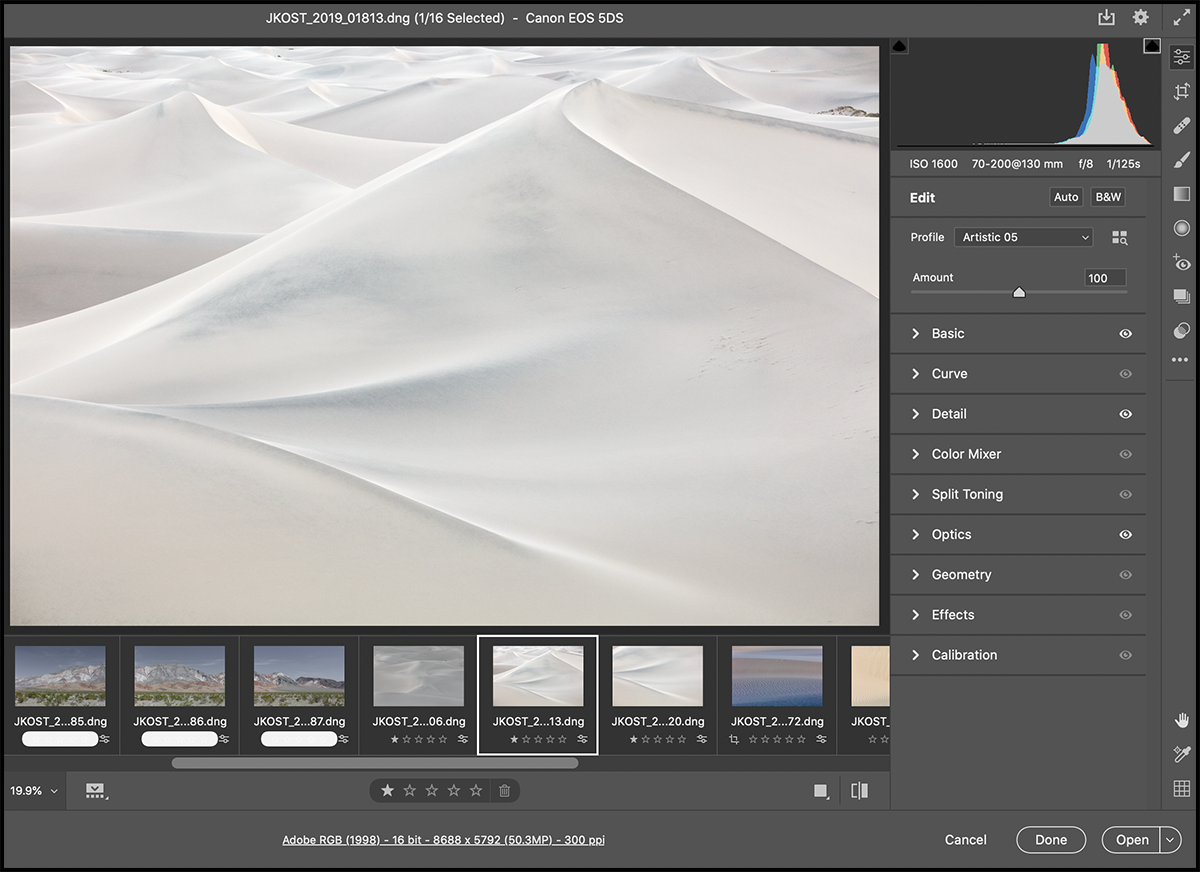
The Filmstrip — Click the Filmstrip icon or tap forward slash (/) to toggle the visibility of the filmstrip.
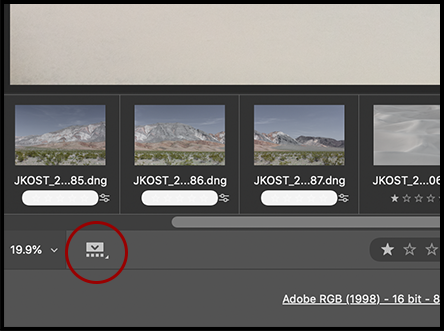
• Click and hold the Filmstrip icon to show filenames, ratings and color labels as well as choose the orientation of the filmstrip (or, use the shortcut Command + Shift + F (Mac) | Control + Shift + F (Win) to toggle the orientation).
• Position the cursor at the top of the Filmstrip (between the image preview area and the image thumbnails) and drag to resize the Filmstrip.
• Tap the Delete key to mark an image for deletion.
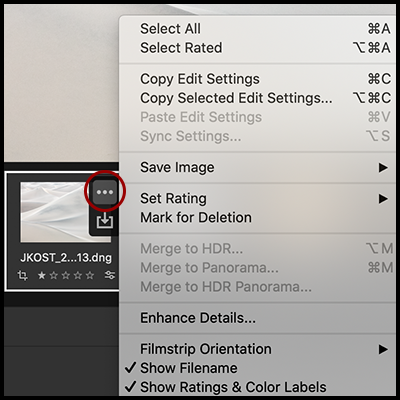
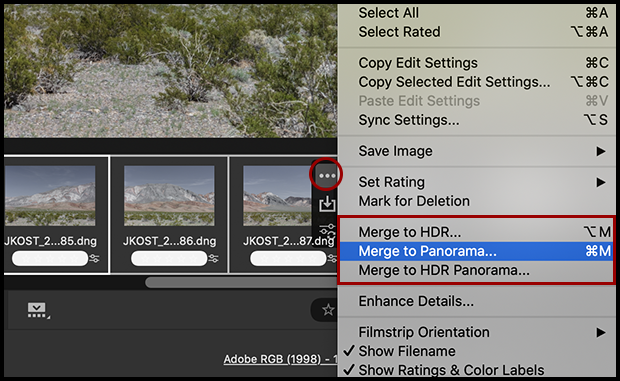
• Position the cursor over a thumbnail in the Filmstrip and click the More icon (the three dots) to access additional options or, Control -click (Mac) | right -click (Win) on a thumbnail to access additional options from the context sensitive menu).
Tools — The tools have been relocated to the right side of the screen, decreasing the distance between the tool and it’s options.
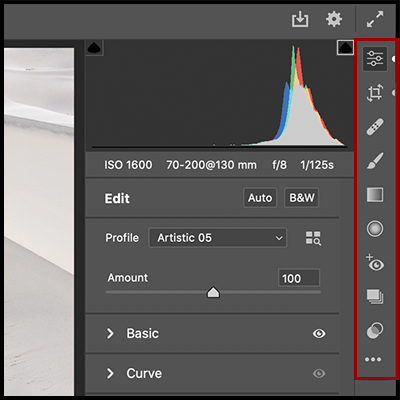
• When appropriate, stand-alone tools (such as the Targeted Adjustment tool) have been added to their corresponding panels.
• A small white dot to the right of the tool, signals that there have been changes made with the tool.
Customizing Panels — ACR’s new single column panel display makes it easy to work with multiple panels at once.
• Click the Settings icon (the gear) and choose Preferences > General (or Control -click (Mac) | right -click on the name of a panel) to select a panel mode:
Single Panel Mode – displays panel options for one panel at a time – clicking on a panel expands the contents of that panel while collapsing any other open panels (useful when working on a laptop or smaller display as it eliminates the need to scroll through several open panels to access options).
Responsive Panel Mode – ACR will intelligently open and close edit panels to automatically fit your monitor.
Multi Panel Mode – leaves all opened panels expanded.
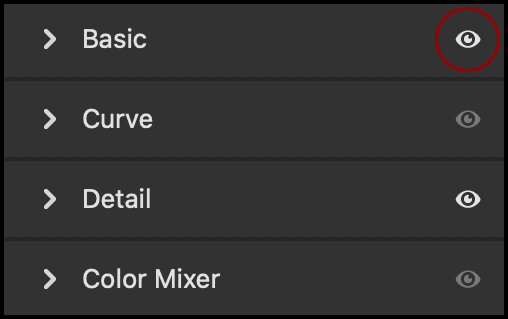
• To toggle the visibility of the edits made on a single panel, click and hold the Per-Panel Preview icon (the eye). Note: if the icon is grayed out, changes have not been made within the panel.
• Option (Mac | Alt (Win) changes the name of the panel to Reset(panel name). Click to reset all edits within the panel.
• Several panels display features with progressive disclosure triangles. Click the disclosure triangle to view more advanced features.
The Crop Tool — The Crop, Straighten, and Rotate tools have been combined into a single panel.
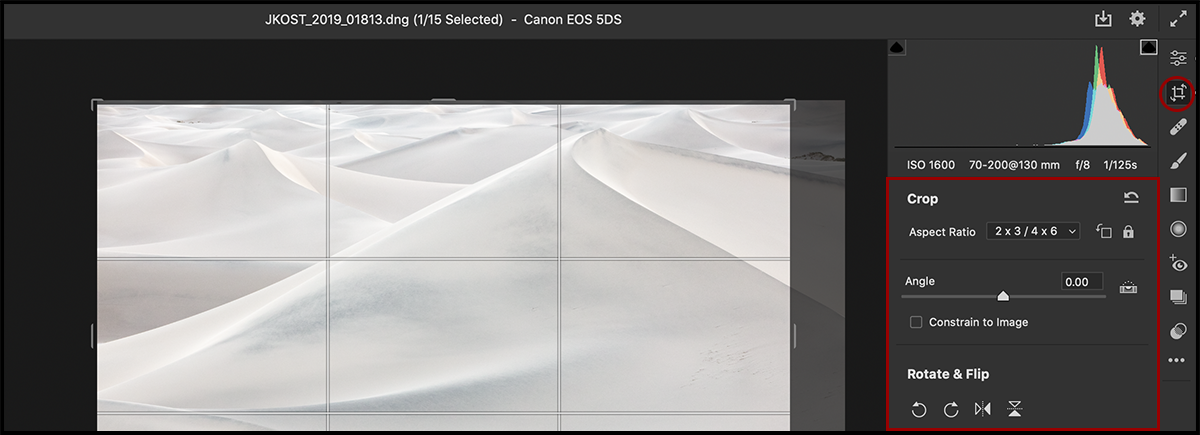
• The Crop tool can display several different overlays. Tap V to view the overlay. Control -click (Mac) | right -click within the crop marquee to select from the list of Overlay Styles.
• Use the Aspect Ratios menu to select and create custom aspect ratios (ACR will remember the 5 most recent custom aspect ratios).
• Click the Rotate Aspect Ratio button to flip the orientation of the crop (or tap the X key).
The Hand Tool — The Hand tool has been relocated in the lower right of the ACR interface.
•With most other tools selected, pressing the Spacebar will temporarily access the Hand tool.
The Zoom Tool — The Zoom tool’s default behavior has been modified – click in the image area to toggle between Fit in View and 100%.
• If you prefer the Zoom tool to automatically swap to the hand tool when zoomed into 100%, click the Settings icon (the gear) and choose General > Zoom and Pan and enable “Use Lightroom Style Zoom and Pan”.
• When moving from one image to another in the filmstrip, the zoom percentage and location will stay constant. To vary the zoom between images disable Global Zoom Editing from the Zoom Level popup in the lower left.
White Balance and Color Sampler Tools — The White Balance tool has been added to the Basic Panel, the Color sampler tool was relocated to the lower right of the dialog, and RGB values are now overlaid on the Histogram (instead of being displayed below the Histogram).
Grid Overlay — Click the Grid Overlay icon (or use Shift + G ) to toggle a grid over the image. Customize the Grid using the Size and Opacity settings at the top of the screen.
Undo/Redo — The keyboard shortcuts for Undo/Redo have been updated:
• Command + Z (Mac) | Control + Z (Win) continues to step back in time.
• Command + Shift + Z (Mac) | Control + Shift + Z (Win) move forward in time.
• Command + Option + Z (Mac) | Control + Alt + Z (Win) toggles the last state off/on (after the most recent command).
• If you prefer the old behavior, click the Settings icon (the gear) and choose General> Keyboard Shortcuts and enable “Use legacy shortcuts”.
Edit (Auto and B/W) and Profile Options — These features have been relocated at the top of the edit panels (below the Histogram) making them easier to access.
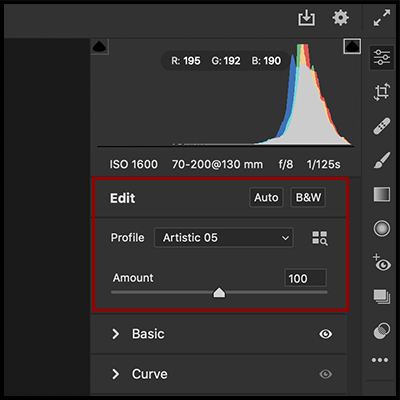
• When Using the Profile browser, click the More icon (the three dots) to change View options (List/Grid/Type), Reset, Manage, and Import/Export profiles.
The Curve Panel — The Tone Curve panel has a new look and feel making it easier to switch between the Parametric and Point Curves, access the individual (RGB) channels of the Point Curve, and make more precise Tone Curve adjustments.
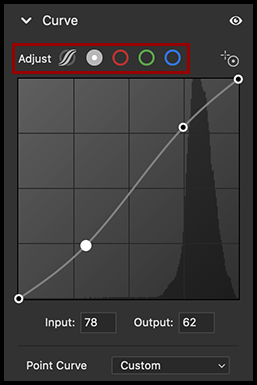
• Use the icons across the top to move between Parametric, Point Curve, and individual Red, Green, and Blue channels.
• The individual Point Curve Channels display color gradients making it easier to anticipate adjustments.
• Control -click (Mac) | Right-click (Win) in the Parametric Curve grid area to quickly reset regions and splits.
• Control -click (Mac) | Right-click (Win) in the Point Curve grid area to access additional options including: Reset Channel, Reset All Channels, Copy/Paste Channel Settings, Snap to Grid, and Show All Curves.
• Option + Command + Shift + T (Mac) | Alt + Control Shift + T (Win) selects the The Targeted Adjustment Tool (now located in the Curves panel).
The Color Mixer Panel — The HSL Adjustments panel has been renamed to Color Mixer and the Targeted Adjustment Tool is displayed when adjusting HSL.
The Optics Panel — The Lens Correction Panel has been renamed to Optics. Use the progressive disclosure triangle to view advanced Profile Correction options. Defringe is now available regardless of whether Profile or Manual is selected (use the progressive disclosure triangle to view advanced Defringe options).
The Geometry Panel — The Transform tool has been relocated to the Geometry Panel where you’ll find all of the Auto Upright, Guided Upright, and Manual Transformation controls.
The Snapshots Panel — The Snapshots panel is now accessed via the tool strip (to the right of the panels).
• Shift + S toggles the Snapshot panel.
• Hover the cursor over a Snapshot to quickly delete it by clicking the trash icon.
• Control -click (Mac) | right -click (Win) in the image area to select Create Snapshot from the context sensitive menu.
The Preset Panel — The Presets panel is now accessed via the tool strip (to the right of the panels).

• Shift +P toggles the Preset Panel.
• Hover the cursor over a custom Preset to quickly delete it by clicking the trash icon.
• In the Presets panel, there is a new group of Presets called “Default”. Within that group are nine different combinations of Profiles/Lens Correction/Noise Reduction options specifically designed to be applied as Raw Default settings (Preferences > Raw Defaults).
• ACR now supports ISO Adaptive Presets which allow a single preset to apply different edit settings to different photos depending on their ISO. For example, you can create an ISO Adaptive Preset that applies different levels of noise reduction or sharpening to high verses low ISO images.
• If you try to delete a preset (from the Preset panel), that is being used as a Raw Default, ACR will display a warning. If you proceed to delete the preset, the Raw Default setting will revert to the Adobe Default.
• For more detailed information about creating and applying Adaptive ISO and custom Raw Defaults in ACR see this post: How to Create Custom Raw Defaults in Adobe Camera Raw (v12.2)
Selective Edits — Brush, Overlay, and Mask options for the Adjustment Brush, Radial and Linear Gradients have been relocated to the top of the panel.
• Click the Reset icon at the top of the panel to reset (delete) all instances of the tool.
• Click the Reset icon to the right of the Selective Edits to reset the edits.
• The Scroll wheel will now change brush size. Add the Shift key to adjust the Feather amount.
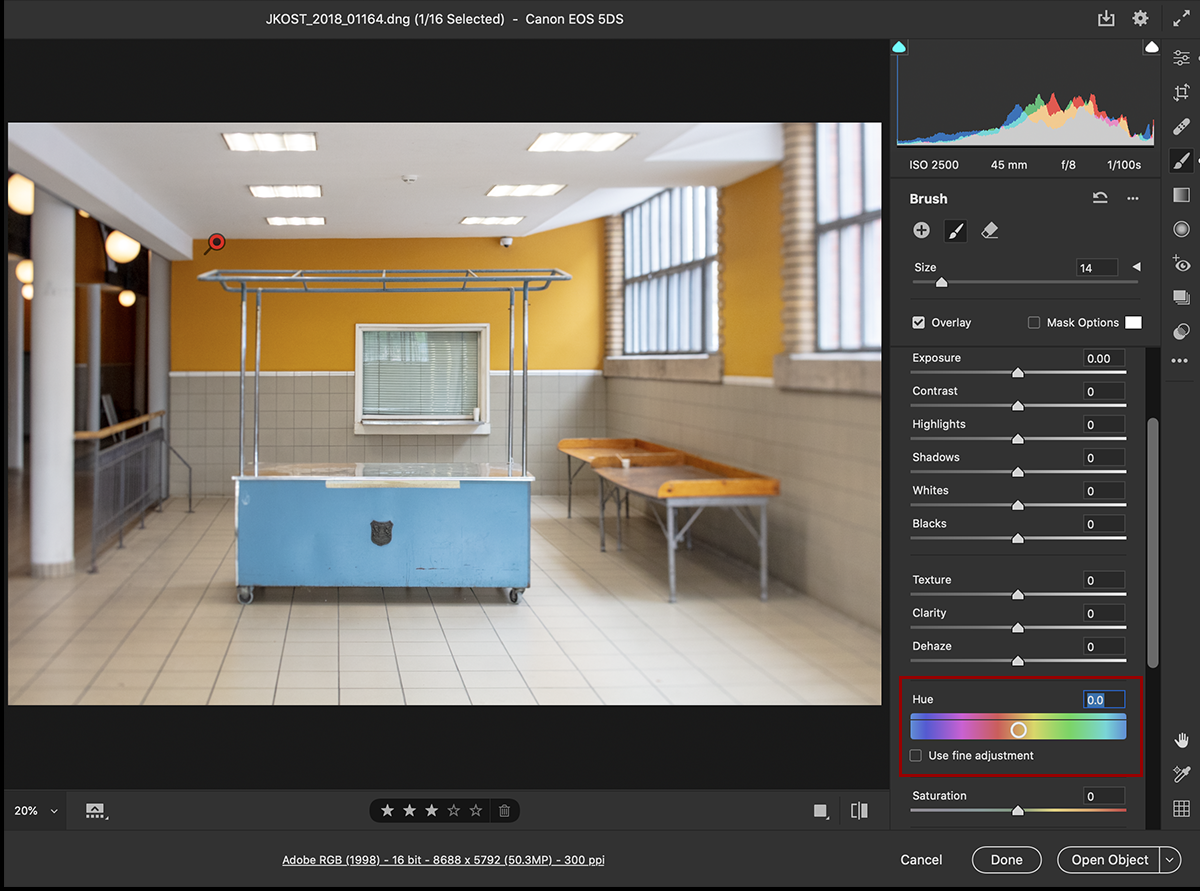
Hue Editing for Local Adjustment Tools — The new Hue slider provides the ability to shift the color in a selected area of a photo while keeping the saturation and luminosity values unchanged. After selecting (masking) the desired area using any of the local adjustment tools (Adjustment Brush, Radial and Linear Gradients), dragging the Hue slider enables a full, 360-degree hue shift that is perfect for both corrective and creative adjustments.
• The two gradient bars can be used to help visualize the color shift in either direction. The gradients will shift to display the primary color from the selected (masked) area. As the Hue slider is repositioned, the hues in the image (as well as the bottom gradient bar) shift to reflect the change. In the illustration below, I selected (masked) the orange portion of the back wall using the Adjustment Brush so the gradient displays orange in the center.
• As the Hue slider is moved to the right, the image is updated and the slider points to the newly appointed hue (cyan/blue) in the top color bar.
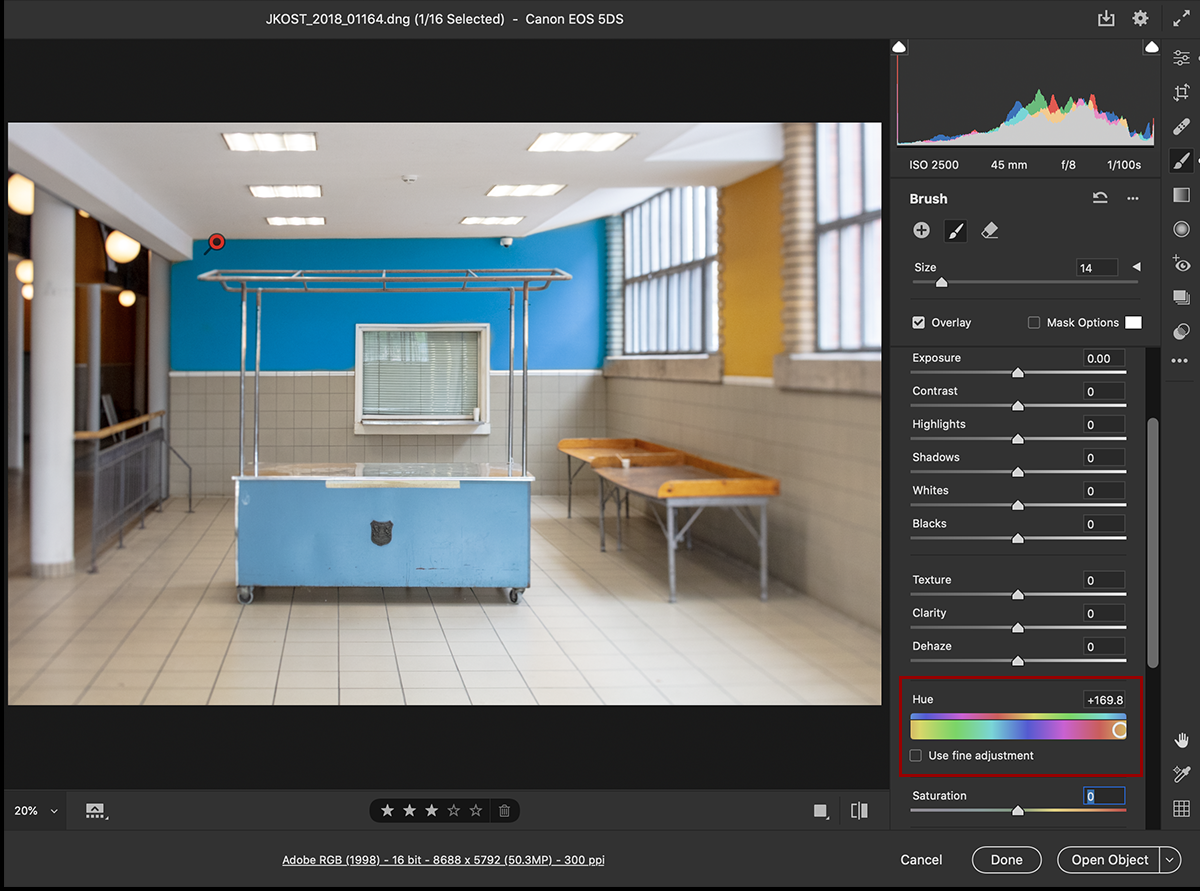
• For more control, enable “Use Fine Adjustment” to slow the rate of change as the slider is scrubbed left/right.
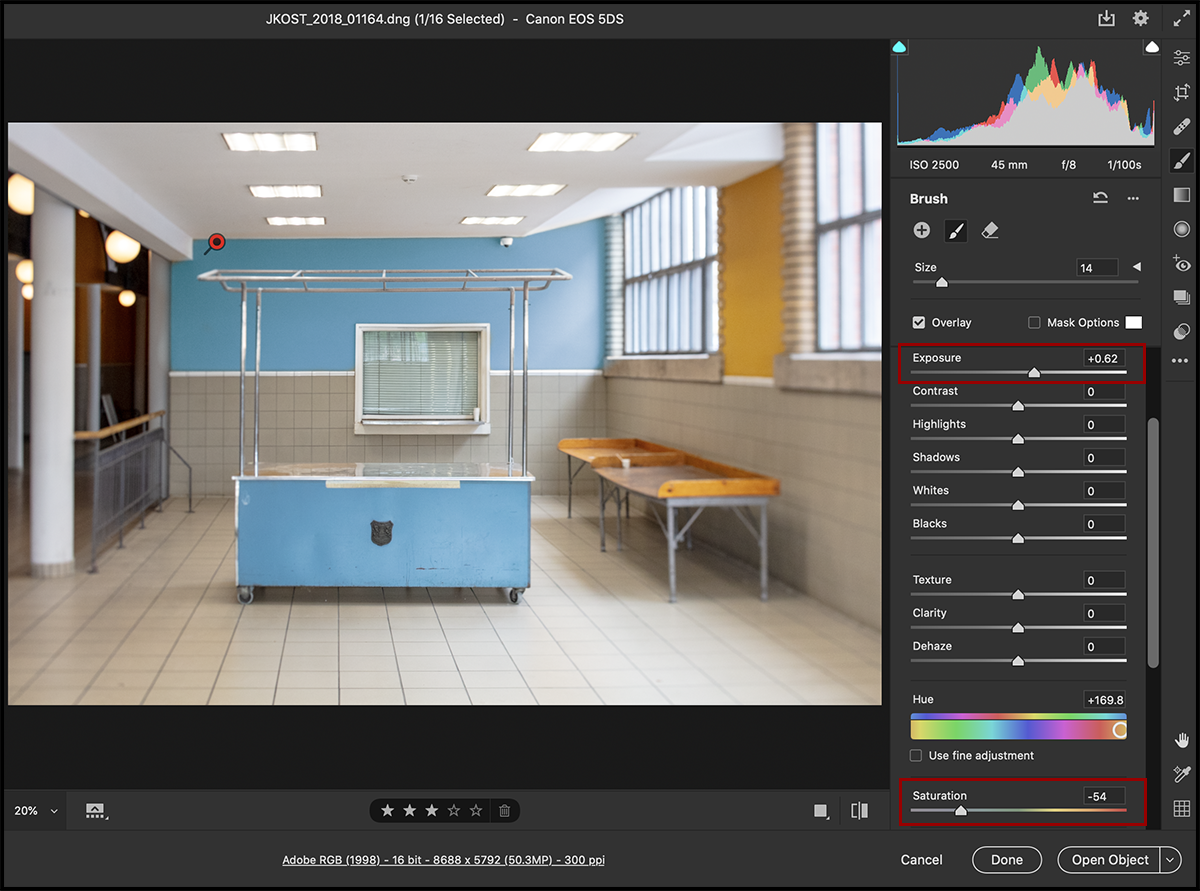
• In this example, because our eyes can perceive colors brighter or more saturated relative to others (and because I wanted to more closely match the blue wall with the blue cart), I chose to also adjust the exposure and saturation.
• In more complex scenarios, or if the initial mask isn’t as precise as the one above, you can use the Hue adjustment in combination with Range Masking to refine which hues are effected. This video (Color and Luminance Range Masking in ACR) demonstrates Range Masking in Lightroom Classic.
Click here for more information about Local Hue Correction direct form the Camera Raw team.
Before and After Views — The Before/After view icons were refreshed but their behavior is the same as in previous versions.
• To toggle the visibility of the edits made on a single panel, click and hold the Per-Panel Preview icon (the eye). If the icon is grayed out, then no changes have been made to that panel.
• The icon to the right of the Before/After view toggles between current/default settings.
Copy and Paste Settings — You can now copy and paste edits between images.
• To quickly copy and paste edit settings from one image to the next, select the edited image in the filmstrip and use the shortcut Command + C (Mac) | Control + C (Win). Then, move to the next image and use the shortcut Command + V (Mac) | Control + V (Win) to paste the settings.
• For more control over which settings are copied, use the shortcut Command + Option + C (Mac) | Control + Alt + C (Win) to display the Copy Edit Settings dialog.
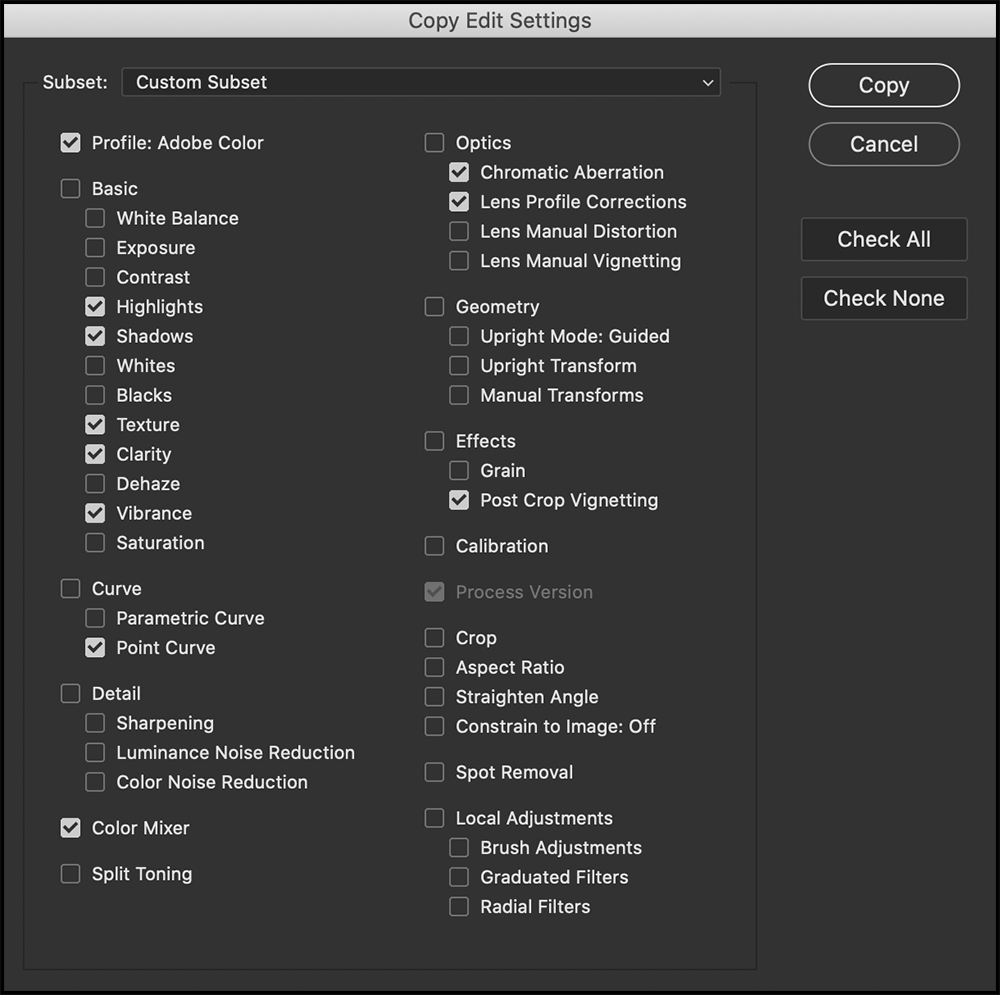
Note: the Copy Edit settings can also be accessed from the context sensitive menus (Control -click (Mac) | right -click (Win) in the image area or on a thumbnail in the Filmstrip, and choose Copy Edit Settings/ Copy Selected Edit Settings).
Sync Settings — With multiple images selected, click the sync icon (in the Filmstrip) or, use the shortcut Option + S (Mac) | Alt + S (Win) to display the Synchronize dialog. Choose the settings to sync and click OK to apply.
Workflow options — Clicking the hyperlink at the bottom of the dialog displays the Workflow options (nested with the other ACR preferences).

Opening Files — Open, Open as Object, and Open as Copy are now easily selectable using the Open drop-down menu.
Preferences — Click the Settings icon (the gear) to access the Preferences (General, File Handling, Performance, Raw Defaults, Workflow).
Saving Images — Access the Save Options by clicking the Save Options icon in the upper right of the dialog or, by hovering the cursor over a thumbnail in the Filmstrip and clicking the Save Options icon. There are two new presets – Save as JPEG and Save as DNG listed under the Save Options.

Merge to HDR, Panorama and HDR Panorama — Select the desired files in the Filmstrip and click the More icon (the three dots) to access the Merge to HDR, Merge to Panorama and Merge to HDR Panorama options.
The Image Settings option in the flyout has been renamed “Reset to Open” (there was no change to the behavior).
This release also includes additional camera raw and lens profile support and addresses bugs that were introduced in previous releases of ACR.
nice update. finally a modernized interface which adapts to the different screen sizes. it was about time for that feature.
Thanks for your thorough and precise description of the changes! In the case of this post (changes in ACR 12.3) your information is even more useful than usual, given the large amount of things that have changed. I’m having a hard time coping with so many things that are different/new in 12.3. Thanks again.
I can’t get the tools like gradient, brush or crop to remember the previously used settings. How do I fix this?
At the bottom of the Selective Edits, there is a “Reset sliders automatically” option – uncheck that.
What happened to the auto mask button in the adjustment brush? I found that very useful. I’m guessing you decided luminosity masking is sufficient, but it isn’t as precise. The mask nearly always bleeds out slightly from the masked area. And the flow slider is gone too.
Mike, The Auto Mask option is still there but it it changed location! to the right of the Brush Size slider is a white triangle, click it to see additional options (feather, flow, mask, etc.).
Is there any way to get the status Icons back on the thumbnails? If you adjusted the tone or crop, icons would appear on the thumbnails indicating the image had been touched. Loved the new look but need this functionality.
Alan, If you click and hold on the Thumbnail icon in the lower left, you will see an option to show File name or Rating/Color. Select either of these and you will also see the icons for Tone and Crop. They also added a small white dots next to the tools if an adjustment has been made to the image. I really like this feature as I can now quickly see if I added a Local edit…
How do I revert to the old version. The new version is looking a lot like Lightroom, which I hate. I did have a very efficient workflow in ACR, now I have to start from the beginning.