This release of Lightroom Classic 10.3 includes native support for Apple Silicon, Premium Presets, Super Resolution, and performance enhancements.
Support for Macs Running Apple Silicon — Lightroom Classic now runs natively on Macs running Apple Silicon with significant speed improvements. When compared to an equivalent Intel Mac, most operations in Lightroom Classic on an M1 Mac are about twice as fast, including launch, import, export, and walking through photos in loupe view. Other operations are even faster — the new Super Resolution feature is more than three times as fast, and batch editing photos is more than four times as fast. For more detailed information on the performance improvements, check out these third party testing results.
Premium Presets — Lightroom Classic includes more than 70 new, hand-crafted Premium Presets designed to help you achieve your creative vision faster than ever before. Carefully crafted by professional photographers, Premium Presets can help give a photograph a unique look and feel, create a more uniform look across multiple photos, and streamline editing workflows. The presets revolve around 5 themes: Portraits, Cinematic, Futuristic, Vintage, and Travel. Applying a preset can certainly be a “one-click solution”, but they can also be easily (and nondestructively) adjusted to match the needs of your images. Below are examples of presets that I applied which I feel take my editing in new and interesting directions. Note: Premium Presets are also available in Lightroom on iOS and Android for to Lightroom Classic customers.
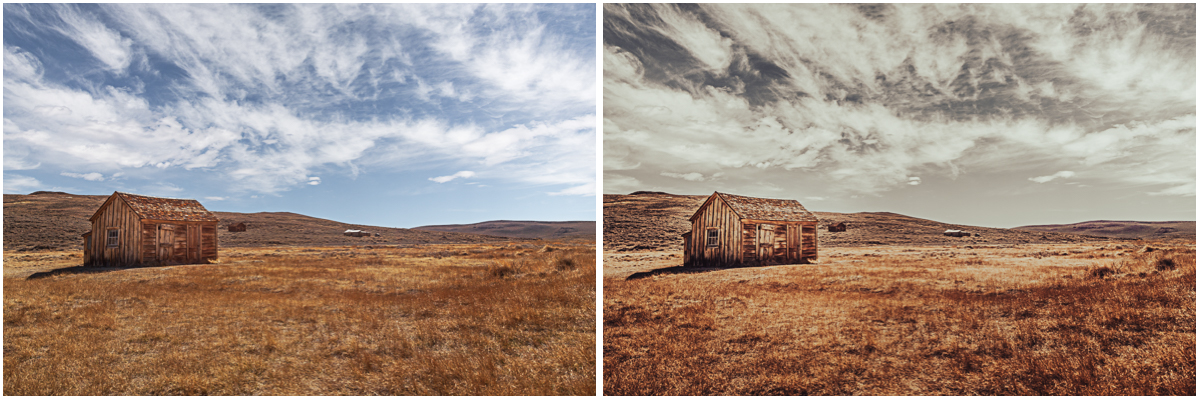
Original image and Premium Preset CN03 applied.

Original image and Premium Preset TR01 applied.

Original image and Premium Preset CN03 applied.

Original image and Premium Preset TR01 applied.

Original image and Premium Preset CN07 applied.

Original image and Premium Preset CN08 applied.

Original image and Premium Preset CN07 applied.
I created the illustration below to gain a better understanding of how each preset adjusts color and tone. Click this link (PremPresetTemplate3K.jpg) to view a larger version.
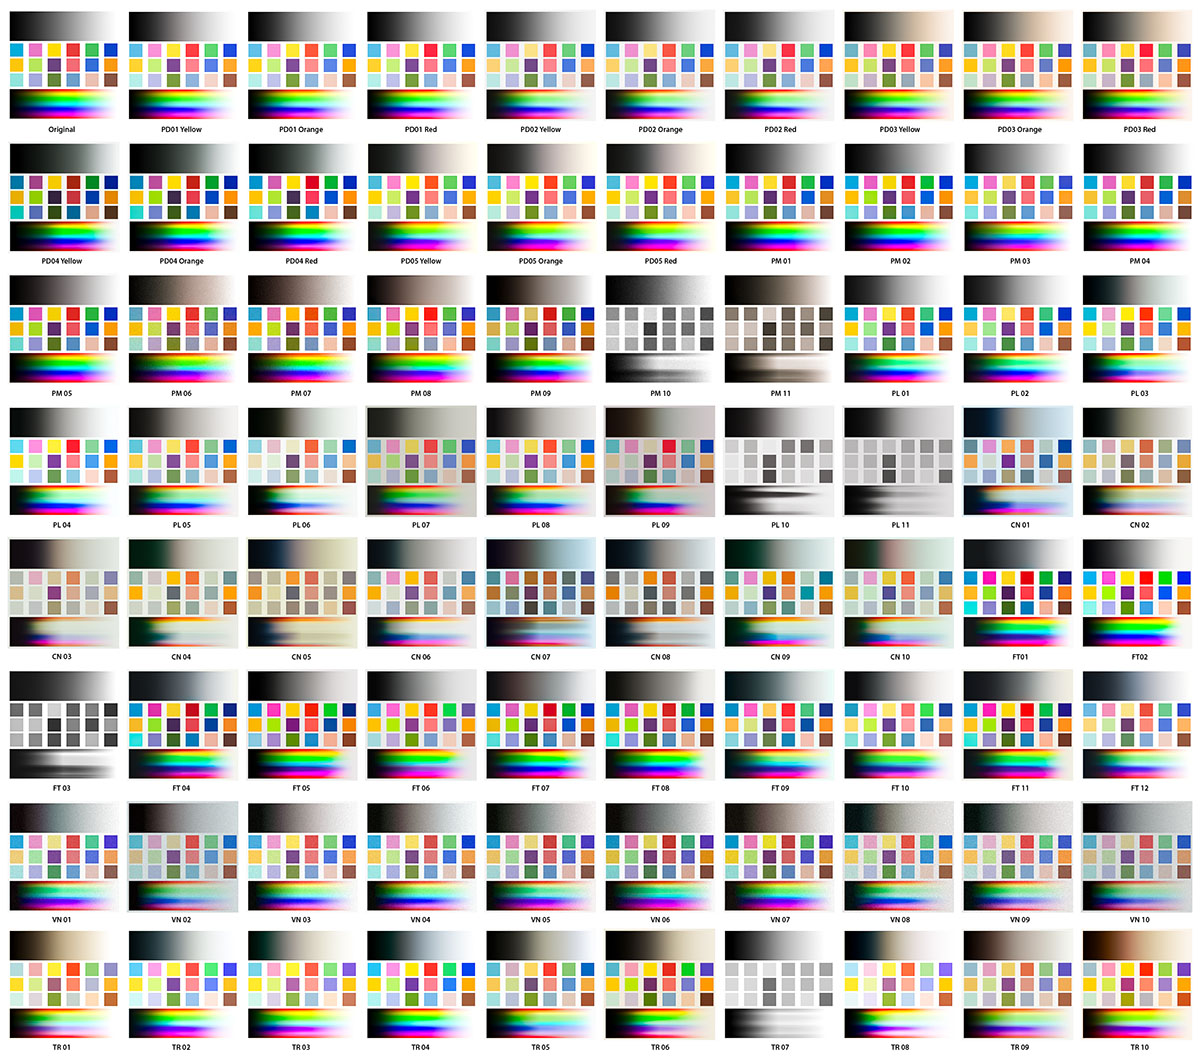
If you would like to download the template that I used to create the illustration above and swap out the image with one of your own, download this layered Photoshop file (PremPresetTemplate3K.psd.zip) and follow the instructions below. Note: While you can easily apply the individual presets in Lightroom Classic, I created this template as a way to preview all of the different presets at once (to compare them) as well as enable me to quickly swap to a different image by replacing the contents of a single Smart Object.
• Download and open the PremPresetsTemplate3K.psd file in Photoshop and, in the Layers panel, target the “Original” layer.
• Select Layer > Smart Objects > Edit Contents. This will open the “Original” layer in its own window named ColorTest1.psb.
• Copy and paste (or drag and drop) your image into the ColorTest1.psb window.
• Choose Edit > Free Transform and scale your image to fit within the canvas as needed.
• Hide (or delete) the background layer.
• Save the changes to the ColorTest1.psb and close it. Photoshop will update all copies of the Smart Object (applying the different Premium Presets via the Camera Raw Filter). Note: the template is a complex document with 70 layers each with its own Camera Raw filter applied – depending on your system, it may take a few moments to save the contents of the Smart Object and update the parent document after saving ColorTest1.psd!
• Once you’ve chosen your preferred preset, return to your original image in Lightroom Classic and apply it!
Note: There might be very slight differences in color/tone between the Preset applied in Lightroom Classic and Photoshop depending on the settings chosen to export the file from Lightroom Classic as well as the Color Settings set in Photoshop.
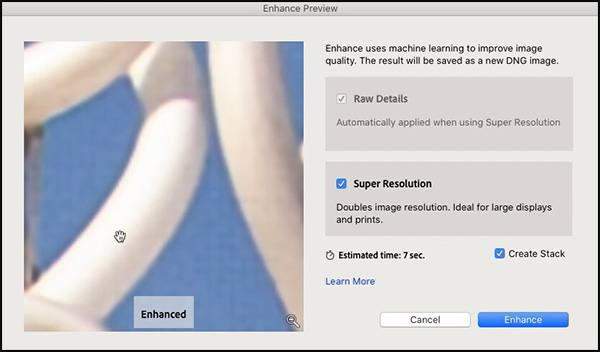
Super Resolution — Lightroom Classic’s new Super Resolution feature uses an advanced machine learning model (trained on millions of photos) to intelligently quadruple the resolution of an image while maintaining clean edges and preserving important details. Super Resolution helps maintain the quality of the photo especially when up-sizing photos taken with low resolution cameras, working with tightly cropped images, and when making large prints. The enhanced image is double the linear resolution meaning that 2x the width and 2x the height of the original image or 4x the total pixel count. Super Resolution works best when working with raw files (the higher the quality of the original the better the results), but can also be used to resize jpg, tiff, psd, and png files. Watch the video below to see Super Resolution in action.
Here are eight quick tips/shortcuts from the video:
• In the Develop module, choose Photo > Enhance or, right-click in the image (Control -click on Mac) and choose Enhance or, use the shortcut Control + Option + I (Mac) | Control + Alt + I (Win) to display the Enhance Preview dialog.
• Control + Option + Shift + I (Mac) | Control + Alt + Shift + I (Win) applies the previously used settings in the Enhance Preview dialog (Enhance Details and/or Super Resolution) on the selected image(s) while bypassing the Enhance Preview dialog.
• Applying Super Resolution automatically enables the Raw Details feature to create the highest quality image possible when working with raw files.
• Any adjustments made to the source photo will automatically be carried over to the newly created, enhanced DNG.
• With Create Stack enabled, Lightroom Classic will stack the enhanced file with the original DNG (the enhanced file will appear at the top of the stack).
• Lightroom Classic has a file size limit of 65,000 pixels on the long side or 500 megapixels. So, you may not be able to apply it to a really large file such as a panorama, since doubling the pixel dimensions of the panorama may exceed the limits of Lightroom Classic. Note: you can still apply the Raw Details option to enhance the image without using Super Resolution if you don’t want the larger file size.
• While you can’t apply Super Resolution multiple times to the same original, you can apply Super Resolution and then enlarge the image further when exporting or, within another application such as Photoshop (using the Image Size command).
• A faster GPU can dramatically speed up performance.
To learn more about how Super Resolution works, check out this post by Eric Chan.
Live View in Tethered Capture — Lightroom Classic now supports Live View when tethering with several Nikon cameras (support for Canon cameras was released in previous versions). Live View is especially valuable when not in reach of the viewfinder and/or when collaborating with teams behind the screen. With Live View, you can now see your camera’s real-time feed (shown in a separate window which can be resized as well as rotated as needed), focus control buttons (including Auto Focus), and exposure settings. Note: Focus controls are enabled only if the lens is in Auto Focus mode.
Note: Tethered capture is not yet supported for Macs running Apple Silicon. When the tether option is selected, Lightroom Classic will display a dialog and launch under Rosetta emulation mode (Rosetta enables applications built for Apple’s Intel chips to run on the new Apple Silicon devices with the M1 chips).
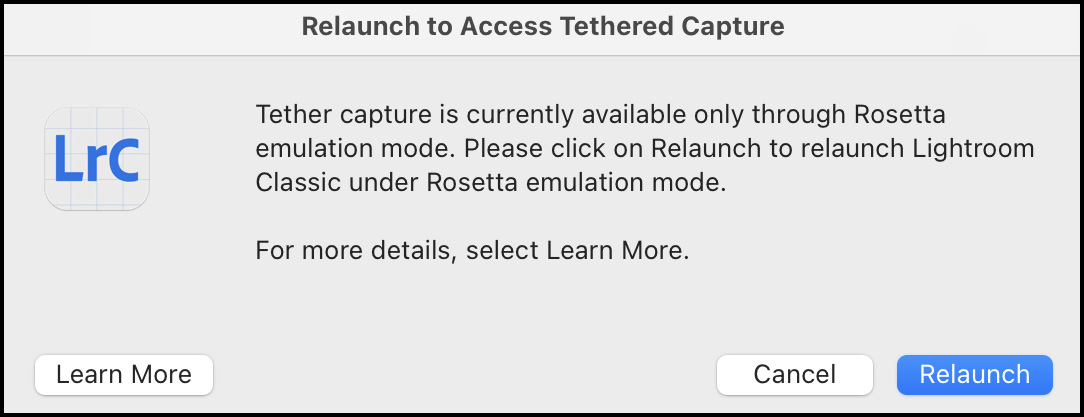
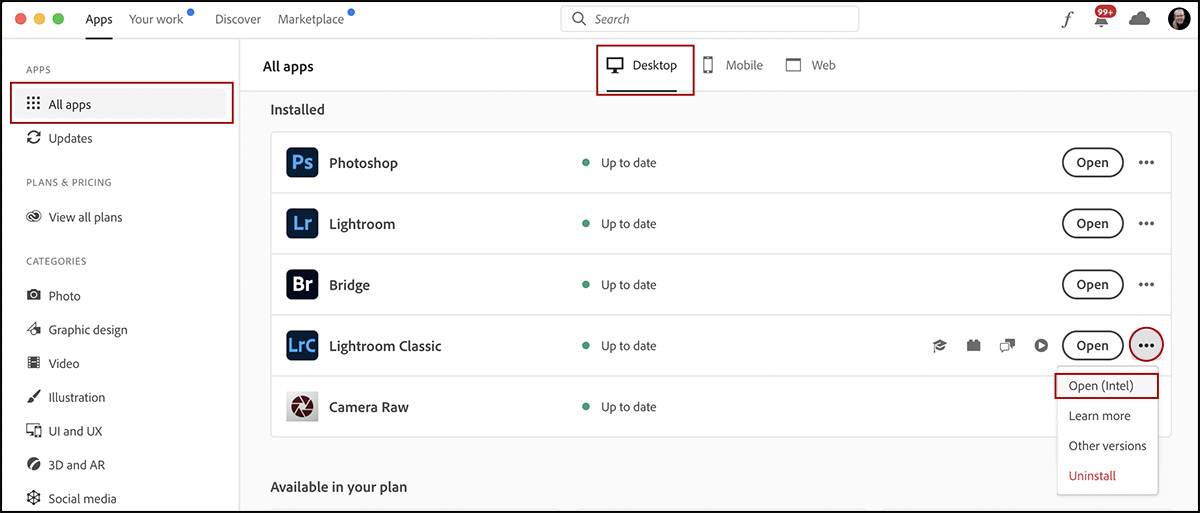
When Lightroom Classic is running in Rosetta mode, the title bar will display: Rosetta/Emulation Mode On. When running Lightroom Classic under Rosetta mode, quitting and relaunching will automatically open Lightroom Classic in the native (Apple Silicon) mode. You can also open Lightroom Classic under Rosetta using the Creative Cloud desktop app: choose All Apps, Desktop, and click the three dots next to Lightroom Classic to choose Open (Intel).
For more information on Tethered capture on Apple Silicon, please click here.
Performance Enhancements — The Metadata panel is much quicker to display (populate) results when multiple images are selected in grid view and edits are faster to make. In addition, updates to VRAM provide additional stability when using Lightroom Classic over extended periods of time.
This release also includes additional camera raw support, lens profile support, and addresses bugs that were introduced in previous releases of Lightroom Classic.
Enjoy!
Thanks for the update, Julieanne. Glad to see super resolution come across from ACR to Lightroom.
Will there ever be a tethered option for Sony cameras? Is this something under active consideration or do Sony block it somehow?
The photoshop tempate for previewing the premium presets is super useful. Thanks a lot for this!
Must admit, I felt just about every image above looked far better before the preset was applied.
Well, as they say, beauty is in the eye of the beholder!
Ms. Kost,
This is my third try to get this posted…..
Adobe should not underplay your last update comment about the metadata selection improvements. This “fix” is wonderful and long overdue. It is 1000x more important than the last five years of bling develop module improvements.
In addition to the metadata selection issue, my 128Gig of RAM, 24 core machine has frozen repeatedly (“not responding”, technically) when making multiple DAM metadata changes, avoidable only by prophylactically closing and reopening LR every half hour or hour or so. I am hoping your comments about “VRAM improvements” refers to this long standing deficiency in memory management.
Please convey my appreciation to whoever drove this development direction and accomplishment.
Once again an M1 update comes and I cannot see anywhere to actually get it in my version of Cloud. For Lightroom I had to actually skip cloud and do it through the Mac App Store, but that doesn’t work here. No matter what I do it installs the Intel version. Tips? Direct download? Thank you.