While I recently posted my video on Curves for my 3, 2, 1, Photoshop series, (Thirteen Tips for Working with Curves in Photoshop), I wasn’t able to fit all of the shortcuts within the 2:20 time limit so I thought I would include them in this post (plus, I know that some of you prefer to simply read the shortcuts rather than watch a video).
Auto Options for Curves — When working with a Curves Adjustment layer, click the Auto button to have PS run an auto-correction on the image. Option -click (Mac) | Alt -click (Win) the Auto button (or choose Auto Options from the Properties panel’s fly-out) for additional auto correction options including:
• Enhance Monochromatic Contrast – this option sets contrast in the image by clipping the shadows and highlights in the image using the composite curve.
• Enhance Per Channel Contrast – this option sets contrast in the image using the individual channels.
• Find Dark & Light Colors – this option will analyze the image, find light and dark colors, and use them as the shadow and highlight colors in the image by modifying both the composite and individual channels.
• Enhance Brightness and Contrast – this option will analyze the image and perform a content aware enhancement using the composite curve.
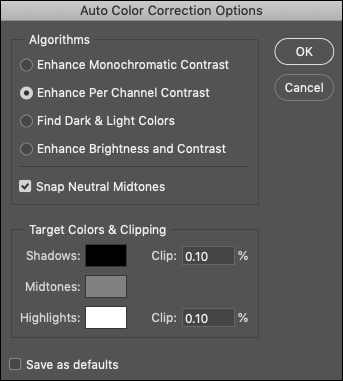
Note: For the first three options, use Snap Neutral Midtones to have Photoshop snap near-neutral midtone colors to a neutral value. Use the Target Colors and Clipping options to change color values in Shadows, Midtones, and Highlights as well as define the percentage of values to be clipped in the shadow and highlights.
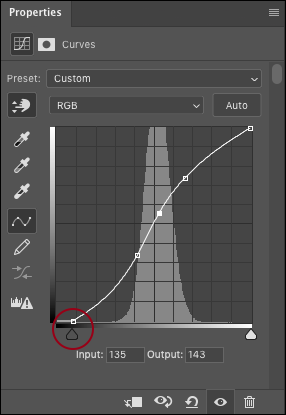
The Curve Modification Tool — By default, the Curve Modification Tool is selected, enabling us to quickly click and drag in the curve (in the Properties panel) to lighten or darken the image.
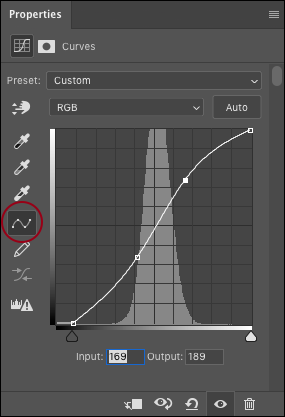
• Use the up/down or left/right arrows to move the selected point on the curve. Add the Shift key to move the point in larger increments.
• Shift + “+” (plus) and Shift + “-” (minus) selects the next/previous point on the curve.
• Shift -click multiple points on the curve to select and modify them simultaneously.
• Use Command + D (Mac) | Control + D (Win) to deselect all selected points.
Deleting Points — To delete a point on a curve do any of the following:
• Select the point and press Delete (Mac) | Backspace (Win).
• Command -click (Mac) | Control -click (Win) on a point.
• Drag the point off of the grid.
Working with Channels — To make changes to individual channels, select them from the list or use the follow shortcuts:
• When working in RGB:
Option + 2 (Mac) | Alt + 2 (Win) selects the Composite (RGB) Channel
Option + 3 (Mac) | Alt + 3 (Win) selects the Red Channel
Option + 4 (Mac) | Alt + 4 (Win) selects the Green Channel
Option + 5 (Mac) | Alt + 5 (Win) selects the Blue Channel

• When working in CMYK,:
Option + 2 (Mac) | Alt + 2 (Win) selects the Composite (CMYK) Channel
Option + 3 (Mac) | Alt + 3 (Win) selects the Cyan Channel
Option + 4 (Mac) | Alt + 4 (Win) selects the Magenta Channel
Option + 5 (Mac) | Alt + 5 (Win) selects the Yellow Channel
Option + 6 (Mac) | Alt + 6 (Win) selects the Black Channel
The Targeted Adjustment Tool — To make change to the image by dragging in the image area select the Targeted-Adjustment Tool.

• Click in the image area to add a point to the curve.
• Click and drag up/down to lighten/darken the value clicked upon.
• To set the Targeted Adjustment Tool as the default tool enable “Auto-Select Targeted Adjustment Tool” from Properties panel’s fly-out menu.
Using the Eyedroppers — Use the Eyedropper tools to set a black, neutral grey, or white point in the image.

• With any of the three Eyedropper tools selected, shift-click in the image area to set a Color Sampler.
• Option + Shift -click (Mac) | Alt + Shift -click (Win) on Color Sampler to delete it.
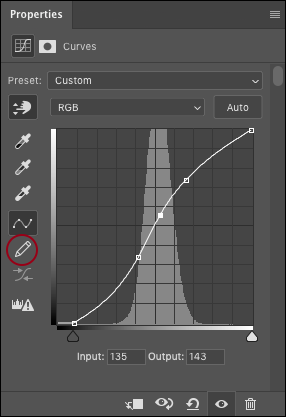
The Pencil Tool — Click the Pencil icon to freely draw in the curve.
Smoothing Curves — Click the icon with the two arrows to smooth the curve values.

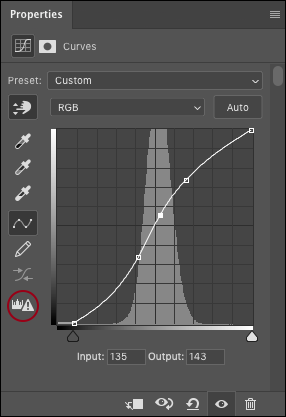
Histogram Warning — After modifying a curve, click the Histogram Warning icon to calculate a more accurate histogram preview of the image.
Grid Lines — Option-click (Mac) | Alt -click(Win) in the grid area on the Properties panel, to toggle more/fewer grid lines.
Preview — Press and hold the backslash key to toggle the preview.
Clipping Warnings — Option + drag (Mac) | Alt + drag (Win) the black/white point sliders (the black / white triangles below the curve) to show values in the image that are clipped to pure black and white on a per-channel basis.
• If you have the black or white point eyedropper selected and mouse over the image area, holding Option (Mac) | Alt (Win) will also preview any clipped values.
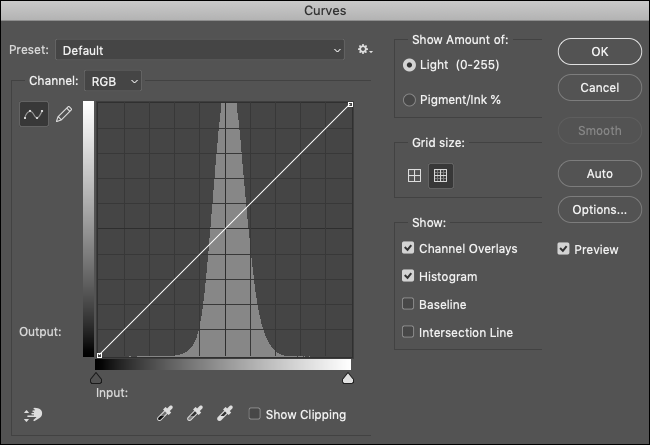
Curve Display Options — Choose Curve Display Options from the Properties panel fly-out menu to change options including:
• How values are displayed (on a scale from 0-255 (light) or 0-100% (Pigment/ink)).
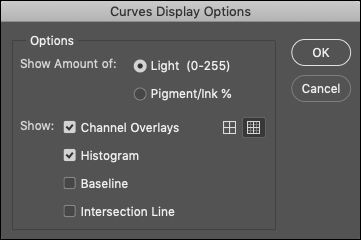
• Whether or not to display Channel Overlays, the Histogram, Baseline, Intersection Line and number of grid lines.
The Color Sampler Tool — When using the Targeted Adjustment and Eyedropper tools in the Curves Adjustments panel, the sample size is linked to the Color Sampler Tool. To quickly change the sample size while using the Curves Adjustments panel, Control -click (Mac) | right -click (Win)in the image area and select the preferred setting from the context sensitive menu. Note: this will change the options for the Color Sampler tool.
Image > Adjustments — There are times when you may want to use the Image > Adjustments > Curves command to make modifications instead of using an Adjustment layer. This is true, for example, when adjusting a mask. While most of the keyboard shortcuts are the same as when using a Curves Adjustment layer, these might also be helpful:
• Command + M (Mac) | Control + M (Win) displays the Curve dialog.
• Command + Option + M (Mac) | Control + Alt + M (Win) displays the Curves dialog with the last used settings.
• With the Curve Modification Tool selected and the Targeted Adjustment Tool deselected, click -dragging in the image will display a small dot on the curve corresponding to the value clicked upon. Command -click (Mac) | Control -click (Win) in the image to set a point on the curve.
Blend Modes — Changing the blend mode of a Curves (or Levels) adjustment layer on the Layers panel from Normal to Luminosity will restrict the adjustment to only change the luminosity (grayscale) value of the image, thereby eliminating an color shift that might otherwise take place.
Auto Tone Based on Selections — If you select an area in your image (a person’s face for example), and then add an adjustment layer (such as Curves), clicking the Auto button, will make the adjustment based on the selected area. Then, you can always disable or delete the mask to apply the effect over the entire image. This produces a different result (based on the area selected) than if the Curve adjustment layer was added to the image without a selection and the Auto button clicked.